Frequently Asked Questions (FAQ)
What are benefits of Access Keys?
Since the concept of Access Keys is unique to NEAR it is worth to first understand why and how they can be used.
Using An App Safely
Imagine that you want to play a web3 game consisting of a web-app and a smart contract. You can create a key that only
allows to call specific methods in the game's contract.
You can safely give the key to the game, so it can sign game-related transactions for you without needing to interrupt
the gameplay on each transaction.
Replacing Keys
If you think any of your keys could be compromised, you can simply remove them or swap them with a new one. Just as how
you would change your password on any website.
Implementing Key Recovery
You could implement a key-recovery contract in your account, and create a
"recovery key" for someone you trust. Such key could only be used to start the recovery.
When needed, that third-party component could trigger the recovery process, helping to create a new master for you.
Read more...
What are the Key Types?
NEAR implements two types of access keys: FullAccess keys and FunctionCall keys.
Read more...
What are the Full Access Keys?
As the name suggests, FullAccess keys have full control of an account, similar to having administrator privileges on your operating system.
Particularly, Full Access keys can be used to sign transactions doing any action in your account's behalf:
- Create immediate sub-accounts.
- Delete your account (but not sub-accounts, since they have their own keys).
- Add or remove Access Keys.
- Deploy a smart contract in the account.
- Call methods on any contract (yours or others).
- Transfer NEAR Ⓝ.
If you hand a
FullAccess to someone, they will have total control over the account.
You add the first Full Access Key of the account when the account is created.
Read more...
What is Function Call Key?
FunctionCall keys only have permission to call non-payable methods on contracts, i.e. methods that do not require you to attach NEAR Ⓝ.
FunctionCall keys are defined by three attributes:
receiver_id: The contract which the key allows to call. No other contract can be called using this key.method_names: The contract's methods the key allows to call (Optional). If omitted, all methods may be called.allowance: The amount of Ⓝ allowed to spend on gas (Optional). If omitted, the key will only be allowed to call view methods (read-only).
Function Call keys main purpose is to be handled to apps, so they can make contract calls in your name.
NEAR simplifies creating and giving FunctionCall keys to dApps by implementing a sign-in process. Briefly, dApps
can ask you to sign-in using the wallet, which automatically creates and gives a FunctionCall key to the dApp.
With the FunctionCall key, the dApp will then be able to call specific methods in your account's behalf, with a default allowance of 0.25Ⓝ for gas.
If the dApps requests to transfer any amount of tokens with the FunctionCall key, the user will be once more prompt by the wallet to authorize the transaction.
Read more...
What is locked account?
If you remove all keys from an account, then the account will become locked, meaning that no external actor can perform transactions in the
account's name.
In practice, this means that only the account's smart contract can transfer assets, create sub-accounts, or update its own code.
Locking an account is very useful when one wants to deploy a contract, and let the community be assured that only the contract is in control of the account.
Read more...
What is implicit account?
Implicit accounts are similar to the classic Bitcoin/Ethereum accounts. They are defined by a 64 character address, which corresponds
to a unique ED25519 key-pair.
For example:
- The public key in base58:
BGCCDDHfysuuVnaNVtEhhqeT4k9Muyem3Kpgq2U1m9HX
- Refers to the implicit account:
98793cd91a3f870fb126f66285808c7e094afcfc4eda8a970f6648cdf0dbd6de
Check our section on how to create implicit accounts
Read more...
What is named account?
In NEAR, users can register named accounts (e.g. bob.near) which are simpler to use and remember.
Moreover, named accounts can create sub-accounts of themselves, helping to better organize related-accounts.
In this way, named accounts work as domains, particularly:
- Only the
registrar account can create short top-level accounts (<32 char).
- Anyone can create long (>= 32 chars) top-level accounts.
- An account can only create immediate sub-accounts of itself.
In other words:
- Only
registrar can create short top-level accounts (e.g. near, aurora).
- Anyone can create long top-level accounts, e.g.
verylongaccountnamethatis32chars.
near can create bob.near, and bob.near can create app.bob.near.near cannot create app.bob.near, and test.near cannot create sub.example.near.
Currently, mainnet accounts are sub-accounts of .near (example.near), and testnet accounts are sub-accounts of testnet
(example.testnet).
info
Accounts have no control over sub-accounts, since they do NOT share access keys
Check our section on how to create named accounts
Read more...
What is The NEAR Wallet?
The NEAR wallet is our web-based user-friendly wallet. You can readily use it without installing software or add-ons.
Testnet
In testnet you can directly create named accounts. Simply go to the wallet,
pick a name, and you are ready to go. Remember to save somewhere safe the mnemonic phrase.
Mainnet
In the mainnet wallet you will be first given an implicit account, which you need to fund. After
that, you can use your implicit account to create a named one.
Read more...
What is the Local Implicit Account?
Create an implicit account locally takes two steps: first you create a key-pair locally, and then you derive its address.
1. Create a ED25519 key-pair locally using near cli
# 1. Generate key pair
near generate-key my-new-account
A new key-pair will be stored at ~/.near-credentials/testnet/my-new-account.json.
2. Convert the public_key to an account ID. {#converting-a-public-key-to-an-account-id}
Use near-cli once more to convert the public_key from the .json file to its related NEAR account address.
# Open the javascript console of near-cli
near repl
// Paste this code in the javascript console
const pk58 = 'ed25519:<data>'
nearAPI.utils.PublicKey.fromString(pk58).data.hexSlice()
The output string will be the account ID in hex (without '), for example 98793cd91a3f870fb126f66285808c7e094afcfc4eda8a970f6648cdf0dbd6de.
You can now share this id with someone and ask them to transfer tokens. At least 0.001Ⓝ is needed to start using the account.
You can also use other languages to infer the implicit address, for example, in python you can use the base58 package: base58.b58decode(<data>).hex()
Read more...
What is the Local Named Account?
In order to create a named account you have to ask the relevant smart contract to create a sub-account for you: near in mainnet, and testnet in testnet.
You can use near-cli for this:
near call testnet create_account '{"new_account_id": "<account-name>.testnet", "new_public_key": "ed25519:<data>"}' --deposit 0.00182 --accountId <account-with-funds>
Notice that you need an already funded account, since you are making a contract call.
The public key that you pass will become the Full Access key of the account.
info
For sub-accounts check the near-cli create-account docs.
Read more...
What is the Mainnet?
mainnet is for production ready smart contracts and live token transfers. Contracts ready for mainnet should have gone through rigorous testing and independent security reviews if necessary. mainnet is the only network where state is guaranteed to persist over time (subject to the typical security guarantees of the network's validation process).
Read more...
What is the Testnet?
testnet is a public network and the final testing network for nearcore changes before deployment to mainnet. testnet is intended for testing all aspects of the NEAR platform prior to mainnet deployment. From account creation, mock token transfers, development tooling, and smart contract development, the testnet environment closely resembles mainnet behavior. All nearcore changes are deployed as release candidates on first testnet, before the changes are released on mainnet. A number of testnet validators validate transactions and create new blocks. dApp developers deploy their applications on testnet before deploying on mainnet. It is important to note that testnet has its own transactions and states.
Read more...
What is the Betanet?
betanet is a public network, where nearcore is run to test its stability and backward compatibility. Validators on betanet are participants in the Betanet Analysis Group, where they engage in active discussions, submit bug reports, and participate in issue resolution. On betanet protocol changes, there are automated hard forks, where the state is compressed into a new genesis. As such, new genesis exists frequently on betanet, and there are no historical data snapshots. betanet usually has daily releases with protocol features that are not yet stabilized. State is maintained as much as possible but there is no guarantees with its high volatility.
Read more...
What is the Localnet?
localnet is intended for developers who want to work with the NEAR platform independent of the public blockchain. You will need to generate nodes yourself. localnet gives you the total control over accounts, economics, and other factors for more advanced use cases (including making changes to nearcore). For developers, localnet is the right choice if you prefer to avoid leaking information about your work during the development process.
More on local development here
near-cli network selection variable is local
Read more...
What are the Accounts?
NEAR uses human-readable account names such as alice.near or bob.near instead of a public hash such as0x71C7656EC7ab88b098defB751B7401B5f6d8976F.
These accounts also have the permission to create subaccounts such as nft.alice.near or example2.bob.near. It's important to know that only the root account can create the subaccount. So only alice.near can create nft.alice.near and only nft.alice.near can create example.nft.alice.near. Note that alice.near does not have permission to create example.nft.alice.near. Only the direct parent account has permission to create a subaccount.
For more information see the accounts section.
Read more...
What are the Keys?
On most blockchains, there is one public/private key pair per account. On NEAR, each account can have many key pairs associated with them which we call "Access Keys". There are two types of "Access Keys":
- Full Access (Grants full control to the account)
- Function Call (Allows for only non-monetary transaction signing)
Full access keys allow for full control of the account. You can send funds, create sub-accounts, delete the account, and more. Function call keys only allow for calling certain methods on a specific smart contract that do not allow the transferring of funds. These keys can be used by dApp developers to allow users to sign simple transactions that mutate state on the blockchain without having to constantly re-direct to the user's wallet to prompt for authorization. They can be widely or narrowly scoped depending on the use case.
For more information see the access keys section.
Read more...
What are the Contracts?
For each account, only one smart contract can be deployed and active at any given moment. All smart contracts on NEAR must be compiled to WebAssemly and currently, AssemblyScript and Rust are the supported languages used. Smart contracts that have been deployed can be updated at any time but not removed. This is where sub-accounts can come in handy. NEAR allows users to organize and create a hierarchy for their accounts.
As an example, benji could have the root account benji.near. He then stores all his NFT contracts as sub-accounts of nft.benji.near. For example, he worked on a cool lazy minting contract deployed to lazy.nft.benji.near. This not only allows for better organization but it allows developers to easily delete and re-create accounts in order to clear state.
For more information see a guide on deploying contracts.
Read more...
What is the Storage?
Any information that is stored on NEAR is accounted for using a mechanism called storage staking. In short, an account must maintain a certain balance that is locked in order to cover the cost of storage. If that storage is released, the funds become available once again. This is why named account IDs on NEAR cost an initial deposit to create. If you attempt to store state on-chain without having the necessary balance in your account to cover the cost, an error will be thrown which will tell you to add more NEAR to your account.
For more information on storage staking, see the storage staking section.
Read more...
Who are validators?
Validators are people distributed around the world, running the infrastructure that underlies the NEAR network. They serve two main jobs:
- Execute the transactions sent by the users, persisting their outcomes in the blockchain.
- Secure the network by overseeing the rest of the validators and the blocks they create.
Read more...
What is the Runtime Overview?
An in-depth code overview of NEAR Runtime.
<iframe
width="560"
height="315"
src="https://www.youtube-nocookie.com/embed/Xi_8PapFCjo"
frameborder="0"
allow="accelerometer; autoplay; clipboard-write; encrypted-media; gyroscope; picture-in-picture"
allowfullscreen>
</iframe>
Read more...
What are the Runtime Action and Data Receipts?
An in-depth code review of how NEAR Runtime implements cross contract calls.
<iframe
width="560"
height="315"
src="https://www.youtube-nocookie.com/embed/RBb3rJGtqOE"
frameborder="0"
allow="accelerometer; autoplay; clipboard-write; encrypted-media; gyroscope; picture-in-picture"
allowfullscreen>
</iframe>
Read more...
What is the Runtime State?
An in-depth overview of how NEAR runtime operates with its state.
<iframe
width="560"
height="315"
src="https://www.youtube-nocookie.com/embed/JCkSNL4ie1U"
frameborder="0"
allow="accelerometer; autoplay; clipboard-write; encrypted-media; gyroscope; picture-in-picture"
allowfullscreen>
</iframe>
Read more...
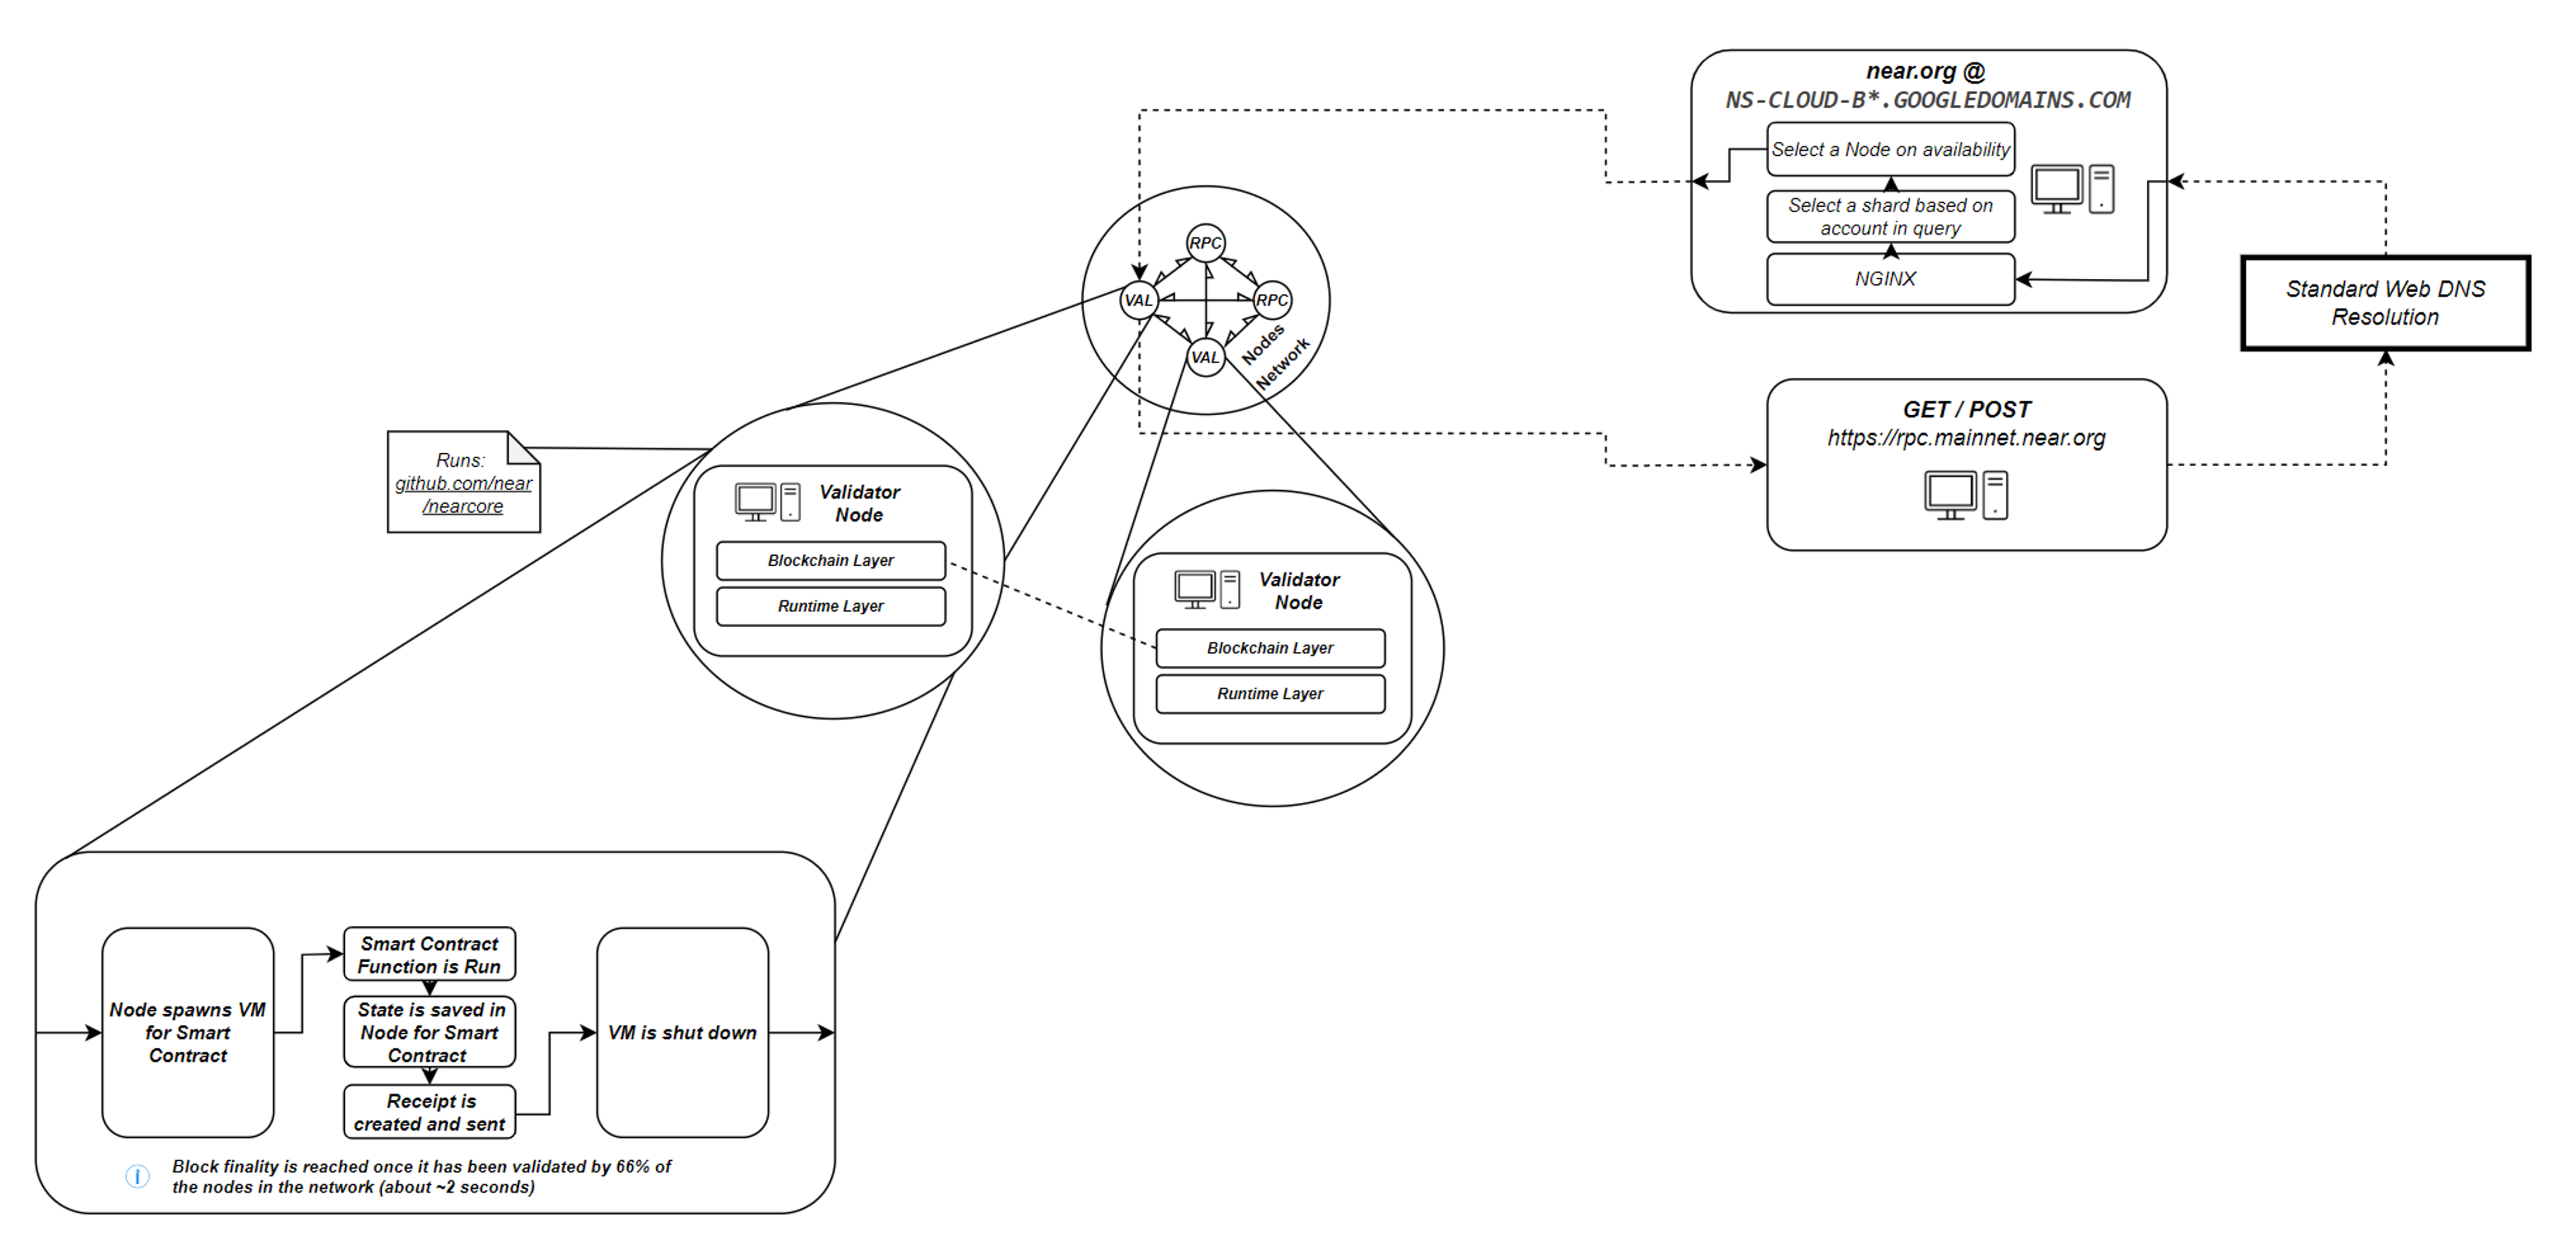
What is a Smart Contract?
Smart Contracts are pieces of logic that are asved on the network of computers that generate and validate the blockchain, and are triggered whenever an RPC API call is performed to the network, either to read or write data. You deploy your application's back-end logic to the blockchain, where it is called a "smart contract" or just "contract" for short.
Whenever a smart contract function is called through the RPC API, this call is routed to a an available node (or machine/computer) that initiates a virtual environment in which the smart contract logic is executed.
The relevant logic from the contract is then executed, reading/writing data and returning a result. If changes were made to the contract these are saved and the changes are propagated to the network. Finally, the virtual environment is torn down and the result is returned to the caller of the RPC API call.
Read more...
What is the API requests flow?
There are different types of Nodes on NEAR: RPC Nodes, Validators, and Archival Nodes.
When calling an endpoint on near.org, it resolves to a server that chooses an available RPC node to handle the request.
Then the RPC node passes the request to an available Validator node. Finally, the validator node spawns a VM environment to execute the contract.
Due to the decentralized nature of a blockchain network, there are many RPC nodes, and a request can reach any one of them, after which it can pass it to any one of the validators.
Read more...
What is the Improper key management?
Improper key management may lead to token loss. Mitigating such scenarios may be done by issuing backup keys
allowing for recovery of accounts whose keys have been lost or deleted.
Read more...
What is the Loss of FullAccess key?
A user may lose their private key of a FullAccess key pair for an account with no other keys.
No one will be able to recover the funds. Funds will remain locked in the account forever.
Read more...
What is the Loss of FunctionCall access key?
An account may have its one and only FunctionCall access key deleted.
No one will be able to recover the funds. Funds will remain locked in the account forever.
Read more...
How deleted accounts are getting refunding?
When a refund receipt is issued for an account, if that account no longer exists, the funds will be dispersed among
validators proportional to their stake in the current epoch.
Read more...
Is it possible to delete account with non-existent beneficiary?
When you delete an account, you must assign a beneficiary.
Once deleted, a transfer receipt is generated and sent to the beneficiary account.
If the beneficiary account does not exist, a refund receipt will be generated and sent back to the original account.
Since the original account has already been deleted, the funds will be dispersed among validators.
Read more...
What if account with zero balance is garbage-collected, just before it receives refund?
If an account A transfers all of its funds to another account B and account B does not exist,
a refund receipt will be generated for account A. During the period of this round trip,
account A is vulnerable to deletion by garbage collection activities on the network.
If account A is deleted before the refund receipt arrives, the funds will be dispersed among validators.
Read more...
What is the Securing the Network?
NEAR Protocol is a proof-of-stake (PoS) network, which means that resistance from various attacks comes from staking NEAR.
Staked NEAR represents the decentralized infrastructure of servers that maintain the network and process transactions for applications and users on NEAR.
Rewards for providing this service are received in NEAR.
Read more...
What is the Providing a Unit of Account?
NEAR is used to price computation and storage on the NEAR infrastructure.
The network charges transaction fees in NEAR to process changes and transactions.
Read more...
What is gas?
NEAR has a more-or-less one second block time, accomplished by limiting the amount of gas per block. You can query this value by using the protocol_config RPC endpoint and search for max_gas_burnt under limit_config. The gas units have been carefully calculated to work out to some easy-to-think-in numbers:
- 10¹² gas units, or 1 TGas ([Tera][metric prefixes]Gas)...
- ≈ 1 millisecond of "compute" time
- ...which, at a minimum gas price of 100 million yoctoNEAR, equals a 0.1 milliNEAR charge
This
1ms is a rough but useful approximation, and is the current goal of how gas units are set within NEAR. Gas units encapsulate not only compute/CPU time but also bandwidth/network time and storage/IO time. Via a governance mechanism, system parameters can be tweaked, shifting the mapping between TGas and milliseconds in the future, but the above is still a good starting point for thinking about what gas units mean and where they come from.
Read more...
What are The cost of common actions?
To give you a starting point for what to expect for costs on NEAR, the table below lists some common actions and how much TGas they currently require, and what the fee would be, in milliNEAR, at the minimum gas price of 100 million yN.
| Operation |
TGas |
fee (mN) |
fee (Ⓝ) |
| Create Account |
0.42 |
0.042 |
4.2⨉10⁻⁵ |
| Send Funds |
0.45 |
0.045 |
4.5⨉10⁻⁵ |
| Stake |
0.50 |
0.050 |
5.0⨉10⁻⁵ |
| Add Full Access Key |
0.42 |
0.042 |
4.2⨉10⁻⁵ |
| Delete Key |
0.41 |
0.041 |
4.1⨉10⁻⁵ |
| <blockquote class="info"> |
|
|
|
| <strong>Dig Deeper</strong><br /><br /> |
|
|
|
| Where do these numbers come from? |
|
|
|
| NEAR is configured with base costs. An example: |
|
|
|
transfer_cost: {
  send_sir:     115123062500,
  send_not_sir: 115123062500,
  execution:    115123062500
}
The "sir" here stands for "sender is receiver". Yes, these are all identical, but that could change in the future.
When you make a request to transfer funds, NEAR immediately deducts the appropriate send amount from your account. Then it creates a receipt, an internal book-keeping mechanism to facilitate NEAR's asynchronous, sharded design (if you're coming from Ethereum, forget what you know about Ethereum's receipts, as they're completely different). Creating a receipt has its own associated costs:
action_receipt_creation_config: {
send_sir: 108059500000,
send_not_sir: 108059500000,
execution: 108059500000
}
You can query this value by using the protocol_config RPC endpoint and search for action_receipt_creation_config.
The appropriate send amount for creating this receipt is also immediately deducted from your account.
The "transfer" action won't be finalized until the next block. At this point, the execution amount for each of these actions will be deducted from your account (something subtle: the gas units on this next block could be multiplied by a gas price that's up to 1% different, since gas price is recalculated on each block). Adding it all up to find the total transaction fee:
(transfer_cost.send_not_sir + action_receipt_creation_config.send_not_sir ) * gas_price_at_block_1 +
(transfer_cost.execution + action_receipt_creation_config.execution) * gas_price_at_block_2
</blockquote>
Read more...
What are the Costs of complex actions?
The numbers above should give you the sense that transactions on NEAR are cheap! But they don't give you much sense of how much it will cost to use a more complex app or operate a NEAR-based business. Let's cover some more complex gas calculations: deploying contracts and function calls.
Read more...
What are the Deploying Contracts?
The basic action costs include two different values for deploying contracts. Simplified, these are:
deploy_contract_cost: 184765750000,
deploy_contract_cost_per_byte: 64572944,
Again, these values can be queried by using the protocol_config RPC endpoint.
The first is a baseline cost, no matter the contract size. Keeping in mind that each need to be multiplied by two, for both send and execute costs, and will also require sending & executing a receipt (see blue box above), the gas units comes to:
2 * 184765750000 +
2 * contract_size_in_bytes * 64572944 +
2 * 108059500000
(Divide the resulting number by 10¹² to get to TGas!)
Note that this covers the cost of uploading and writing bytes to storage, but does not cover the cost of holding these bytes in storage. Long-term storage is compensated via [storage staking], a recoverable cost-per-byte amount that will also be deducted from your account during contract deployment.
The AssemblyScript contract in this example Fungible Token compiles to just over 16kb (the Rust contract is much larger, but this will be optimized). Using the calculation above, we find that it requires 2.65 TGas (and thus 0.265mN at minimum gas price) for the transaction fee to deploy the contract, while 1.5N will be locked up for storage staking.
Read more...
What are the Function calls?
Given the general-purpose nature of NEAR, function calls win the award for most complex gas calculations. A given function call will use a hard-to-predict amount of CPU, network, and IO, and the amount of each can even change based on the amount of data already stored in the contract!
With this level of complexity, it's no longer useful to walk through an example, enumerating each (see ext_costs under wasm_config using the protocol_config RPC endpoint) of the gas calculations as we go (you can research this yourself, if you want). Instead, let's approach this from two other angles: ballpark comparisons to Ethereum, and getting accurate estimates with automated tests.
<blockquote class="lesson">
How much of the gas fee goes as a 30% reward to the smart contract account?
The NEAR Whitepaper mentions that 30% of all gas fees go to smart contract accounts on which the fees are expensed.
This amount can be calculated for function calls in two ways:
- Summing all values in the gas profile
- Taking the total gas burnt for the transaction and subtract the static execution gas (which is equal to the amount of gas spent on sending the receipt(s)) from it. Both these numbers are available on the NEAR Explorer overview page for a transaction.
The second approach is shorter, and quite possibly easier to remember. So here's an example:
- An account calls the method
submit on aurora
- Converting the transaction to receipt burned a total of ~0.00024Ⓝ
- Executing the receipt burned a total of ~0.00376Ⓝ
The 30% reward for the smart contract owner (in this case aurora) would be: (0.00376Ⓝ - 0.00024Ⓝ) * 0.3 = 0.001056Ⓝ
This transaction can also be found here on NEAR Explorer, feel free to have a look around!
For calls involving multiple contracts, calculating the reward for each contract with this method would not be possible with the data shown on NEAR Explorer (June 2022) as the explorer does not show the conversion cost for the second (and other) receipt(s).
</blockquote>
Ballpark Comparisons to Ethereum {#ballpark-comparisons-to-ethereum}
Like NEAR, Ethereum uses gas units to model computational complexity of an operation. Unlike NEAR, rather than using a predictable gas price, Ethereum uses a dynamic, auction-based marketplace. This makes a comparison to Ethereum's gas prices a little tricky, but we'll do our best.
Etherscan gives a historic Ethereum gas price chart. These prices are given in "Gwei", or Gigawei, where a wei is the smallest possible amount of ETH, 10⁻¹⁸. From November 2017 through July 2020, average gas price was 21Gwei. Let's call this the "average" gas price. In July 2020, average gas price went up to 57Gwei. Let's use this as a "high" Ethereum gas fee.
Multiplying Ethereum's gas units by gas price usually results in an amount that's easy to show in milliETH (mE), the same way we've been converting NEAR's TGas to milliNEAR. Let's look at some common operations side-by-side, comparing ETH's gas units to NEAR's, as well as converting to both the above "average" & "high" gas prices.
| Operation |
ETH gas units |
avg mE |
high mE |
NEAR TGas |
mN |
| Transfer native token (ETH or NEAR) |
21k |
0.441 |
1.197 |
0.45 |
0.045 |
| Deploy & initialize a [fungible token] contract |
[1.1M] |
23.3 |
63.1 |
[9]<super>†</super> |
0.9 (plus 1.5Ⓝ in [storage staking]) |
| Transfer a fungible token |
[~45k] |
0.945 |
2.565 |
[14] |
1.4 |
| Setting an escrow for a fungible token |
[44k] |
0.926 |
2.51 |
[8] |
0.8 |
| Checking a balance for a fungible token |
0 |
0 |
0 |
0 |
0 |
| <super>†</super> Function calls require spinning up a VM and loading all compiled Wasm bytes into memory, hence the increased cost over base operations; this is being optimized. |
|
|
|
|
|
| While some of these operations on their surface appear to only be about a 10x improvement over Ethereum, something else to note is that the total supply of NEAR is more than 1 billion, while total supply of Ethereum is more like 100 million. So as fraction of total supply, NEAR's gas fees are approximately another 10x lower than Ethereum's. Additionally, if the price of NEAR goes up significantly, then the minimum gas fee set by the network can be lowered. |
|
|
|
|
|
| You can expect the network to sit at the minimum gas price most of the time; learn more in the Economics whitepaper. |
|
|
|
|
|
| [fungible token]: https://github.com/near-examples/FT/pull/42 |
|
|
|
|
|
| [1.1m]: https://github.com/chadoh/erc20-test |
|
|
|
|
|
| [9]: https://explorer.testnet.near.org/transactions/GsgH2KoxLZoL8eoutM2NkHe5tBPnRfyhcDMZaBEsC7Sm |
|
|
|
|
|
| [storage staking]: /concepts/storage/storage-staking |
|
|
|
|
|
| [~45k]: https://ethereum.stackexchange.com/questions/71235/gas-limit-for-erc-20-tokens |
|
|
|
|
|
| [14]: https://explorer.testnet.near.org/transactions/5joKRvsmpEXzhVShsPDdV8z5EG9bGMWeuM9e9apLJhLe |
|
|
|
|
|
| [8]: https://explorer.testnet.near.org/transactions/34pW67zsotFsD1DY8GktNhZT9yP5KHHeWAmhKaYvvma6 |
|
|
|
|
|
| [44k]: https://github.com/chadoh/erc20-test |
|
|
|
|
|
Accurate Estimates with Automated Tests {#accurate-estimates-with-automated-tests}
We will have a demonstration of how to do in-depth gas cost estimation soon; subscribe to this issue for updates. Until then, you may want to look at this example of how to do simulation testing, a powerful way to test your contracts and inspect every aspect of their execution.
If you're using NEAR's AssemblyScript SDK, you can use two methods, context.prepaidGas and context.usedGas. These can be used with or without tests to report what the virtual machine knows about attached gas and its consumption at the moment your contract method is being executed:
/**
* Get the number of gas units attached to the call
*/
get prepaidGas(): u64 {
 return env.prepaid_gas();
}
/**
* Get the number of gas units that was already burnt during the contract execution and
* attached to promises (cannot exceed prepaid gas).
*/
get usedGas(): u64 {
 return env.used_gas();
}
Read more...
How do I buy gas?
You don't directly buy gas; you attach tokens to transactions.
Calls to NEAR to read data are always free. But when you make a call to add or update data, you have to do so from an account that has some amount of NEAR tokens available in its balance, and these tokens will be attached to pay the gas fee.
If you're coming from Ethereum, you may be used to the idea of paying a higher gas price to get your transaction processed faster. In NEAR, gas costs are deterministic, and you can't pay extra.
For basic operations like "transfer funds," you can't specify an amount to attach. The gas needed is easy to calculate ahead of time, so it's automatically attached for you. (Check it: near-cli has a send command, which accepts no gas parameter; near-api-js has a sendTokens function which accepts no gas argument.) As shown in the tables above, these operations are cheap, so you probably won't even notice the slight reduction in your account's balance.
Function calls are more complex and you can attach an explicit amount of gas to these transactions, up to a maximum value of 3⨉10¹⁴ gas units. This maximum value of prepaid gas is subject to change but you can query this value by using the protocol_config RPC endpoint and search for max_total_prepaid_gas.
You can also override the default value of attached gas. Here is an example using near-cli:
near call myContract.testnet myFunction "{ "arg1": "val1" }" --gas=300000000000000
And in near-api-js, you can also specify an explicit amount of gas units to attach when calling a change method; see example here.
The telltale error that calls for this solution looks like this:
Error:
  Transaction A9BzFKmgNNUmEx9Ue9ARC2rbWeiMnq6LpcXh53xPhSN6 failed.
  Exceeded the prepaid gas
<blockquote class="warning">
<strong>How many tokens will these units cost?</strong><br /><br />
Note that you are greenlighting a maximum number of gas units, not a number of NEAR tokens or yoctoNEAR.
These units will be multiplied by the gas price at the block in which they're processed. If the function call makes cross-contract calls, then separate parts of the function will be processed in different blocks, and could use different gas prices. At a minimum, the function will take two blocks to complete, as explained in the blue box above.
Assuming the system rests at minimum gas price of 100 million yoctoNEAR during the total operation, a maximum attached gas of 3⨉10¹⁴ would seem to allow a maximum expenditure of 3⨉10²² yN. However, there's also a pessimistic multiplier of about 6.4 to prevent shard congestion.
Multiplying all three of these numbers, we find that maximum attached gas units allow about 0.2Ⓝ to be spent on the operation if gas prices stay at their minimum. If gas prices are above the minimum, this charge could be higher.
What if the gas price is at the minimum during the starting block, but the operation takes several blocks to complete, and subsequent blocks have higher gas prices? Could the charge be more than ~0.2Ⓝ? No. The pessimistic multiplier accounts for this possibility.
</blockquote>
Read more...
How extra attached gas is getting refunded?
How can you know the exact right amount to attach when you call a function? You can't!
Gas units are based on computational complexity for a given operation, which can be affected by a smart contract's state. This is hard to predict ahead of time. And gas price is adjusted each block based on how busy the network was during the previous block, which is also hard to predict ahead of time.
But good news!
- Gas doesn't cost much on NEAR
- If you attach more gas than needed, you'll get refunded
This is also true for basic operations. In the previous section we mentioned that these are automatically calculated and attached. In fact, given that the gas price could be adjusted slightly while these operations are being applied (see blue box above), a slight amount extra is attached, and any beyond what's necessary gets refunded.
Read more...
What is the Pessimistic gas price inflation?
A transactions may take several blocks before it completes. Due to dynamic gas price adjustments, later blocks may have a higher gas price than when the transaction was signed. To guarantee that the transaction can still finish, the amount of tokens reserved when starting a transaction is increased by the pessimistic-inflation rule.
The pessimistic inflation rule means that the gas has to be purchased at the highest theoretical gas price that the transaction could reach. The extra spending is only temporary, the difference between the pessimistic and actual price is refunded when the transaction finishes. This is the reason why in the explorer, virtually every transaction that spans more than one block contains a refund, even if all the gas has been spent.
By how much is the price inflated? It depends on how many blocks a transaction may take. A simple transaction that only sends tokens from one account to another can take between 2-3 blocks.
- One block to subtract the money from the signer's account
- One block to add it to the receivers account
- Potentially another block if the receiver is on another shard and the receipt application gets delayed.
Therefore, the pessimistically inflated price is increased by 3% or calculated as
gas_price ⨉ 1.03. Every additional cross-shard communication adds another factor of 1.03.
For a function call, the maximum block delay is computed as the total gas attached divided by the minimum amount required to call another function. Therefore, the more gas you attach to a transaction, the higher your gas price. But again, the increased price is temporarily and will be refunded unless the network actually becomes that congested. Prices would have to go up by the maximum every block and your receipts would need to be very unlucky to have extra delays every time.
Read more...
What about Prepaid Gas?
The NEAR Team understands that developers want to provide their users with the best possible onboarding experience. To realize this vision, developers can design their applications in a way that first-time users can draw funds for purchasing gas directly from an account maintained by the developer. Once onboarded, users can then transition to paying for their own platform use.
In this sense, prepaid gas can be realized using a funded account and related contract(s) for onboarding new users.
So how can a developer pay the gas fee for their users on NEAR?
- A user can use the funds directly from the developer's account suitable only for the gas fees on this dApp. Then the developer has to distinguish users based on the signers' keys instead of the account names.
- Using function calls, you can allow a new user without an account to use your dApp and your contract on-chain. The back-end creates a new access key for the user on the contract's account and points it towards the contract itself. Now the user can immediately use the web app without going through any wallet.
NEAR Protocol does not provide any limiting feature on the usage of developer funds. Developers can set allowances on access keys that correspond to specific users -- one
FunctionCall access key per new user with a specific allowance.
Read more...
What's the price of gas right now?
You can directly query the NEAR platform for the price of gas on a specific block using the RPC method gas_price. This price may change depending on network load. The price is denominated in yoctoNEAR (10^-24 NEAR)
- Take any recent block hash from the blockchain using NEAR Explorer
At time of writing,
SqNPYxdgspCT3dXK93uVvYZh18yPmekirUaXpoXshHv was the latest block hash
- Issue an RPC request for the price of gas on this block using the method
gas_price documented herehttp post https://rpc.testnet.near.org jsonrpc=2.0 method=gas_price params:='["SqNPYxdgspCT3dXK93uVvYZh18yPmekirUaXpoXshHv"]' id=dontcare
- Observe the results
{
  "id": "dontcare",
  "jsonrpc": "2.0",
  "result": {
    "gas_price": "5000"
  }
}
The price of 1 unit of gas at this block was 5000 yoctoNEAR (10^-24 NEAR).
Read more...
What is the Transaction?
A Transaction is a collection of Actions that describe what should be done at the destination (the receiver account).
Each Transaction is augmented with critical information about its:
- origin (cryptographically signed by
signer)
- destination or intention (sent or applied to
receiver)
- recency (
block_hash from recent block within acceptable limits - 1 epoch)
- uniqueness (
nonce must be unique for a given signer AccessKey)
Read more...
What is the Action?
An Action is a composable unit of operation that, together with zero or more other Actions, defines a sensible Transaction. There are currently 8 supported Action types:
FunctionCall to invoke a method on a contract (and optionally attach a budget for compute and storage)Transfer to move tokens from between accountsDeployContract to deploy a contractCreateAccount to make a new account (for a person, contract, refrigerator, etc.)DeleteAccount to delete an account (and transfer the balance to a beneficiary account)AddKey to add a key to an account (either FullAccess or FunctionCall access)DeleteKey to delete an existing key from an accountStake to express interest in becoming a validator at the next available opportunity
You can find more about the technical details of Actions in the NEAR nomicon.
Read more...
What is the Receipt?
A Receipt is the only actionable object in the system. Therefore, when we talk about "processing a transaction" on the NEAR platform, this eventually means "applying receipts" at some point.
A good mental model is to think of a Receipt as a paid message to be executed at the destination (receiver). And a Transaction is an externally issued request to create the Receipt (there is a 1-to-1 relationship).
There are several ways of creating Receipts:
- issuing a
Transaction
- returning a promise (related to cross-contract calls)
- issuing a refund
You can find more about the technical details of
Receipts in the NEAR nomicon.
Read more...
What is the Transaction Atomicity?
Since transactions are converted to receipts before they are applied, it suffices to talk about receipt atomicity.
Receipt execution is atomic, meaning that either all the actions are successfully executed or none are.
However, one caveat is that a function call transaction, unlike other transactions, can spawn an indefinite amount of receipts, and while each receipt is atomic, the success or failure of one receipt doesn't necessarily affect the status of other receipts spawned by the same transaction.
info
When designing a smart contract, you should always consider the asynchronous nature of NEAR Protocol.
Read more...
What are the Transaction Status?
You can query the status of a transaction through RPC API. An example of the query result looks like this:
{
  "status": { "SuccessValue": "" },
  "transaction": {
    "actions": [
      { "Transfer": { "deposit": "50000000000000000000000000" } }
    ],
    "hash": "EL9cEcoiF1ThH1HXrdE5LBuJKzSe6dRr7tia61fohPrP",
    "nonce": 51,
    "public_key": "ed25519:5zset1JX4qp4PcR3N9KDSY6ATdgkrbBW5wFBGWC4ZjnU",
    "receiver_id": "transfer-vote.near",
    "signature": "ed25519:37rcwcjDBWWAaaRYCazHY72sfDbmudYvtmEBHMFmhYEfWD3mbrgrtYs5nVh9gzRUESELRDET9g72LnAD2BWdSgKu",
    "signer_id": "near"
  },
  "transaction_outcome": {
    "block_hash": "dvwSabiWzRjfQamZCEMeguxxXL4885JGU87xfjoPWR2",
    "id": "EL9cEcoiF1ThH1HXrdE5LBuJKzSe6dRr7tia61fohPrP",
    "outcome": {
      "executor_id": "near",
      "gas_burnt": 223182562500,
      "logs": [],
      "metadata": { "gas_profile": null, "version": 1 },
      "receipt_ids": [
        "6LrHPazG3DTcKkd4TjqbgajqmbcAfyoTG383Cft5SZ5Y"
      ],
      "status": {
        "SuccessReceiptId": "6LrHPazG3DTcKkd4TjqbgajqmbcAfyoTG383Cft5SZ5Y"
      },
      "tokens_burnt": "22318256250000000000"
    },
    "proof": []
  },
  "receipts_outcome": [
    {
      "block_hash": "6evPKFQRw1E3gH9L1d59mz7GahsbnqsdYwcZQo8hpFQB",
      "id": "6LrHPazG3DTcKkd4TjqbgajqmbcAfyoTG383Cft5SZ5Y",
      "outcome": {
        "executor_id": "transfer-vote.near",
        "gas_burnt": 223182562500,
        "logs": [],
        "metadata": { "gas_profile": null, "version": 1 },
        "receipt_ids": [
          "7NMpF9ZGwSj48bpvJK2xVobJkTasEkakazTKi2zotHR4"
        ],
        "status": { "SuccessValue": "" },
        "tokens_burnt": "22318256250000000000"
      },
      "proof": []
    },
    {
      "block_hash": "Gm6TFS1ZxmA45itVj8a7vE8yJF8V5hXeNF1EhEVr7GVS",
      "id": "7NMpF9ZGwSj48bpvJK2xVobJkTasEkakazTKi2zotHR4",
      "outcome": {
        "executor_id": "near",
        "gas_burnt": 0,
        "logs": [],
        "metadata": { "gas_profile": null, "version": 1 },
        "receipt_ids": [],
        "status": { "SuccessValue": "" },
        "tokens_burnt": "0"
      },
      "proof": []
    }
  ]
}
The query result displays:
- the overall status of the transaction,
- the outcomes of the transaction,
- and the outcome of the receipts generated by this transaction.
The
status field appears at:
- the top-level, where it indicates whether all actions in the transaction have been successfully executed,
- under
transaction_outcome, where it indicates whether the transaction has been successfully converted to a receipt,
- under
receipts_outcome for each receipt, where it indicates whether the receipt has been successfully executed.
The status is an object with a single key, one of the following four:
status: { SuccessValue: 'val or empty'} - the receipt or transaction has been successfully executed. If it's the result of a function call receipt, the value is the return value of the function, otherwise the value is empty.status: { SuccessReceiptId: 'id_of_generated_receipt' } - either a transaction has been successfully converted to a receipt, or a receipt is successfully processed and generated another receipt. The value of this key is the id of the newly generated receipt.status: { Failure: {} }' - transaction or receipt has failed during execution. The value will include error reason.status: { Unknown: '' }' - the transaction or receipt hasn't been processed yet.
note
For receipts, SuccessValue and SuccessReceiptId come from the last action's execution. The results of other action executions in the same receipt are not returned. However, if any action fails, the receipt's execution stops, and the failure is returned, meaning that status would be Failure. And if the last action is not a function call and it's successfully executed, the result will be an empty SuccessValue
The top-level status indicates whether all actions in the transaction have been successfully executed. However, one caveat is that the successful execution of the function call does not necessarily mean that the receipts spawned from the function call are all successfully executed.
For example:
pub fn transfer(receiver_id: String) {
    Promise::new(receiver_id).transfer(10);
}
This function schedules a promise, but its return value is unrelated to that promise. So even if the promise fails, potentially because receiver_id does not exist, a transaction that calls this function will still have SuccessValue in the overall status. You can check the status of each of the receipts generated by going through receipt_outcomes in the same query result.
Read more...
What is the Validator's Economy?
In exchange for servicing the network, validators are rewarded with a target number of NEAR every epoch. The target value is computed in such a way that, on an annualized basis, it will be 4.5% of the total supply.
All transaction fees (minus the part which is allocated as the rebate for contracts) which are collected within each epoch are burned by the system. The inflationary reward is paid out to validators at the same rate regardless of the number of fees collected or burned.
Read more...
What are the Intro to Validators?
Validators are responsible for producing blocks and the security of the network.
Since Validators validate all shards, high requirements are set for running them (an 8-Core CPU with 16GB of RAM and 1 TB SSD of storage). The cost of running a block-producing validator node is estimated to be $330 per month for hosting. Please see our hardware and cost estimates page for more info.
The current active Validators are available on the Explorer. The minimum seat price to become a block-producing validator is based on the 100th proposal. (If more than 100 proposals are submitted, the threshold will simply be the stake of the 100th proposal, provided that it’s larger than the minimum threshold of 67,000 $NEAR.) The current seat price to become a block-producing validator is updated live on the Explorer. Any validator nodes with stakes higher than the seat price can join the active set of Validators.
<blockquote class="lesson">
<strong>Is there a plan to support GPU compute if certain validator nodes can offer that or is it just CPU?</strong><br /><br />
We don't need GPU support as we are a POS chain and we require very little compute power.
You can read more about our consensus strategy on our <a href="https://github.com/near/wiki/blob/master/Archive/validators/about.md">Validator Quickstart</a> and <a href="https://github.com/near/wiki/blob/master/Archive/validators/faq.md">Staking FA</a>.
</blockquote>
Read more...
What are the Chunk-Only Validators?
The Chunk-Only Producer is a more accessible role with lower hardware and token requirements. This new role will allow the network's validator number to grow, creating more opportunities to earn rewards and secure the NEAR Ecosystem.
Chunk-Only Producers are solely responsible for producing chunks (parts of the block from a shard, see Nightshade for more detail) in one shard (a partition on the network). Because Chunk-Only Producers only need to validate one shard, they can run the validator node on a 4-Core CPU, with 8GB of RAM, and 200 GB SSD of storage.
Like Validators, Chunk-Only Producers will receive, at minimum, 4.5% annual rewards. If less than 100% of the tokens on the network is staked, Chunk-Only Producers stand to earn even more annual rewards. For more details about the Validator’s economics, please check out NEAR’s Economics Explained.
Read more...
What is the Dedicated Validator Documentation Site?
If you'd like to further explore Validators and Nodes in general, you can visit the Dedicated Validator Documentation Site.
<blockquote class="lesson">
<strong>If a developer writes a vulnerable or malicious dApp, is a validator implicitly taking on risk?</strong><br /><br />
No. We have handled the potential damages to the network on the protocol level. For example, we have a lot of limiters that constrain how much data you can pass into a function call or how much compute you can do in one function call, etc.
That said, smart contract developers will need to be responsible for their own dApps, as there is no stage gate or approval process. All vulnerability can only damage the smart contract itself. Luckily, updating smart contracts is very smooth on NEAR, so vulnerabilities can be updated/patched to an account in ways that cannot be done on other blockchains.
</blockquote>
Read more...
What is the Arweave?
Arweave is a new type of storage that backs data with sustainable and perpetual endowments
(tokens held within the protocol that benefit from inflation and the decrease in the cost of storage over long periods of time). This allows users and developers to store data forever.
Arweave acts as a collectively owned hard drive, and allows their users to preserve valuable information, apps, and history indefinitely.
The Arweave protocol matches a torrent-like swarm of incentivised miners with massive collective hard drive space with those individuals and organizations that need to store data or host content permanently. This is achieved in a decentralized network, and all data stored is backed by block mining rewards and a sustainable endowment ensuring it is available in perpetuity.
info
To learn more about Arweave, check its mining mechanism and its bandwidth-sharing system.
Read more...
How does NEAR's design align incentives?
Storage-staked tokens are unavailable for other uses, such as validation staking. This increases the yield that validators will receive. Learn more in the economics whitepaper.
Read more...
When do tokens get staked?
On each incoming transaction that adds data.
Let's walk through an example:
- You launch a guest book app, deploying your app's smart contract to the account
example.near
- Visitors to your app can add messages to the guest book. This means your users will, by default, pay a small gas fee to send their message to your contract.
- When such a call comes in, NEAR will check that
example.near has a large enough balance that it can stake an amount to cover the new storage needs. If it does not, the transaction will fail.
Read more...
What is The "million cheap data additions" attack?
Note that this can create an attack surface. To continue the example above, if sending data to your guest book costs users close to nothing while costing the contract owner significantly more, then a malicious user can exploit the imbalance to make maintaining the contract prohibitively expensive.
Take care, then, when designing your smart contracts to ensure that such attacks cost potential attackers more than it would be worth.
Read more...
How to remove data to unstake some tokens?
People familiar with the "immutable data" narrative about blockchains find this surprising. While it's true that an indexing node will keep all data forever, validating nodes (that is, the nodes run by most validators in the network) do not. Smart contracts can provide ways to delete data, and this data will be purged from most nodes in the network within a few epochs.
Note that a call to your smart contract to remove data has an associated gas fee. Given NEAR's gas limit, this creates an upper limit on how much data can be deleted in a single transaction.
Read more...
What is the Example cost breakdown?
Let's walk through an example.
A non-fungible token is unique, which means each token has its own ID. The contract must store a mapping from token IDs to owners' account ID.
If such an NFT is used to track 1 million tokens, how much storage will be required for the token-ID-to-owner mapping? And how many tokens will need to be staked for that storage?
Using this basic AssemblyScript implementation as inspiration, let's calculate the storage needs when using a PersistentMap from near-sdk-as. While its specific implementation may change in the future, at the time of writing near-sdk-as stored data as UTF-8 strings. We'll assume this below.
Here's our PersistentMap:
type AccountId = string;
type TokenId = u64;
const tokenToOwner = new PersistentMap<TokenId, AccountId>("t2o");
Behind the scenes, all data stored on the NEAR blockchain is saved in a key-value database. That 't2o' variable that's passed to PersistentMap helps it keep track of all its values. If your account example.near owns token with ID 0, then at the time of writing, here's the data that would get saved to the key-value database:
- key:
t2o::0
- value:
example.near
So for 1 million tokens, here are all the things we need to add up and multiply by 1 million:
- The prefix,
t2o, will be serialized as three bytes in UTF-8, and the two colons will add another two. That's 5 bytes.
- For an implementation where
TokenId auto-increments, the values will be between 0 and 999999, which makes the average length 5 bytes.
- Let's assume well-formed NEAR
AccountIds, and let's guess that NEAR Account IDs follow the approximate pattern of domain names, which average about 10 characters, plus a top-level name like .near. So a reasonable average to expect might be about 15 characters; let's keep our estimate pessimistic and say 25. This will equal 25 bytes, since NEAR account IDs must use characters from the ASCII set.
So:
1_000_000 * (5 + 5 + 25)
35 million bytes. 350 times 100Kib, meaning Ⓝ350. To do the exact math: Multiplying by 1e19 yoctoNEAR per byte, we find that the tokenToOwner mapping with 35m bytes will require staking 3.5e26 yoctoNEAR, or Ⓝ350
Note that you can get this down to Ⓝ330 just by changing the prefix from t2o to a single character. Or get rid of it entirely! You can have a zero-length prefix on one PersistentVector in your smart contract. If you did that with this one, you could get it down to Ⓝ250.
Read more...
What is the Calculate costs for your own contract?
Doing manual byte math as shown above is difficult and error-prone. Good news: you don't have to!
You can test storage used right in your unit tests:
Read more...
What is the Other ways to keep costs down?
Storing data on-chain isn't cheap for the people running the network, and NEAR passes on this cost to developers. So, how do you, as a developer, keep your costs down? There are two popular approaches:
- Use a binary serialization format, rather than JSON
- Store data off-chain
Read more...
What is the Use a binary serialization format, rather than JSON?
The core NEAR team maintains a library called borsh,
which is used automatically when you use near-sdk-rs. Someday, it will probably also be used by near-sdk-as.
Imagine that you want to store an array like [0, 1, 2, 3]. You could serialize it as a string and store it as UTF-8 bytes. This is what near-sdk-as does today. Cutting out spaces, you end up using 9 bytes.
Using borsh, this same array gets saved as 8 bytes:
\u0004\u0000\u0000\u0000\u0000\u0001\u0002\u0003
At first glance, saving 1 byte might not seem significant. But let's look closer.
The first four bytes here, \u0004\u0000\u0000\u0000, tell the serializer that this is a u32 array of length 4 using little-endian encoding. The rest of the bytes are the literal numbers of the array – \u0000\u0001\u0002\u0003. As you serialize more elements, each will add one byte to the data structure. With JSON, each new element requires adding two bytes, to represent both another comma and the number.
In general, Borsh is faster, uses less storage, and costs less gas. Use it if you can.
Read more...
What is the Store data off-chain?
This is especially important if you are storing user-generated data!
Let's use this Guest Book as an example. As implemented today, visitors to the app can sign in with NEAR and leave a message. Their message is stored on-chain.
Imagine this app got very popular, and that visitors started leaving unexpectedly long messages. The contract owner might run out of funding for storage very quickly!
A better strategy could be to store data off-chain. If you want to keep the app decentralized, a popular off-chain data storage solution is IPFS. With this, you can represent any set of data with a predictable content address such as:
QmYwAPJzv5CZsnA625s3Xf2nemtYgPpHdWEz79ojWnPbdG
Such a content address could represent a JSON structure or an image or any other type of data. Where does this data get physically stored? You could use Filecoin or run your own IPFS server to pin your app's data.
With this approach, each record you add to your contract will be a predictable size.
Read more...
What is the Building blocks of Web decentralization?
As we already briefly discussed, the current Web is highly centralized, and mostly built using client-server architecture on centralized servers hosted on one of the clouds (AWS, Azure, GCP, etc). According to one report, 90% of mobile traffic goes to the clouds, which means a significant portion of the Internet is basically controlled by a handful of companies. This consolidation of power has a number of downsides and this article on "Why Decentralization Matters" does a good job explaining some of those problems.
The first decentralization revolution happened in file sharing, with the arrival of the (in)famous BitTorrent protocol. By being a p2p protocol, it’s truly decentralized, and allows data to be stored distributedly without any central authority (and sometimes without consent of a central authority, which caused a lot of drama, but that’s a story for another time). Ideas behind this protocol have been used in modern decentralized file storages like IPFS and FileCoin, we’ll come back to this later and explore it in more details.
The next revolution happened in the world of finance. For a long time transferring money required a central authority (banks), which would monitor, approve and execute these transfers. This has changed when the first cryptocurrency - Bitcoin - appeared. As already mentioned BitTorrent protocol, it also uses p2p communication, but instead of files it operates a transaction ledger, which is stored as a blockchain. Blockchain structure is needed to ensure that stored ledger cannot be altered, and at the same time to incentivize storage of this data. Unlike BitTorrent, Bitcoin network participants are rewarded for their services using a process called “mining”. This created a foundation for a new form of currency - digital currency (or cryptocurrency), with a unique property that it doesn’t need a central authority to function. Instead, users themselves maintain and operate it. And as with the previous decentralized system, BitTorrent, central authorities have issues with this.
Following the success of Bitcoin, other cryptocurrencies started to appear. The most important one is Ethereum, which took the concept of blockchain one step further and adapted it to store not just a transactions leger, but any kind of data, and, most importantly code (which is just another form of data). Basically, it turned out we can use it as a decentralized database transaction log. And if we have data and code living in the decentralized database, the only thing we lack to build a decentralized application is an ability to execute this code. So Ethereum did just that, and a Smart Contract was born. Now, let's dive deeper into the world of blockchains, smart contracts, and explore how we can build decentralized applications with them.
Read more...
What are the Blockchain basics?
Let's start with a brief overview of what blockchain and smart contracts are.
In classical Web 2.0 applications, you need 2 things to build an application backend: a database to store data and a server to execute your code. The same is true for the Web 3.0, but instead of a database we have a blockchain, and instead of a server we have smart contracts.
Blockchain itself is just a linked list (chain) of transactions. As a performance optimization, instead of linking individual transactions, they are grouped into blocks. Linking happens using hashes - each block contains the cryptographic hash of a previous block. Such a structure grants us an important property - we cannot modify an individual transaction inside a chain, since it would change its hash and invalidate all transactions after it. This makes it an ideal structure to store in a decentralized fashion, since everyone can quickly verify the integrity of a transaction on a chain (and of the entire chain).
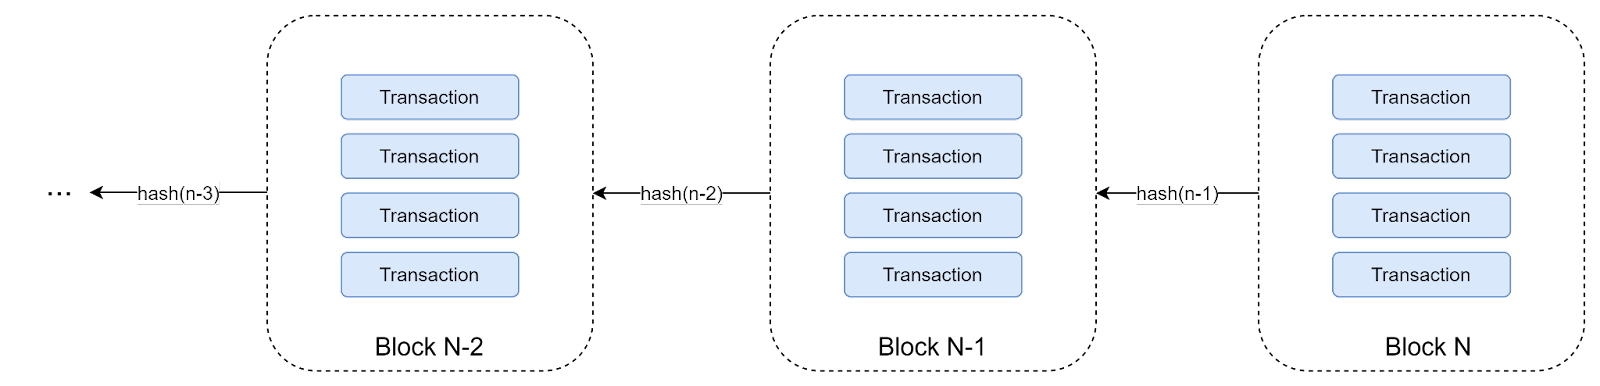 Since we can only add new transactions to the chain, it serves as a decentralized transaction log. And if we have a transaction log, we basically have our database. Another good mental model is to think about this as a decentralized event sourcing pattern, where each transaction represents a separate event.
Due to the distributed nature of a blockchain, that has no single server which would manage a blockchain, a consensus mechanism is used to add new blocks, synchronize data between machines, and incentivize network participation. Several consensus mechanisms exist, we’ll discuss them in more detail later.
It’s important to remember that every transaction on blockchain is publicly visible, so sensitive data should be encrypted beforehand.
But how do we put transactions into a blockchain? That’s the purpose of a Blockchain Node. Everyone can set up their own node, connect to the p2p blockchain network, and post new transactions. Also, this node provides access to the current blockchain data.
<div align="center">
<img src="/docs/assets/web3/web3--2.png" alt="image" width="440" />
</div>
Blockchain transactions themselves can be of a different type; exact supported types depend on a specific blockchain network. In the first Blockchain network, the Bitcoin, which stored only a financial ledger, transactions were quite simple - mostly just transfers of funds between accounts. This works very well for decentralized financing (Bitcoin is still the most popular cryptocurrency), but if we want to build general-purpose decentralized applications (or dApps for short), we need something better. That's where smart contracts come into the stage.
For Web 2.0 developers, a good way to think about a smart contract is as a serverless function which runs on blockchain nodes, instead of a traditional cloud. However, It has a few important properties:
Since we can only add new transactions to the chain, it serves as a decentralized transaction log. And if we have a transaction log, we basically have our database. Another good mental model is to think about this as a decentralized event sourcing pattern, where each transaction represents a separate event.
Due to the distributed nature of a blockchain, that has no single server which would manage a blockchain, a consensus mechanism is used to add new blocks, synchronize data between machines, and incentivize network participation. Several consensus mechanisms exist, we’ll discuss them in more detail later.
It’s important to remember that every transaction on blockchain is publicly visible, so sensitive data should be encrypted beforehand.
But how do we put transactions into a blockchain? That’s the purpose of a Blockchain Node. Everyone can set up their own node, connect to the p2p blockchain network, and post new transactions. Also, this node provides access to the current blockchain data.
<div align="center">
<img src="/docs/assets/web3/web3--2.png" alt="image" width="440" />
</div>
Blockchain transactions themselves can be of a different type; exact supported types depend on a specific blockchain network. In the first Blockchain network, the Bitcoin, which stored only a financial ledger, transactions were quite simple - mostly just transfers of funds between accounts. This works very well for decentralized financing (Bitcoin is still the most popular cryptocurrency), but if we want to build general-purpose decentralized applications (or dApps for short), we need something better. That's where smart contracts come into the stage.
For Web 2.0 developers, a good way to think about a smart contract is as a serverless function which runs on blockchain nodes, instead of a traditional cloud. However, It has a few important properties:
- It is a pure function, which accepts the current state (which is stored on the blockchain) and caller-supplied arguments, and returns a modified state: F(state, args) -> state. In practical terms, it means that we can’t do any external (off-blockchain) calls from it - no API or DB server calls are allowed. The reason behind this is decentralization - different nodes on the network should be able to execute it and get the same result.
- It’s fully open-source. Everyone is able to view your code and check what it’s doing.
- It cannot be changed. Once deployed, code remains on the chain forever and cannot be altered. Different upgrade mechanisms are possible, but are chain-specific.
Such properties allow us to make analogies with real-world legal contracts - they cannot be changed (usually), they're predictable and they're publicly accessible for participants. Smart contracts are basically such contracts, or agreements, but instead of a human performing actions, they are represented as code.
But how do we deploy and execute them, if everything we can do is to create a transaction? All we need are 2 specific types of transactions:
- Deploy smart contract code, so it will be persisted in the blockchain, together with other data.
- Call a smart contract with given arguments. As an outcome, a modified state will be returned.
When a call transaction arrives on a node, it will read the contract's code and state from the blockchain, execute it, and put a modified state back on a chain (as a transaction).
<div align="center">
<img src="/docs/assets/web3/web3-2.png" alt="image" width="440" />
</div>
So far we’ve explored how the backend layer of a dApp looks like, but what about the client side? Since we are using an API to communicate, we can use any kind of a client we use in the Web 2.0 - web, mobile, desktop, and even other servers. However, an important distinction lies with users.
In a traditional Web 2.0 application, each server owns the identities of its users, and fully in control over who can and can’t use its services. In blockchain, however, there are no such restrictions, and anyone can interact with it (there are private blockchains, but we’ll leave them out of scope).
But how do we perform authentication if there is no standard login/registration process? Instead, we use public key cryptography, where a public key serves as a username, and a private key is a loose equivalent of a password. The major distinction is that instead of a login procedure, in which the server verifies the credentials and grants some form of an access token, here the users sign transactions with a private key. This means there's no classical Web 2 identity (like username, email, or an ID) available. This should be considered if you are building applications that require KYC.
Another important implication of using private/public key pairs for auth, is that they cannot be easily memorized, like username/password pair. For this purpose, special applications called wallets are used. They store user’s key pairs and can sign transactions or provide them for other applications.
<div align="center">
<img src="/docs/assets/web3/web3-3.png" alt="image" width="440" />
</div>
The one aspect we haven’t considered yet is infrastructure cost. In WEB 2.0, users pay for the provided service (directly with money or indirectly with their data, or both), and service providers pay for the infrastructure.

In a Web 3.0 model, users pay directly to the infrastructure provider (nodes running in the blockchain), bypassing the service provider.

This has huge implications:
- Service providers can’t shut down services or restrict their usage, since they are deployed on blockchain and can’t be removed. This means the application will live forever (or at least while the blockchain network is alive).
- A new monetization model should be used for such services, since users don’t pay directly to service providers. For example, a fee can be coded into a smart contract for performing certain actions.
- Since users should pay for the infrastructure, there’s no free lunch (this is usually true for Web 2.0 as well, but it’s often not obvious for ordinary users). Service providers can cover some cost or provide a credit to simplify onboarding, but ultimately users would have to pay.
But how do users pay? Since it’s a blockchain, they can’t pay directly with a credit card - in this way it will be tied to a central authority and not really decentralized. A solution is to use a decentralized currency - cryptocurrency. Each blockchain has its own currency, which is used for payments inside of it.
Whenever a user wants to perform an action on a blockchain by calling a smart contract, it should always pay an infrastructure cost, and optionally a service cost to the service provider.

This infrastructure cost, often called “gas”, usually consists of 2 parts:
- Computational cost - to cover computational power needed to add a transaction into a blockchain.
- Storage cost - to cover additional storage requirements necessary for each transaction.
However, the question still remains how users can obtain cryptocurrency tokens in the first place. One option is to buy it from other users who already own it by using traditional money or another cryptocurrency. There are exchanges which provide such kind of functionality, e.g. Binance. But this will work only if there is already an existing supply of tokens already in circulation.
In order to create and grow this supply the blockchain consensus mechanism is used. Earlier, we mentioned that it is used to incentivize blockchain network participation, but how exactly does it happen? Each node that processes transactions receives a reward for its work:
reward = infrastructureCostReward + coinbaseReward
where:
infrastructureCostReward - share of infrastructure cost paid for the transactions by the userscoinbaseReward - new cryptocurrency token created specifically to reward processing nodes
This means each time a transaction is processed a small amount of cryptocurrency is created, so the amount of cryptocurrency in circulation grows over time (of course some amount of tokens should be created to bootstrap the network, e. g. by using ICO).
At a present day, two consensus mechanisms are commonly used:- Proof-of-work - original consensus mechanism, which is used by Bitcoin and Ethereum. It’s highly criticized for its inefficiency - processing of new transactions requires “mining”, which is a highly computationally intensive process. Because of this, graphic cards became an endangered species. Another disadvantage - cost of transactions is very high and processing speed is also quite slow.
- Proof-of-stake - newer consensus mechanism, which doesn’t require significant processing power (and graphic cards). Processing of transactions is usually called “validation”. Newer chains, like NEAR, use it. Ethereum is also currently in a process of switching to this model. Transactions are usually much cheaper and processing speed is faster.
At this point, we should have enough knowledge to proceed to the next chapter - choosing the best blockchain to build dApps.
Read more...
What are the Non-Fungible Tokens?
At the heart of the new Web 3 economy lies Non-Fungible token (NFT). In a nutshell, it’s a way to represent digital ownership in a decentralized way. From a technical perspective, it’s just a piece of data on a blockchain. The simplest case of such data is just a (token_id, accoount_id) tuple, where token_id uniquely identifies an asset, and account_id identifies an owner. A smart contract that owns this data defines a set of allowed operations - like creation of a new token (minting) or transfer of a token to another account. An exact set of allowed operations is defined in an NFT standard. Different blockchains have different standards, NEAR NFT Standard is available here.
Because NFTs are tied to a specific contract, they mostly make sense only in scope of this contract, and subsequently they are tied to a specific dApp. It’s possible to implement transfer of NFTs between contracts, but there’s no standard way to do this.
What digital asset is hiding behind a token_id is up to the smart contract to decide. There are few common ways how to handle this:
- Store an asset itself in a smart contract alongside the ownership information. This is the most straightforward way, but often is not feasible since storage cost is quite high and many types of digital assets, especially media, are quite big.
<div align="center">
<img src="/docs/assets/web3/web3-20.png" alt="image" width="400" />
</div>
- Store token data off-chain. Such an approach solves storage cost problems, but requires some level of trust to guarantee that data in the off-chain storage won’t be changed or removed.

- Store asset’s metadata and hash on chain, and an asset itself on some off-chain storage. Storing an asset’s hash on a chain guarantees data integrity and immutability. On-chain metadata usually includes basic token information, like title, description and media url. It’s required to quickly identify an asset without downloading it from the storage. This is the most popular approach to handle NFT’s since it combines the best of 2 previous approaches - token is immutable and storage cost is cheap (exact cost depends on the storage solution, but it usually several orders of magnitude cheaper than an on-chain storage)
 Choosing the right off-chain storage also can be a challenge, in general they can be divided into 2 buckets:
- Centralized storages - traditional Web 2 storage solutions, like relational databases or blob storages. While suitable for some applications, this means NFTs can be destroyed if a central server goes offline, so they aren’t the most popular in the Web 3 world.
- Decentralized storages. As we already mentioned, BitTorrent protocol is one of the first examples of such decentralized storage solutions, but in recent years more advanced solutions have appeared - like IPFS, FileCoin and Arweawe. Such solutions are a preferred method to store digital assets, since they are cheap and decentralized, so no-one can destroy or alter NFT assets.
In addition to the NFT standard, NEAR also provides its implementation, which can be used by Smart Contract developers to implement NFTs in their smart contract. Implementation itself doesn’t dictate assets storage model, so it’s up to a developer to decide how and where it will be stored.
Read more...
What are the Accounts & Transactions?
NEAR's account system is very powerful and differs substantially from other blockchains, like Bitcoin or Ethereum. Instead of identifying users by their public/private key pairs, it defines accounts as first-class entities. This has a few important implications:
- Instead of public keys, users can use readable account names.
- Multiple key pairs with different permissions can be used. This provides a better security model for users, since loss of one key pair doesn’t compromise an entire account and has a quite limited impact.
- Hierarchical accounts structure is supported. This is useful if we want to manage multiple smart contracts under one parent account.
- Accounts/public keys are created using transactions, since they are stored on the blockchain.
More information on NEAR accounts can be found in the docs.
But an account by itself won’t get us anywhere, its transactions that make things happen. In NEAR, we have only one transaction type, but the transaction itself may have different actions included. For most practical purposes, transactions will have a single action included, so for simplicity we’ll use “action” and “transaction” terms interchangeably further down the road. Each transaction always has sender and receiver accounts (and it is cryptographically signed by the sender’s key). The following transaction (action) types are supported:
- CreateAccount/DeleteAccount, AddKey/DeleteKey - accounts and key management transactions.
- Transfer - send NEAR tokens from one account to another. The basic command of any blockchain.
- Stake - needed to become a validator in a Proof-of-Stake blockchain network. We won’t touch this topic in this guideline, more information can be found here.
- DeployContract - deploy a smart contract to a given account. An important thing to remember - one account can hold only one contract, so the contract is uniquely identified by the account name. If we issue this transaction to an account which already has a deployed contract, a contract update will be triggered.
- FunctionCall - the most important action on the blockchain, it allows us to call a function of a smart contract.
Smart Contracts on NEAR are written in Rust, and compiled into WebAssembly (technically, AssemblyScript is also supported, but it’s not yet production ready). Each contract has one or more methods that can be called via a FunctionCall transaction. Methods may have arguments provided, so each smart contract call includes the following payload: account id, method name, and arguments.
There are 2 ways to call a method on a smart contract:
- Issue a FunctionCall transaction. This will create a new transaction on a blockchain which may modify a contract state.
- Make a smart contract view call. NEAR blockchain RPC nodes provide a special API that allow execution of methods that do not modify contract state (readonly methods).
The second method should always be used whenever possible since it doesn’t incur any transaction cost (of course, there is some cost of running a node, but it’s still much cheaper than a transaction; public nodes are available which can be used free of charge). Also, since there’s no transactions, we don’t need an account to make a view call, which is quite useful for building client-side applications
Read more...
What is the Gas and Storage?
As we already discussed, users should pay computational costs for each transaction. This cost is called “gas” and is measured in gas units (this is an established term in the blockchain world). Each time a transaction is posted, an amount of gas is attached to it to cover the cost. For simple transactions, gas can be calculated ahead of time to attach an exact amount. For FunctionCall transactions, however, exact cost is impossible to automatically calculate beforehand, so the usual approach is to attach a large enough amount of gas to cover the cost, and any excess will get automatically refunded.

But why do we need separate gas units, why not just pay directly with NEAR tokens? It’s necessary to accommodate for changing infrastructure costs - as the network evolves over time, cost of gas units may change, but the amount of gas required for a transaction will remain constant.
However, computational cost is not everything - most smart contracts also need storage. The storage cost in NEAR is quite different from gas.
First of all, it’s not cheap - while gas is very cheap and its cost will be almost unnoticeable by the users, storage is very expensive. As a consequence, the storage budget should be carefully calculated and only necessary data stored on the blockchain. Any auxiliary data (that is not necessary to the contract operations) should be stored off-chain (possible solutions will be covered in later chapters).
The second important difference - storage is not bought, but leased (in NEAR, it’s called staking). When a smart contract wants to store some data, storage cost is computed and the appropriate amount of NEAR tokens is “locked” on the account. When data is removed, tokens are unlocked. And unlike gas, these tokens are locked on the smart contract’s account, so the user doesn’t directly pay for it.
But what if we want users to pay for the storage (or just pay some fee for using a smart contract)? So far, the only way we’ve seen to transfer a token is a Transfer transaction. It turns out, a FunctionCall transaction also allows us to transfer tokens alongside the call (this is called a deposit). Smart Contracts can verify that an appropriate amount of tokens has been attached, and refuse to perform any actions if there’s not enough (and refund any excess of tokens attached).
In combination, gas fee and deposit attachments enable creation of contracts that need zero cost from developers to support and can live on blockchain forever. Even more, 30% of gas fees spent on the contract execution will go to a contract’s account iself (read more here), so just by being used it will bring some income. To be fair, due to the cheap gas cost this will make a significant impact only for most popular and often-called contracts, but it’s nice to have such an option nonetheless.
One last gotcha about storage - remember that smart contracts themselves are also just a code stored on a blockchain, so a DeployContract transaction will also incur storage fees. Since smart contracts code can be quite big, it’s important to optimize their size. A few tips on this:
- Don’t build Rust code on Windows, it produces quite big output. Use WSL or build on other OSes.
- Optimize smart contracts code for size - more info here.
More details on the storage model can be found in the docs.
Read more...
What is the Clients Integration?
So far, we’ve discussed how to call smart contracts in a client-agnostic way. However, in the real world, calls we’ll be performed from a client side - like web, mobile or a desktop application.
As we’ve learned from previous chapters, each transaction should be signed using a key. And since keys are managed by a wallet, each application should integrate with it. At the time of this writing, there’s only one officially supported NEAR Wallet. It is a web application, so integration happens using HTTP redirects. This is relatively straightforward to do in web applications (JavaScript SDK is available), but for mobile or desktop applications it may require deep linking or other more advanced approaches.
The general flow for transactions signing looks like this:
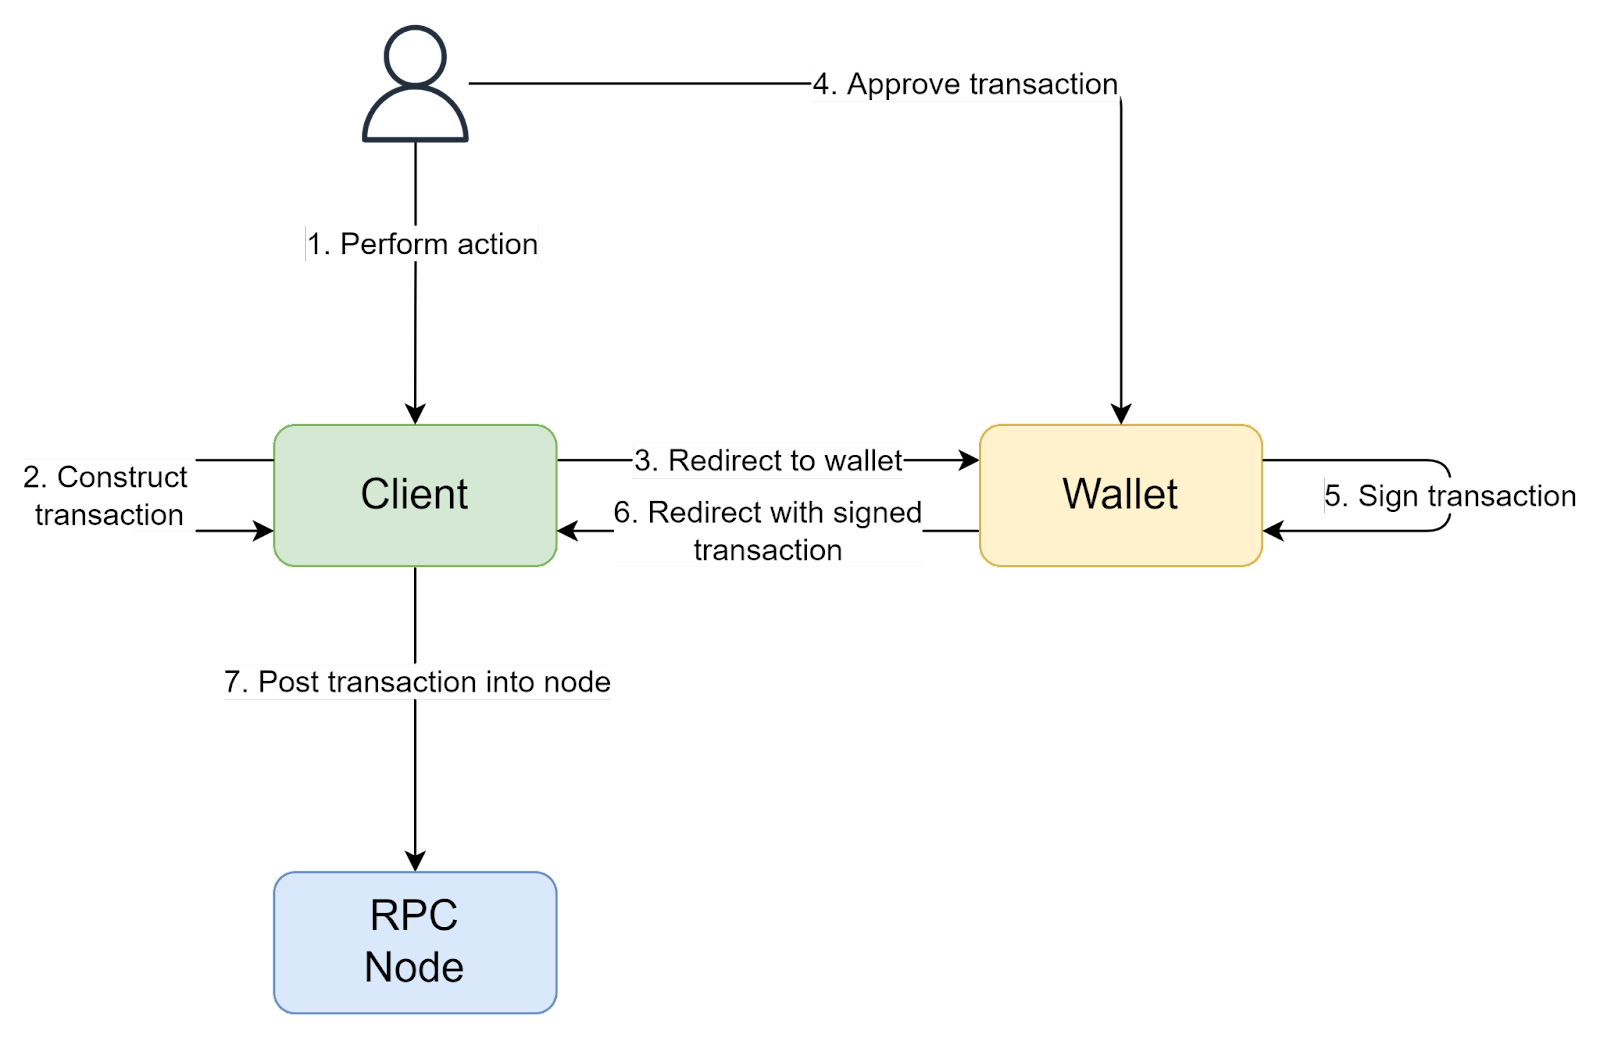
Each time we want to post a transaction, the client redirects the user to a wallet, where the transaction is approved and wallet returns a signed transaction back to the client (via redirect). This is a quite secure way of signing, since the private key is not exposed to the client, but constant redirects might quickly get annoying for users, especially if we just want to call smart contract functions that incur only small gas fees. That’s why NEAR introduced two types of access keys - full keys and functional call keys. Full access keys, as the name implies, can be used to sign any types of transactions. Functional call keys, on the other hand, aim to solve this UX problem. They are tied to a specific contract, and have a budget for gas fees. Such a key can’t be used to sign transactions that transfers NEAR tokens (payable transactions), and can only be used to cover gas fees, that’s why it’s not so security-critical and can be stored on the client. Because of this, we can create a simplified signing flow for non-payable transactions. First of all, a login flow to obtain a Functional Call key is used.
 The client generates a new key pair and asks a wallet to add it as a functional call key for a given contract. After this, a login session is established and considered alive until the client has the generated key pair.
To provide the best user experience usage of both keys is combined - type of signing is determined based on a transaction type (payable or non-payable). In case of a payable transaction, flow with wallet redirection is used, otherwise simplified local signing flow (using a stored function call key) is applied:
<div align="center">
<img src="/docs/assets/web3/web3-11.png" alt="image" width="300" />
</div>
It’s important to note that it’s possible to generate a Full Access key using the same key addition flow as for the Functional Call key, but this is very dangerous since compromise of such key will give full control over an account. Applications that want to work with Full Key directly should be designed with extreme care, especially in the matters of security.
The client generates a new key pair and asks a wallet to add it as a functional call key for a given contract. After this, a login session is established and considered alive until the client has the generated key pair.
To provide the best user experience usage of both keys is combined - type of signing is determined based on a transaction type (payable or non-payable). In case of a payable transaction, flow with wallet redirection is used, otherwise simplified local signing flow (using a stored function call key) is applied:
<div align="center">
<img src="/docs/assets/web3/web3-11.png" alt="image" width="300" />
</div>
It’s important to note that it’s possible to generate a Full Access key using the same key addition flow as for the Functional Call key, but this is very dangerous since compromise of such key will give full control over an account. Applications that want to work with Full Key directly should be designed with extreme care, especially in the matters of security.
Read more...
What are the Cross-contracts calls?
Throughout this section, we’ve discussed how to call a smart contract from a client. But a single smart contract can only take us so far. The true power is achieved when smart contracts are working in concert and communicating with each other. To achieve this, NEAR provides cross-contract calls functionality, which allows one contract to call methods from another contract. The general flow looks like this:

Looks simple enough, but there are few gotchas:
- In order to provide a call status (success or failure) and a return value to the calling contract, a callback method should be called, so there’s no single activation of ContractA. Instead, an entry method is called first by the user, and then a callback is invoked in response to cross-contract call completion.
- Transaction status is determined by the success or failure of a first method call. For example, if a ContractB.methodB or ContractA.methodACb call fails, the transaction will still be considered successful. This means that to ensure proper rollbacks in case of expected failures, custom rollback code must be written in the ContractA.methodACb, and the callback method itself must not fail at all. Otherwise, smart contract state might be left inconsistent.
- Cross-contract calls must have gas attached by the calling contract. Total available gas is attached to a transaction by a calling user, and distributed inside the call chain by contracts. For example, if 15TGas are attached by the user, ContractA may reserve 5TGas for itself and pass the rest to ContractB. All unspent gas will be refunded back to the user.

- NEAR tokens can also be attached to cross contract calls, but they work differently from the gas. Attached deposit is taken directly from the predecessor account. It means even if a user hasn’t attached any deposit, a contract still can attach tokens, which will be taken from its account. Also, since cross-contract call failure doesn’t mean transaction failure, there are no automatic refunds. All refunds should be done explicitly in the rollback code.

A few notes on failure modes - since smart contracts run on a decentralized environment, which means they are executed on multiple machines and there is no single point of failure, they won’t fail because of environmental issues (e.g. because a machine suddenly lost power or network connectivity). The only possible failures come from the code itself, so they can be predicted and proper failover code added.
In general, cross-contract call graphs can be quite complex (one contract may call multiple contracts and even perform some conditional calls selection). The only limiting factor is the amount of gas attached, and there is a hard cap defined by the network of how many gas transactions may have (this is necessary to prevent any kind of DoS attacks on the Network and keep contracts complexity within reasonable bounds).
Read more...
What are the Data Structures, Indexers and Events?
We’ve already discussed the storage model on NEAR, but only in abstract terms, without bringing the exact structure, so it’s time to dive a bit deeper.
Natively, NEAR smart contracts store data as key-value pairs. This is quite limiting, since even simplest applications usually need more advanced data structures. To help in development, NEAR provides SDK for smart contracts, which includes data structures like vectors, sets and maps. While they are very useful, it’s important to remember a few things about them:
- Ultimately, they are stored as binary values, which means it takes some gas to serialize and deserialize them. Also, different operations cost different amounts of gas (complexity table). Because of this, careful choice of data structures is very important. Moving to a different data structure later will not be easy and would probably require data migration.
- While very useful, vectors, maps and sets won’t match the flexibility and power of classical relational databases. Even implementations of simple filtering and searching might be quite complex and require a lot of gas to execute, especially if multiple entities with relations between them are involved.
- They are limited to a single contract. If data from multiple contracts is required, aggregation should be performed using cross-contract calls or on a client side, which is quite expensive in terms of gas and time.
To support more complex data retrieval scenarios, smart contract data should be put in a more appropriate store, like a relational database. Indexers are used to achieve this. In a nutshell, indexer is just a special kind of blockchain node that processes incoming transactions and puts relevant data into a database. Collected data can be exposed to a client using a simple API server (e.g. REST or GraphQL).
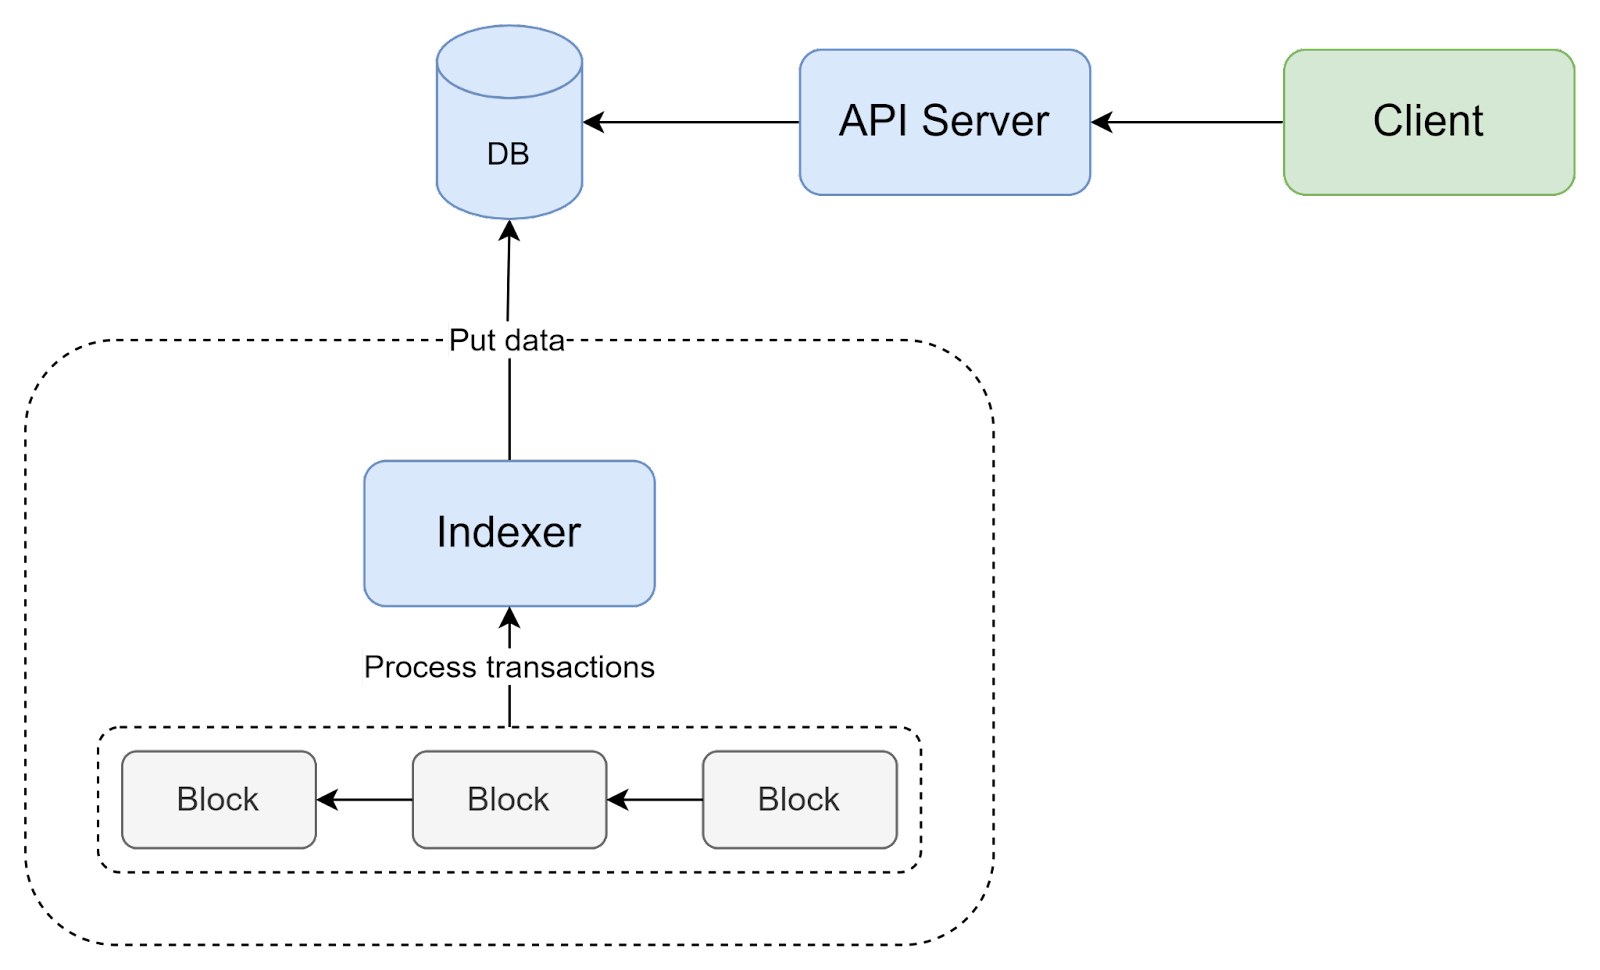
In order to simplify creation of indexers, NEAR Indexer Framework has been created. However, even with a framework available, extracting data from a transaction may not be an easy task, since each smart contract has its unique structure and data storage model. To simplify this process, smart contracts can write structured information about outcome into the logs (e.g. in the JSON format). Each smart contract can use its own format for such logs, but the general format has been standardized as Events.
Such architecture is very similar to Event Sourcing, where blockchain stores events (transactions), and they are materialized to a relational database using an indexer. This means the same drawbacks also apply. For instance, a client should be designed to accommodate indexing delay, which may take a few seconds.
As an alternative to building your own indexer with a database and an API server, The Graph can be used instead, which currently has NEAR support in beta. It works using the Indexer-as-a-Service model, and even has decentralized indexing implementation.
Read more...
What are the Development tools?
By now, we should be familiar with necessary concepts to start developing WEB 3.0 applications, so let’s explore the development tools available.
First of all, we need a development and testing environment. Of course, we could theoraticaly perform development and testing on the main blockchain network, but this would not be cheap. For this reason, NEAR provides several networks that can be used during development:
- testnet - public NEAR network which is identical to mainnet and can be used for free.
- localnet - you can deploy your personal NEAR network on your own environment. Because it’s owned by you, data and code can be kept private during development. More info on how you can run your own node can be found here. Alternatively, you can bootstrap an entire testing infrastructure in Docker on your local machine using Kurtosis - guide is here.
- workspaces - you can start your own local network to perform e2e testing. More info here.
Once we’ve chosen a network to use, we need a way to interact with it. Of course, transactions can be constructed manually and posted into node’s API. But this is tedious and isn’t fun at all. That’s why, NEAR provides a CLI which automates all of the necessary actions. It can be used locally for development purposes or on build machines for CI/CD scenarios.
In order to manage accounts on the NEAR network, Wallet can be used. It can show an effective account balance and active keys.
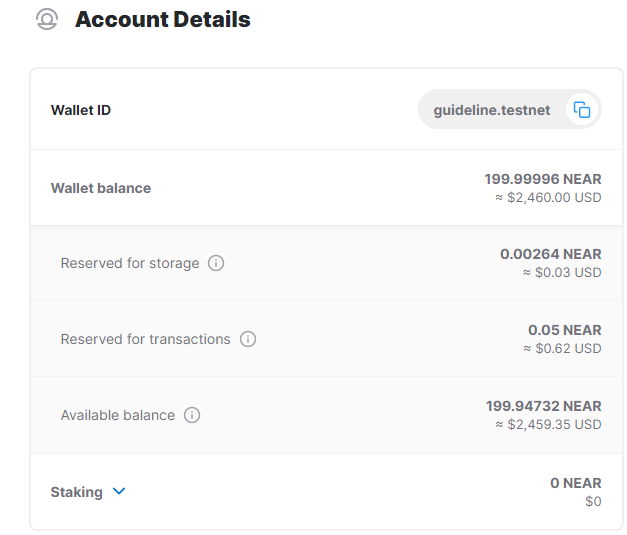 On the image above, “Reserved for storage” are tokens locked by a smart contract to cover current storage requirements, and “Reserved for transactions” represents the amount of tokens locked to cover gas cost by Functional Call keys.
Currently, there’s no UI to connect sub-accounts into a wallet. Instead, they should be imported via a specially constructed direct link:
On the image above, “Reserved for storage” are tokens locked by a smart contract to cover current storage requirements, and “Reserved for transactions” represents the amount of tokens locked to cover gas cost by Functional Call keys.
Currently, there’s no UI to connect sub-accounts into a wallet. Instead, they should be imported via a specially constructed direct link:
https://wallet.testnet.near.org/auto-import-secret-key#YOUR_ACCOUNT_ID/YOUR_PRIVATE_KEY
(you should provide a private key of a full access key for the account in question, so make sure this link is used securely).
Last, but not least, blockchain transactions can be viewed using NEAR Explorer. It provides insights into transaction execution and outcome. Let’s look at one example.
First of all, we can see general transaction information - sender, receiver, status. After this, we can see gas usage information:
- Attached gas - total gas provided for the transaction.
- Gas used - actual gas spend.
- Transaction fee - gas used multiplied to current gas price, shows an actual cost of a transaction in NEAR tokens.
Also, Deposit Value shows the amount of NEAR tokens transferred from sender to receiver.
 Below this, we can inspect transaction actions (recall, that transactions may have multiple actions). In this case, we have a single FunctionCall action with arguments:
 At the end, transaction execution details, including token transfers, logs, cross-contract calls and gas refunds are provided. One thing that we haven’t covered yet is shown here - receipts. For most practical purposes they are just a transaction implementation detail. They are quite useful in a transaction explorer to understand how a transaction was executed, but aren’t really relevant outside of it.

Read more...
What are the Contract upgrades?
During the development, and sometimes even in production, updates to a contract’s code (or even data) are needed. That’s why different contract upgrades mechanisms have been created.
During the local development, we can just recreate a smart contract’s account each time we deploy a contract (dev-deploy command in NEAR CLI exists for this). With such an approach, contract data will be purged each time a contract is redeployed. More info here.
However, once we move to a more stable environment, like testing or production, more sophisticated methods are needed. Redeployment of code is quite simple - we just issue another DeployContract transaction, and NEAR will handle the rest. The biggest challenge is to migrate contract state - several approaches are possible, but all of them involve some kind of migration code.
But we can take our upgrade strategy one step further. In described strategies, developers are fully in control of code upgrades. This is fine for many applications, but it requires some level of trust between users and developers, since malicious changes could be made at any moment and without user’s consent (as it sometimes happens in npm world). To solve this, a contract update process itself can also be decentralized - this is called DAO-Governed Updates. Exact strategy may vary, but the basic idea is that contract update code is implemented in a smart contract itself, and a Full Access key to the contract account is removed from a blockchain (via DeleteKey transaction). In this way, an update strategy is transparent to everyone and cannot be changed by developers at will.
Read more...
What is the Blockchain-Enabled Application Architecture?
First of all, let’s outline a typical architecture of a Web 2 application. In most cases, a classic client-server model is used:
<div align="center">
<img src="/docs/assets/web3/nfts-1.png" alt="image" width="150" />
</div>
In such architecture, we usually have 3 layers:
- Database - stores application’s data. This can be a single database, or several databases of different types, but this is mostly an implementation detail - for our purposes we can view it as a single logical database.
- Server - a centralized web-server. It may be implemented using different architecture patterns (monolithic, microservices, serverless) and technologies, but again, we can consider it as a single logical server.
- Client - client side application user directly interacts with. Different client types are possible: web, mobile or desktop. There is a difference between these clients in regards to blockchain integration, which we’ll discuss later.
Now, let’s compare it to a dApp architecture:
<div align="center">
<img src="/docs/assets/web3/nfts-2.png" alt="image" width="400" />
</div>
We can notice that there is a common component in these architectures - the client application. This means we can use it as a junction point to connect them together.
<div align="center">
<img src="/docs/assets/web3/nfts-3.png" alt="image" width="400" />
</div>
A keen reader may notice an additional connection between the Server and RPC Node. This is required because in a client-server architecture clients cannot be trusted. That’s why every action performed from the client should be validated by a backend server. But in our case everything is complicated by the fact that we essentially have two backends: Web 2 server and a smart contract, so two possible validation flows are possible:
- Client performs an action on a server, which involves blockchain data. In this case the server should talk to the blockchain and verify that valid data is provided.
- Client performs an action on a smart contract, which involves server-owned data. Since the smart contract can’t talk to the server directly to verify it, we should use a different way to verify the authenticity of the data. In blockchain terminology, such a server is called an Oracle.
We’ll explore how to implement both of these approaches later.
By now, we've reached the point where the type of our client begins to matter. Specifically, problems arise from the dApps payment model - user’s pay for the blockchain infrastructure using gas, so money goes directly to infrastructure providers. Also, users make payments directly on the blockchain, without using any intermediaries, like banks or payment services. This approach is at odds with mobile app stores (Google Play Store and Apple App Store) - they don’t allow any payments on their respective mobile platforms without their cut. Although some shifts in policy are starting to happen (e.g. Apple vs Epic Games duel), at the time of this writing getting blockchain-enabled applications into the stores will probably get vetoed by reviewers. There are some ways to bypass these limitations, e.g. by not using Play Store on Android, but all of these ways are either sub-par in terms of usability or involve some risk of getting banned by stores. That’s why for mobile applications an alternative approach is needed.
Sometimes, to move forward we need to take a step back. In our case, to solve a problem with mobile clients we can return to our initial concept of having two clients - one for blockchain integration, and another one for Web 2 server. Blockchain client can be a usual web application, which isn’t subject to any constraints from stores. It can also serve as a connection point between blockchain and our existing application.
 In this architecture the mobile client is still allowed to talk to the blockchain, but only in a read-only way, which doesn’t require wallet connection or any payments. All actions on the blockchain happen on the Web Client instead.
Further in this guide we’ll use such dual-client architecture, since simpler architecture with a single client can be directly derived from it by merging two clients together.
At this point, our architecture covers almost everything we need to start building our application. However, since we want to build a user-owned economy, we need a marketplace where it’ll happen. An obvious choice is to put this marketplace into the web client, but there’s one gotcha. If we recall the smart contract’s storage model, it’s not suitable to serve complex data queries, so an indexer should be used to aggregate data from blockchain into a proper database.
In this architecture the mobile client is still allowed to talk to the blockchain, but only in a read-only way, which doesn’t require wallet connection or any payments. All actions on the blockchain happen on the Web Client instead.
Further in this guide we’ll use such dual-client architecture, since simpler architecture with a single client can be directly derived from it by merging two clients together.
At this point, our architecture covers almost everything we need to start building our application. However, since we want to build a user-owned economy, we need a marketplace where it’ll happen. An obvious choice is to put this marketplace into the web client, but there’s one gotcha. If we recall the smart contract’s storage model, it’s not suitable to serve complex data queries, so an indexer should be used to aggregate data from blockchain into a proper database.
 By now, every building-block is in place and we can start exploring how to implement this architecture in practice.
Read more...
What are the NFTs in Web 2 Applications?
In order to implement a fully functional application using a hybrid Web 2 - Web 3 architecture, a lot of technological challenges have to be addressed, like authentication and authorization, seamless NFTs usage in client and server, and proper NFT storage model. In the following sections we’ll take a closer look at this and describe common patterns and approaches.
Read more...
What is the Authentication and Authorization?
Since our digital assets are represented as NFTs on blockchain, in order to use them in our Web 2 application, a server needs a way to authorize their usage. The basic idea is pretty simple - it can just read data from blockchain by calling a smart contract method and check an owner’s account id. For such flow, we have 3 actors:
- Client that wants to use some digital asset (NFT).
- Smart Contract for NFTs. Should be implemented according to NEAR NFT standards.
- Server that verifies ownership of NFT and uses it in its internal logic.
A general flow looks like this:
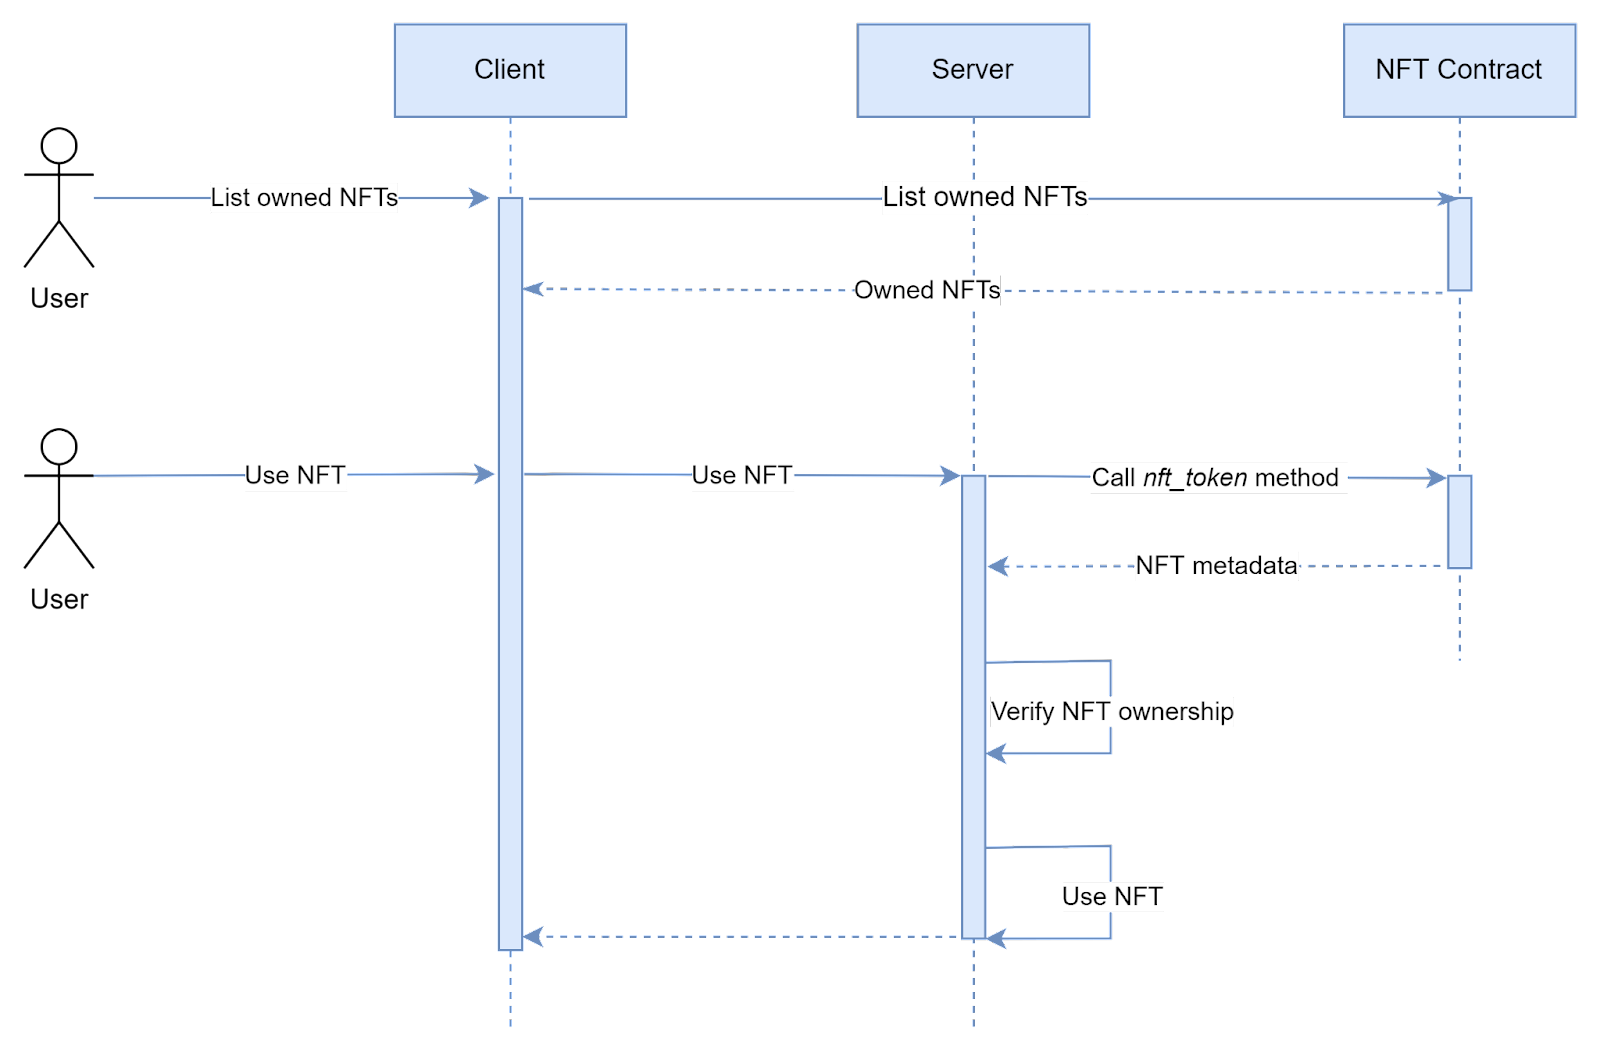 However, such an authorization process cannot be performed without authentication, so the server also needs a way to authenticate a user.
Recall that the user's identity on a blockchain is represented by a key pair. However, since in NEAR a user may have multiple key pairs and an account is a separate entity, the authentication procedure is a bit more complicated.
To authenticate our requests, we can use public-key cryptography - a client can sign a request using a user’s private key, and then a server can verify the signature and key ownership. A typical request with authentication may look like this:
However, such an authorization process cannot be performed without authentication, so the server also needs a way to authenticate a user.
Recall that the user's identity on a blockchain is represented by a key pair. However, since in NEAR a user may have multiple key pairs and an account is a separate entity, the authentication procedure is a bit more complicated.
To authenticate our requests, we can use public-key cryptography - a client can sign a request using a user’s private key, and then a server can verify the signature and key ownership. A typical request with authentication may look like this:
{
	"payload": { /* request-specific payload */ },
	"accountId": "account.near",
	"publicKey": "...",
	"timestamp": 1647091283342,
	"signature": "..."
}
where:
accountId – user’s account id on NEAR.publicKey - public key of the key pair used for signature, must be either Functional or Full access key for the provided account.timestamp - current datetime, must be verified on server. It’s needed to prevent replay attacks. Alternative to timestamps is usage of nonce, but it’s more complicated.signature - signature of the request payload and other fields. Usually, a payload is hashed beforehand.
Depending on the implementation, request body, headers, or other side channels can be used to transfer authentication data - exact implementation depends on used technologies and protocols.
Server can use this data to authenticate a request using the following approach:
 3 authentication steps are performed on the server:
- Signature verification - if the signature is correct, we are sure that the client really has the private key for the provided public key. Also, this proves that request data hasn't been modified in transit.
- Timestamp verification - prevents replay attacks. Server can verify that the request’s timestamp is not too old (e.g. has been created no more than 10 seconds ago).
- Public key ownership verification - by calling view_access_key method, we can make sure that the provided public key is really associated with the provided account.
Such authentication approach is the simplest one, but has a few major drawbacks:
- Performing a REST API call to RPC Node is quite expensive to do each time from the performance perspective.
- We can’t sign requests from the mobile client, since it usually should be disconnected from the blockchain due to store policies, and hence doesn’t have a key pair.
- A NEAR account is required in order to start using the application, which complicates the onboarding process.
To solve the first problem, we can simply issue a JWT token or authenticate connection in some other way after a successful NEAR account authentication, so the it will serve as “login” of sorts:
 While this may be enough for some applications, it doesn’t address the last 2 problems. In order to solve all of them, we can use a hybrid authentication approach with 2 accounts:
- “Classic” Web 2 account - all clients can use this account to call a server. For example, this can be a simple username/password or OAuth 2 login with a JWT token.
- NEAR account - can be used from non-mobile clients only. Instead of performing NEAR account auth each time we need to use it, we can do it a single time in order to “connect” this account to our primary Web 2 account and store Classic-NEAR account connection in our server database. In this way we solve all problems - server doesn’t need to authenticate NEAR account each time it wants to perform an authorization, instead it can read an associated NEAR account from its own database.
With such hybrid approach, different authentication methods are used for blockchain and server:
<div align="center">
<img src="/docs/assets/web3/nfts-9.png" alt="image" width="400" />
</div>
NEAR account connection sequence can be implemented in a very similar way to the already described NEAR authentication method, where at the end we store an authenticated account in our database:
 There’s one more improvement we can make to this flow. Since a Web Client uses both accounts, a user is forced to login using both Web 2 login method (e.g. login/password) and NEAR Wallet. This is not ideal from the UX perspective, so we can simplify it by introducing a “Login with Wallet” method to our server, which would work when a user already has a wallet connected. We can do this in a similar way to the account connection flow:
 Now, as we’ve discussed possible approaches for authentication, let’s summarize it as an overall login flow for our clients:
 Of course, this is just one possible flow, and a different solution can be assembled from described building blocks. The most important considerations for choosing right authentication flow are following:
- Type of your client - for web/desktop clients, or sideloaded Android clients, it’s possible to use Wallet as a single authentication method. For mobile clients installed from a store, a hybrid approach with multiple auth methods should be used.
- Target audience - if you target regular users that are not familiar with blockchain technologies, having a hybrid auth method to simplify onboarding might be better than forcing users to learn blockchain before trying your application.
Blockchain Auth & Auth
So far, we’ve discussed authentication and authorization on the Web 2 server’s side. But what about Web 3 smart contracts? Everything is much more straightforward in this case.
Since everything is public data on the blockchain, we don’t need any authentication for read calls. For transactions, each is signed by an account’s private key, and authentication is performed by the network. More details on transaction signing can be found in the docs.
Authorization, on the other hand, must be performed on a smart contract itself, the simplest way is just to check whether caller is allowed to perform an action:
assert_eq!(
            env::predecessor_account_id(),
            self.tokens.owner_id,
            "Unauthorized"
        );
Read more...
What is the NFT usage?
After we’ve learned how to authenticate users and how to authorize NFTs usage, let’s find out how we can actually use them in our application.
Since we essentially have two backends in our application - server and smart contract(s), they both can use NFTs for different purposes:
- Server usually uses NFTs for actual functional purposes, e.g. by treating NFT as an in-game character, it can read its properties and stats and apply them using some logic.
- Smart contract is responsible for NFTs ownership, as well as NFTs creation, modification and burning (destruction).
This is the point where the NFT data storage model comes into place. Let’s recall, that there are 3 possible options:
- Store data in a smart-contract (on-chain).
- Store data in an off-chain decentralized storage, like IPFS (off-chain).
- Store data in an application itself (in-application).
First 2 approaches provide good decentralization, but make NFT harder to work with, especially if we need to modify its properties. Let’s consider usage options depending on a storage model used:
- On-chain storage:
- Server can read data from the blockchain by making an API call. Server can’t directly modify data, it should make a smart contract call instead (by issuing a transaction).
- Smart contract can directly read/modify NFT data.
- Clients can read all data directly from the blockchain.
- Off-chain storage:
- Server can read data from storage by making an API call. Data on the off-chain storage is usually immutable, so no modifications are possible.
- Smart contract cannot read data directly, an Oracle should be used. Data cannot be modified from it.
- Clients should read data from both blockchain and off-chain storage.
- In-application storage:
- Server can read/modify data from its own database.
- Smart contract cannot read data directly, an Oracle should be used. Data cannot be modified from it.
- Clients should read data from both blockchain and server.
Depending on a particular use case, any approach, or combination of them, can be used. The simplest case is when we don’t have any dynamic NFT data, and we can easily divide data by domains:
- Data that is used by smart contracts is stored on-chain.
- Other data is stored either off-chain or in-application.
<div align="center">
<img src="/docs/assets/web3/nfts-13.png" alt="image" width="400" />
</div>
In this approach the server needs to read data from the smart contract, and, optionally, from an off-chain storage (like IPFS or Database).
This will work well for simple use cases, but everything becomes more complicated if we need to have some dynamic data associated with NFTs. E.g we may want to have experience points associated with our game character. Such data can be stored either on-chain or in-application (off-chain storage is also possible, but it’s more involved, so we won’t discuss it here).
In case of in-application storage, data can be modified by a server without any problems, but there are few drawbacks:
- In order to read this data, clients should make an API call to the server. This adds a centralized point for our NFT, and may not be suitable for all applications.
- If a smart contract requires this data, a server should serve as a Blockchain Oracle, which complicates things.
If we want our server to serve as an oracle for our smart contract, the easiest way is to cryptographically sign server’s data and verify it on the contract’s side (server’s public key that was used for signing should be stored in a contract in this case).
In order to prevent replay attacks, signed data should include a timestamp, which should also be verified. However, there’s on trick to this - smart contracts can’t access current time, since it would make them non-deterministic. Instead, transaction signature time can be used - it can be accessed using
env::block_timestamp() function.
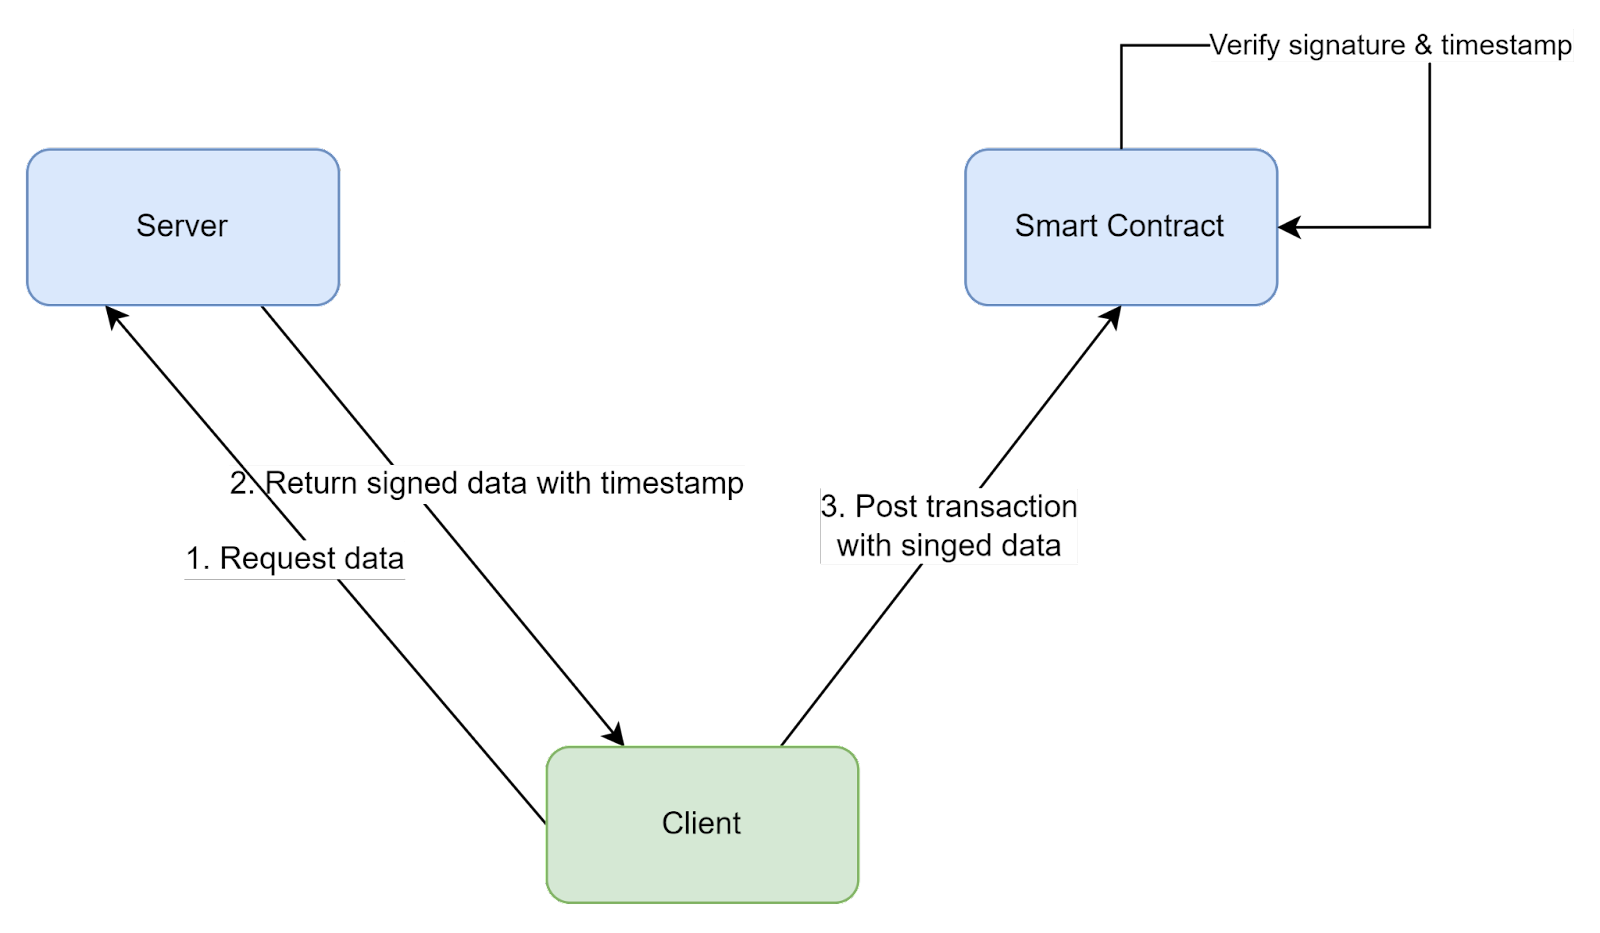 In order to avoid all these complications, we can instead store dynamic data on-chain, and use smart contract calls to update it.
<div align="center">
<img src="/docs/assets/web3/nfts-15.png" alt="image" width="500" />
</div>
Such an approach has one drawback - in order to call a smart contract’s method, a transaction should be created by the server, and in order to create a transaction it must be signed using an account’s key. That’s why a separate NEAR account should be created to be used by the server. Actions on the smart contract can be configured to authorize only this account, so regular users will be disallowed from modifying such data.
Yet another option is to store data on the server-side, but a smart contract can authorize only a server account for calls that rely on this data. As with the previous scenario, the server must have its own NEAR account.
<div align="center">
<img src="/docs/assets/web3/nfts-16.png" alt="image" width="500" />
</div>
In general, the approach of storing dynamic data on the Smart Contract side is much easier, but an important constraint should be considered - storing data on the blockchain is not cheap, so an appropriate method can be chosen depending on a scenario.
By now, we’ve covered methods to store and interact with NFTs from our application, an exact strategy should be chosen depending on use cases and constraints. A few things to remember:
In order to avoid all these complications, we can instead store dynamic data on-chain, and use smart contract calls to update it.
<div align="center">
<img src="/docs/assets/web3/nfts-15.png" alt="image" width="500" />
</div>
Such an approach has one drawback - in order to call a smart contract’s method, a transaction should be created by the server, and in order to create a transaction it must be signed using an account’s key. That’s why a separate NEAR account should be created to be used by the server. Actions on the smart contract can be configured to authorize only this account, so regular users will be disallowed from modifying such data.
Yet another option is to store data on the server-side, but a smart contract can authorize only a server account for calls that rely on this data. As with the previous scenario, the server must have its own NEAR account.
<div align="center">
<img src="/docs/assets/web3/nfts-16.png" alt="image" width="500" />
</div>
In general, the approach of storing dynamic data on the Smart Contract side is much easier, but an important constraint should be considered - storing data on the blockchain is not cheap, so an appropriate method can be chosen depending on a scenario.
By now, we’ve covered methods to store and interact with NFTs from our application, an exact strategy should be chosen depending on use cases and constraints. A few things to remember:
- Storing NFTs data in a centralized storage (like an application's database) goes against Web 3 philosophy, and should be used sparingly and with care.
- Storage on the blockchain is not cheap, so decentralized off-chain storages can be used to store large data.
- Storing and using dynamic NFT data is quite tricky, and should be carefully designed. If such dynamic data is needed by smart contracts, it’s better to store it inside this contract if possible.
Read more...
What is the NFT minting?
So far, we’ve discussed only how to use NFTs in the application, but how do they get created?
In the blockchain world, creation of new NFTs is usually called minting. And as with traditional digital assets, there are few ways how to create them:
- Users can mint them directly. This can be done by either allowing creation of NFTs from scratch, or by using more complex processes, like breeding or upgrading. The most famous example of such process is breeding in CrytoKitties game - new NFTs are created by combining existing ones. With this approach users usually have to pay to cover the storage and gas cost of NFTs creation.
- NFTs can be distributed by the developer to a set of users - it is usually called NFTs airdrop. Most often this is used as a marketing strategy to kickstart NFTs usage in applications. Storage and gas costs in this case are covered by developers.
- NFTs can be bought on a market or obtained from the lootbox. Depending on an exact strategy, costs can either be paid by a user or by developer. Also, in this case NFTs sometimes can be minted on-demand, to avoid paying upfront costs.
An exact strategy used for NFTs minting depends on application use cases. However, almost always there’ll be an
nft_mint _function defined in a smart contract, which will handle creation of new tokens. This function itself isn't defined in the standard and is up to the application to implement, but the standard library provides a core implementation for it - mint_internal. On top of this function an additional logic, e.g. for authorization, can be added:
#[payable]
pub fn nft_mint(
    &mut self,
    token_id: TokenId,
    receiver_id: AccountId,
    token_metadata: TokenMetadata,
) -> Token {
    assert_eq!(
        env::predecessor_account_id(),
        self.tokens.owner_id,
        "Unauthorized"
    );
    let token = self
        .tokens
        .internal_mint(token_id, receiver_id, Some(token_metadata));
    return token;
}
This approach is quite simple, but everything becomes a bit complicated if we want to provide some on-demand minting functionality to avoid paying upfront costs. For example, we may want to create a lootbox with a set of predefined items appearing with some probability.
One approach is to handle this logic on a server side, in this case the server will call nft_mint function with computed parameters. However, in this case developers will have to pay the cost of minting. If we want to avoid this, loot box logic can be moved into the smart contract itself. If users want to open a loot box, he can call a smart contract function and pay for this action (e.g. by using NEAR or Fungible Tokens). Developers would only need to pay for a lootbox configuration costs, like possible items and their probabilities.
Read more...
What is the Blockchain Onboarding?
Before designing an onboarding strategy, the target audience should be carefully analyzed. As we briefly mentioned before, users can be divided into two broad buckets:
- Users that are already familiar with blockchain, have their own wallets and understand cryptocurrency basics.
- “Casual” users that aren’t familiar with blockchain and don’t know much about it.
If only the first category is targeted, then everything is quite simple - users are already familiar with main concepts, and will have no problem connecting their own wallet or creating a new one. However, if we want to target the second category of users as well, a strategy has to be developed to make onboarding into the blockchain world as smooth as possible. While a lot relies on proper UX and is very application-specific, a few architectural patterns and technologies exist to simplify this process: custodial wallets, NEAR drops, Prepaid Gas and Implicit Accounts.
Custodial Wallet is a wallet which is managed by a third party. In our case, a wallet can be created and stored on a server side, and all blockchain operations could be done using the server as a proxy.
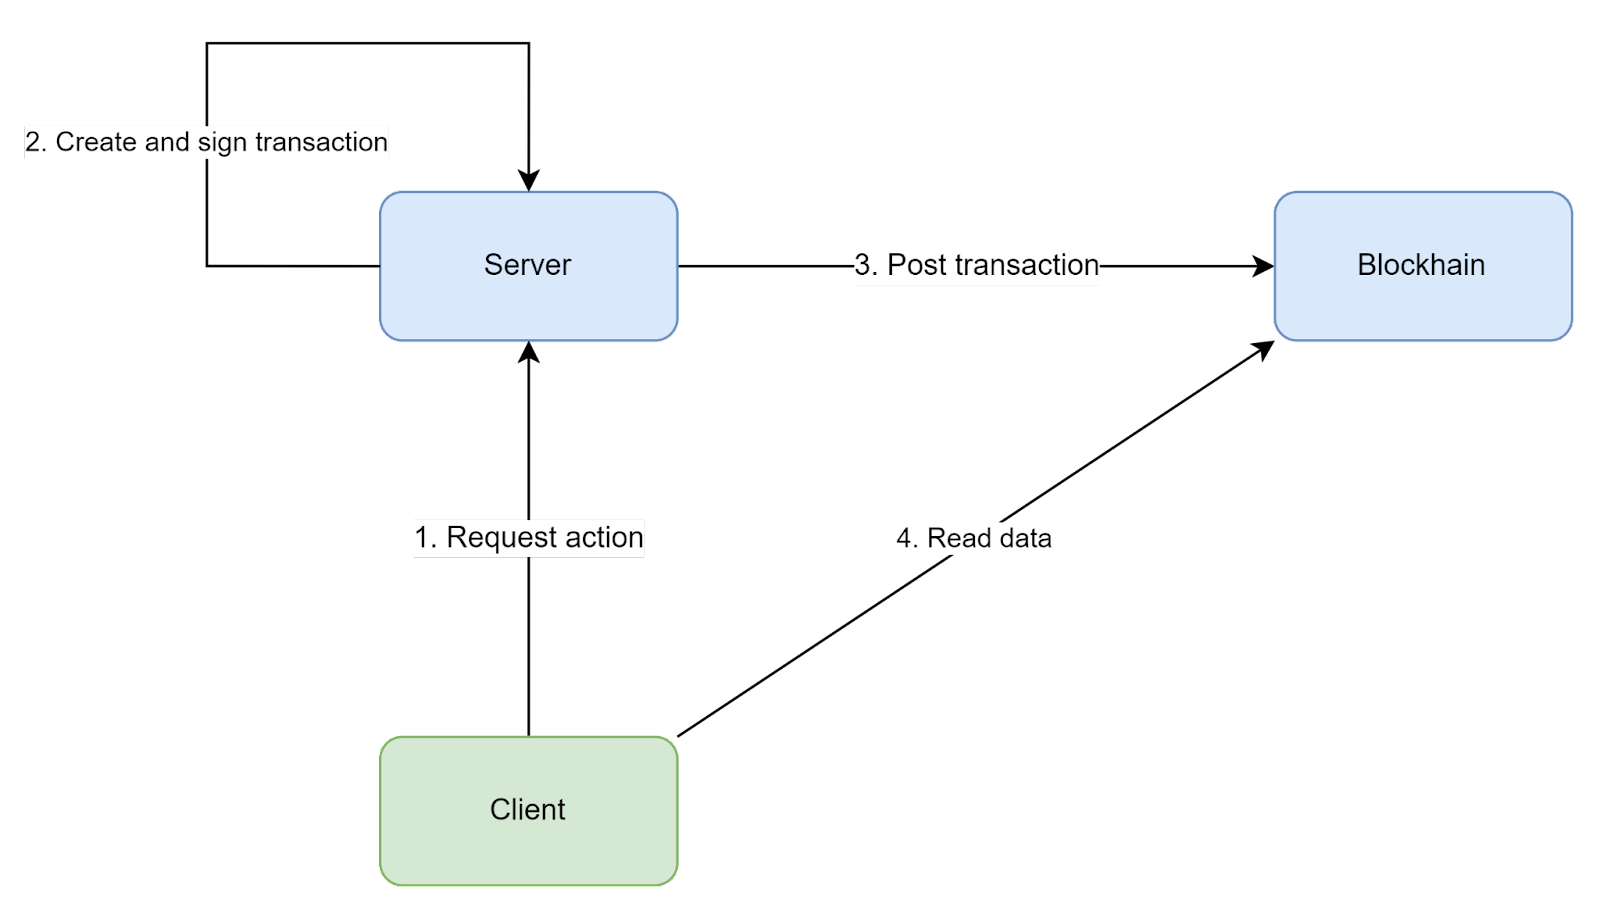 In this way, users can remain unaware about the intricacies of blockchain until they are comfortable enough to claim ownership of this account. Once they are ready, the server can transfer the account's ownership and remove it from the server. However, despite simplifying UX for the users, such approach has a few significant drawbacks:
- Users should trust our application to manage their accounts.
- Accounts creation is not free, so unless developers want to pay for it, funds should be transferred from a user to cover this cost. Traditional payment methods can be used, like PayPal or Apple/Google Pay. However, such an approach should be used with care for mobile applications due to app stores policies. Alternatively, NEAR Implicit Accounts can be used to avoid paying for account creation.
- Unless we want to leave a custodial wallet as the only supported wallet type, we need to support both types of wallets (custodial and non-custodial) in our application. This will increase implementations complexity, since we need to support 2 transaction types:
- Server-signed transactions in case of custodial wallet.
- Client-signed transactions in case of non-custodial wallet.
As we mentioned above, Implicit Accounts can be used to avoid paying account creation costs. This is especially useful for custodial wallets, since it allows us to create a NEAR Account free of charge. Basically, they work like an Ethereum/Bitcoin-style account by using a public key as an account id, and later can be converted to a full NEAR account. However, they have drawbacks as well. First of all, human-readable account names cannot be used. Also, if we want to convert it to a proper NEAR account, which can support Functional Call keys, the account creation fee still has to be paid.
While being very powerful, custodial accounts are quite complex and tricky to implement. An alternative approach to ease users onboarding is to simplify creation of a wallet itself. In NEAR, we can do this using NEAR Drops. It allows us to generate a link that guides users through a quick wallet creation process. However, the same problem as for the custodial accounts applies - creation of an account is not free. That’s why, such a link has NEAR tokens attached to it to cover account creation cost and to serve as an initial balance for a newly created wallet. And as with custodial accounts, funds should be transferred from a user to cover this cost using traditional payment channels.
Another option to simplify onboarding is usage of the Prepaid Gas concept. For example, we can issue a Functional Call key that allows users to interact with blockchain without having an account created. In this case funds will be drawn from the developer's account. This can be used for demo purposes, or to allow users without a NEAR account to perform some smart contract actions.
Read more...
What is the NFT Marketplace?
At this point, we’ve covered in detail how to integrate NFTs into our Web 2 application, but we’ve stayed away from the economy part. The essential part for having a functioning economy is a marketplace where users can freely trade and exchange their NFTs. Such a marketplace usually consists of a smart contract and a client application. This smart contract is closely integrated with a NFT’s smart contract using the cross-contract calls. The reason for having a separate smart contract is two-fold:
- This provides a better separation of concerns - we can modify and upgrade our marketplace independently from the NFT contract.
- Multiple marketplaces can be used - e.g. we can have an internal marketplace, and in addition to it users can list their NFTs on external marketplaces. This is possible because a common NFT standard exists that all marketplaces can rely on.
General flow of a simple marketplace integration can look like this:
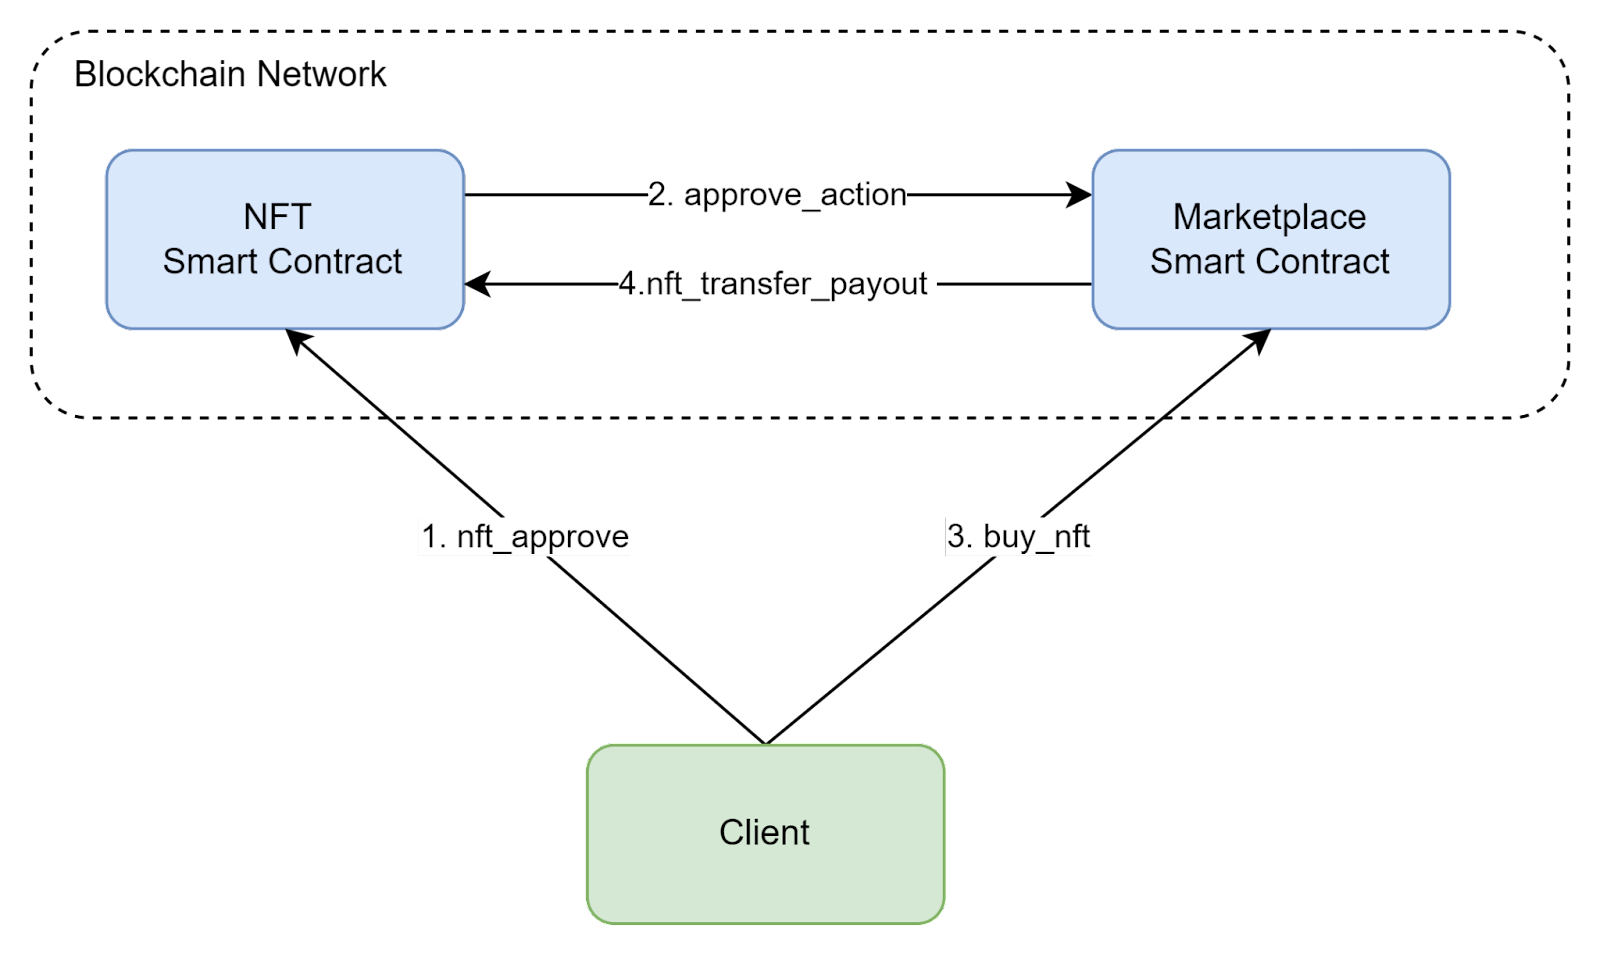
- Client calls the nft_approve method on the NFT smart contract. This will approve Marketplace Smart Contract to sell this NFT.
- After approving an account, NFT smart contract issues a cross-contract call to the Marketplace to create a sale object. Arguments for this call are provided as part of the
nft_approve call.
- Another user wants to buy the NFT on sale, so he issues a call to the marketplace contract offering to buy it. An exact call signature for such action is not standardized and depends on marketplace implementation.
- If an offer to buy a NFT is valid, Marketplace issues an nft_transfer_payout call to transfer the NFT and return payout information. This information is used by the Marketplace to distribute profits from the sale between recipients. In the simplest case, all profits go to a seller.
Such flow looks relatively simple, but a few important details are missing.
First of all, in order to create a sale, storage needs to be paid for. Usually, the seller is the one who needs to pay for it, but other models are possible - e.g. marketplace or application developers could cover the cost. If we want users to pay for a sale, an approach with storage reservation can be used:
- Before approving NFT for sale, a user should reserve storage on the Marketplace contract to cover sale storage requirements.
- After the NFT is bought or delisted, the user can withdraw storage reservation (remember, that in NEAR storage staking model is used, so data can be deleted and locked tokens refunded).
While this model is relatively straightforward, it’s not ideal from the UX perspective - users must make a separate action to reserve storage if they want to sell their NFTs. To improve this, we can combine
nft_approve call with storage reservation, and automatically refund back the storage cost after the sale is removed.
 Another missing thing is how a client can read data about available sales. Of course, sales information can be read directly from a smart contract, but available data structures are not optimized for searching or filtering. Also, we would have to join data from the NFT and Marketplace contracts on the client side, which isn’t efficient. In order to solve these problems, an indexer can be used to aggregate data into a suitable database, where data can be stored in a way optimal for retrieval (e.g. a relational database or an ElasticSearch index can be used).
 This is just one example of how a marketplace can be designed, but with it we’ve covered all basic concepts and problems. Most important points to remember:
- It’s better to implement a marketplace as a separate contract.
- Storage management should be carefully designed, with UX in mind.
- In order to implement a proper searching/filtering functionality, a separate indexing service is needed.
An example of a simple marketplace can be found here. A more sophisticated marketplace may allow purchases with Fungible Tokens as payment.
Read more...
What are the Implementing Components?
Now, let’s explore our choice of libraries, frameworks and third-party solutions that can be used to implement our architecture.
Client & Server
First of all, how can we interact with blockchain from our clients?
If we need read-level access only, we can simply use the REST API, so it can be integrated into any language and technology without any problems. But everything becomes more complicated if we need to post transactions from a client. Remember, that transaction should be signed with a private key which is stored in a wallet:
- In case of a Functional Call key, it can be obtained from the wallet and used directly by the client.
- In case of a Full Access key, the user should be redirected to the wallet to approve a transaction.
A JavaScript SDK exists to cover all of these scenarios. It has all of the necessary functionality to integrate Web/Node.JS applications with blockchain. This SDK is a perfect choice for the Web-based clients, but it’s not suitable for desktop or mobile based clients. Other libraries can be used for them:
- .NET Client - suitable for Unity or Xamarin.
- Swift
- Python
- Unity
Same SDKs and libraries can be used for servers. The only difference is that a server cannot interact with a Wallet, so it must have access to a Full Access key, which should be stored and accessed in a secure way.
Also, another solution is available if a server uses a technology that doesn’t have NEAR SDK available for - we can create a separate (micro)service using the Node.js, which would handle all blockchain interactions:
<div align="center">
<img src="/docs/assets/web3/nfts-21.png" alt="image" width="450" />
</div>
An example of such a proxy server can be found here.
Contracts
As we discovered in a previous section, for our application we need two smart contracts: for NFT and for Marketplace. There are two options on how to get them - use in-house implementation or some third-party/SAAS solution. Both options are viable and have different pros/cons.
If we want to create our own contract, we are fully in control and can implement anything we want. An obvious drawback, of course, is that it will take time and money to build it. Third-party solutions, on the other hand, are limited in their functionality and often cannot be easily extended. Also, they usually have some upfront costs and/or usage fees.
For an in-house NFT contract implementation a few resources can be used as a starting point. First of all, a Rust library is available which implements most of the standard. Another option is to build an entire contract from scratch, a good guide on how to do this is available by this link.
Implementing an own Marketplace contract is more involved since there is no standard implementation. A few examples:
- Basic marketplace example
- Paras marketplace contract - source.
As for third-party solutions, the most complete one is Mintibase, which provides a full suite of components for NFTs integration - including contracts, indexer, API and a web client:
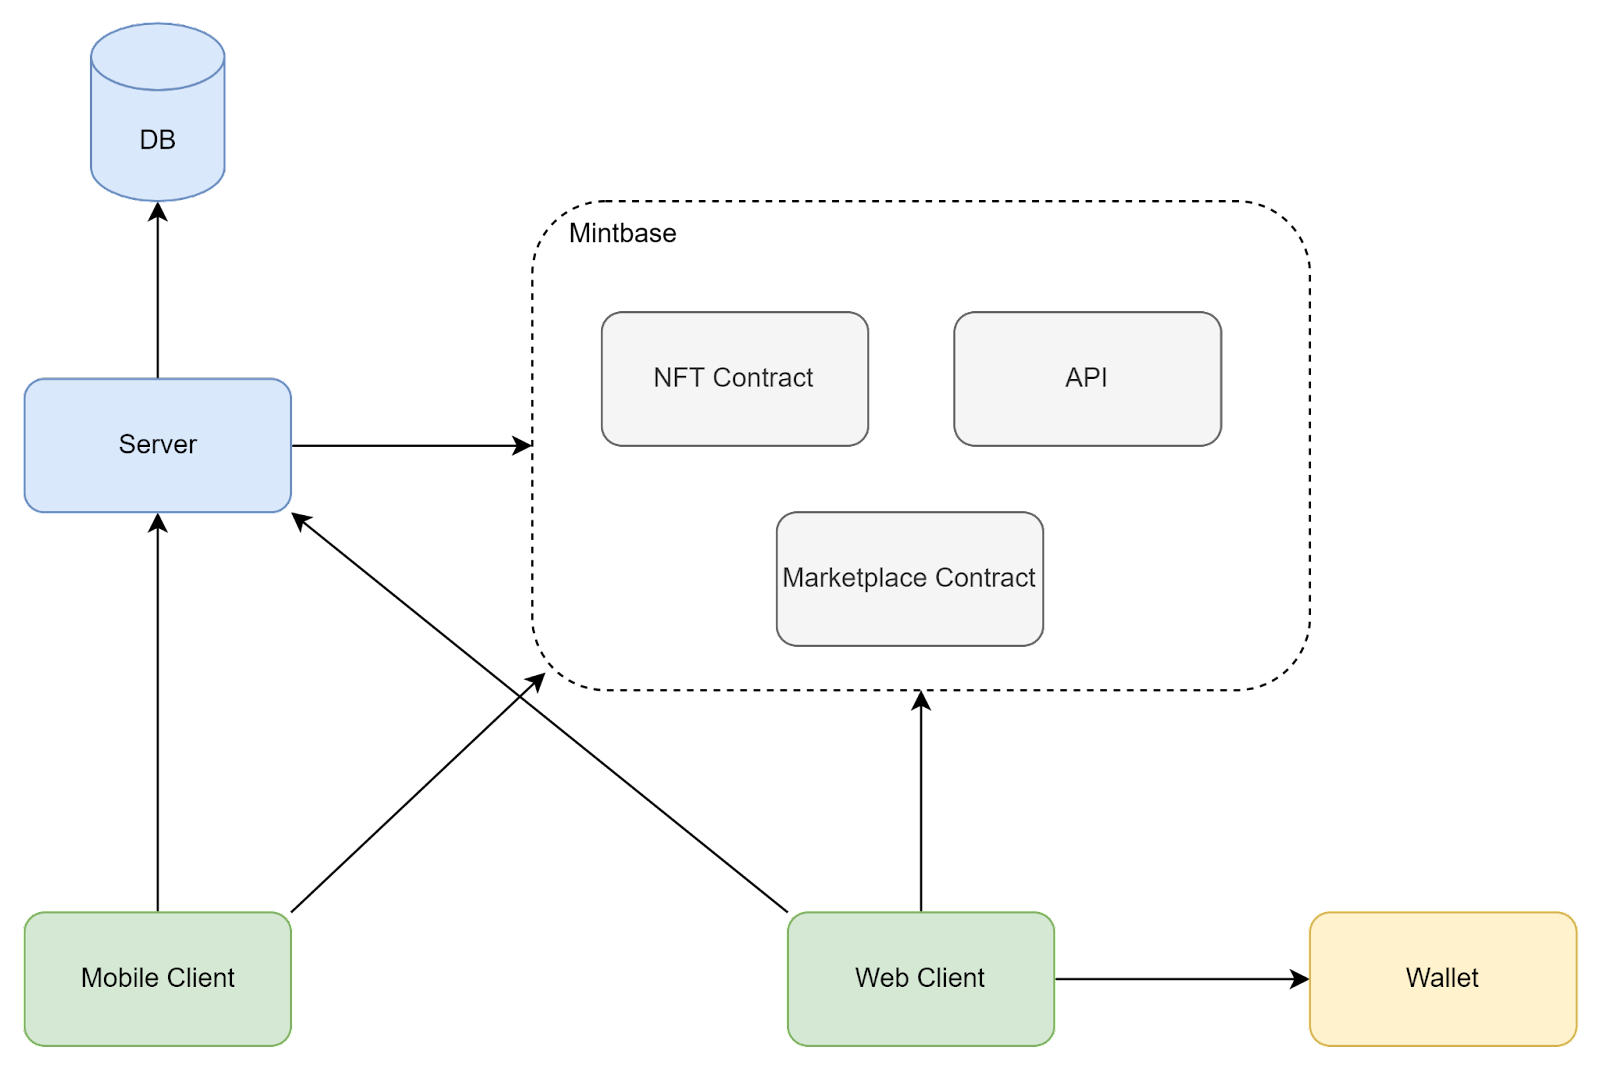 Another option is to roll-out an own NFT contract and integrate with one of the third-party marketplaces, e.g. with Paras (integration docs).
 The major advantage of an external marketplace is the fact that they usually run their own indexer and expose collected data via an API, so we don’t have to implement these components. However, they usually have their fee for providing them, so a cost-benefit analysis should be conducted before using them.
Off-chain storages
Previously, we’ve discussed that storage on the blockchain is not cheap, so in most cases some decentralized storage solution should be used. A few options are available:
- IPFS - one of the first decentralized storage solutions, which is widely used in the blockchain world. However, in order to make sure that data is preserved on the network, an IPFS node(s) should be maintained.
- Arweawe - blockchain-based decentralized storage.
- Filecoin - another blockchain-based storage.
- nft.storage - a free service built on top of the IPFS and Filecoin.
A more in-depth overview of such solutions is available in the docs. In general, there's no “silver bullet”, so different solutions should be evaluated and the most suitable chosen. The main concerns while choosing a solution are availability guarantees, and cost.
Indexer
As we already determined, an indexing service is needed in order to support marketplace functionality. It usually consists of 3 components:
- Indexer - processes transactions from a NEAR network and puts extracted data into a database.
- Database - database of choice to store extracted data.
- Indexer API - an API layer on top of the database.
<div align="center">
<img src="/docs/assets/web3/nfts-24.png" alt="image" width="150" />
</div>
While any technology of choice can be used to implement Database and API, an indexer itself is usually implemented using Rust, since a framework is available for this language. Guide how to implement your own indexer can be found here.
Usually, an indexer works by extracting data from Events, which are basically just structured log messages written during contract execution.
The Graph is an alternative to building an indexer from scratch. This is an Indexer-as-a-Service solution, which simplifies their creation and deployment. Guide on how to create a NEAR indexer is available by this link.
Automated Testing
Automated testing of the code is one of the pillars of modern software development. But how do we test our dApp?
Recall that a smart contract is a pure function, which can be easily tested using Unit Tests. Guide on how to write them is available here, and some examples can be found here. Another important kind of tests that is supported by NEAR are E2E tests, they can be executed either deploying contract code to either the local network environment (more info here), or directly to testnet, more info here).
Having both types of tests is equally important to ensure continuous quality of smart contracts, especially since contract upgrades usually aren’t easy to perform (remember, that in DAOs upgrade itself might be governed by a community vote).
Read more...
What are the Non-Functional Concerns?
Last, but not least, let’s cover important non-functional concerns for our architecture.
Read more...
What is the Security?
The most important thing to remember during the entire development is security, and especially the security of smart contracts. Since their code is public and an upgrade procedure is not trivial, it should be carefully audited for security issues and logical exploits.
Another important thing that should be kept secure is a user's private key. In most cases, only Functional Call keys should be directly accessed from a client, and Full Access keys should be kept in a wallet. However, in some cases a Full Access key might have to be used directly (e.g. in case of server transaction signing scenarios). In such a case, it must be kept in a secure location and treated as a most sensitive secret, since its compromise might lead to a full account takeover.
In general, before deploying an application to the NEAR mainnet, it’s a good idea to conduct a full security audit.
Read more...
What is the Scalability and Availability?
Another concern is scalability and availability of a solution. There are a lot of ways to scale traditional servers, but how do we scale our blockchain and make sure it’s always available?
Since blockchain is decentralized, it provides us with high-availability by design, and NEAR provides a great scalability by employing Proof-of-Stake consensus and sharding. However, in order to interact with a network, we need an RPC Node. NEAR maintains publicly available nodes for its networks (listed here), but it doesn't provide any performance or availability guarantees for them. So, in order to make sure our architecture is scalable and fault tolerant, we need to maintain our own cluster of RPC nodes, typically behind a load balancer.
<div align="center">
<img src="/docs/assets/web3/nfts-25.png" alt="image" width="150" />
</div>
Information on how to set up an RPC node is available here.
Also, to guarantee availability and scalability of a whole system, all used third-party services should be reviewed as well. For example, if IPFS is used as a storage for NFTs, pinning nodes and IPFS gateway should be scalable and fault tolerant.
Read more...
Why Choosing NEAR?
NEAR has been developed with a focus on performance and usability, both for developers and users.
Read more...
What is the Simple to Use?
- Uses human-readable accounts (e.g.
alice.near).
- Leverages a web-based wallet, no need for uses to install programs or browser extensions.
- Possess a simple yet rich system of Access Keys to handle account permissions.
Read more...
What is the Fast and Environmentally Friendly?
What is the Great Developer Experience?
- Enables making smart contracts using Javascript or Rust.
- Simple onboarding, thanks to its complete documentation and a multitude of examples.
- NEAR DevRel holds office hours every weekday, where anybody can participate.
- 30% of gas fees goes to the developers.
- Project funding available through our Grants Program.
Read more...
What is the Transfer NEAR Ⓝ?
You can send NEAR from the your contract to any other account on the network in the form of a promise. The Gas cost for transferring $NEAR is fixed and is based on the protocol's genesis config. Currently, it costs ~0.45 TGas.
<Tabs className="language-tabs">
<TabItem value="rs" label="🦀 - Rust">
use near_sdk::borsh::{self, BorshDeserialize, BorshSerialize};
use near_sdk::{near_bindgen, AccountId, Promise, Balance};
#[near_bindgen]
#[derive(Default, BorshDeserialize, BorshSerialize)]
pub struct Contract { }
#[near_bindgen]
impl Contract {
  pub fn transfer(&self, to: AccountId, amount: Balance){
    Promise::new(to).transfer(amount);
  }
}
</TabItem>
</Tabs>
The only case where the transfer will fail is if the receiver account does not exist.
caution
Remember that your balance is used to cover for the contract's storage. When sending money, make sure you always leave enough to cover for future storage needs.
Read more...
What is the Function Call?
Your smart contract can call methods in another contract. In the snippet bellow we call a method
in a deployed Hello NEAR contract, and check if everything went
right in the callback.
<Tabs className="language-tabs">
<TabItem value="rs" label="🦀 - Rust">
use near_sdk::borsh::{self, BorshDeserialize, BorshSerialize};
use near_sdk::{near_bindgen, env, log, Promise, Gas, PromiseError};
use serde_json::json;
#[near_bindgen]
#[derive(Default, BorshDeserialize, BorshSerialize)]
pub struct Contract { }
const HELLO_NEAR: &str = "hello-nearverse.testnet";
const NO_DEPOSIT: u128 = 0;
const CALL_GAS: Gas = Gas(5_000_000_000_000);
#[near_bindgen]
impl Contract {
  pub fn call_method(&self){
    let args = json!({ "message": "howdy".to_string() })
              .to_string().into_bytes().to_vec();
    Promise::new(HELLO_NEAR.parse().unwrap())
    .function_call("set_greeting".to_string(), args, NO_DEPOSIT, CALL_GAS)
    .then(
      Promise::new(env::current_account_id())
      .function_call("callback".to_string(), Vec::new(), NO_DEPOSIT, CALL_GAS)
    );
  }
  pub fn callback(&self, #[callback_result] result: Result<(), PromiseError>){
    if result.is_err(){
        log!("Something went wrong")
    }else{
        log!("Message changed")
    }
  }
}
</TabItem>
</Tabs>
warning
The snippet showed above is a low level way of calling other methods. We recommend make calls to other contracts as explained in the Cross-contract Calls section.
Read more...
What is the Create a Sub Account?
Your contract can create sub accounts of itself, i.e. <prefix>.<account-id>.near.
Something important to remark is that an account does NOT have control over
its sub-accounts, since they have their own keys. A sub-account is exactly the same as a regular account but it just has a different name. They are useful for organizing your accounts
(e.g. dao.project.near, token.project.near).
<Tabs className="language-tabs">
<TabItem value="rs" label="🦀 - Rust">
use near_sdk::borsh::{self, BorshDeserialize, BorshSerialize};
use near_sdk::{near_bindgen, env, Promise, Balance};
#[near_bindgen]
#[derive(Default, BorshDeserialize, BorshSerialize)]
pub struct Contract { }

const MIN_STORAGE: Balance = 1_000_000_000_000_000_000_000; //0.001Ⓝ
#[near_bindgen]
impl Contract {
  pub fn create(&self, prefix: String){
    let account_id = prefix + "." + &env::current_account_id().to_string();
    Promise::new(account_id.parse().unwrap())
    .create_account()
    .transfer(MIN_STORAGE);
  }
}
</TabItem>
</Tabs>
Notice that in the snippet we are transferring some money to the new account for storage
caution
When you create an account from within a contract, it has no keys by default. This means it cannot sign transactions and is essentially useless since it has no contract deployed to it. See the following section adding keys for more information.
Creating Other Accounts
If your contract wants to create another mainnet or testnet account, then it needs to call
the create_account method of near or testnet.
<Tabs className="language-tabs">
<TabItem value="rs" label="🦀 - Rust">
use near_sdk::borsh::{self, BorshDeserialize, BorshSerialize};
use near_sdk::{near_bindgen, Promise, Gas, Balance };
use serde_json::json;
#[near_bindgen]
#[derive(Default, BorshDeserialize, BorshSerialize)]
pub struct Contract { }
const CALL_GAS: Gas = Gas(28_000_000_000_000);
const MIN_STORAGE: Balance = 1_820_000_000_000_000_000_000; //0.00182Ⓝ
#[near_bindgen]
impl Contract {
  pub fn create_account(&self, account_id: String, public_key: String){
    let args = json!({
                "new_account_id": account_id,
                "new_public_key": public_key,
              }).to_string().into_bytes().to_vec();
    // Use "near" to create mainnet accounts
    Promise::new("testnet".parse().unwrap())
    .function_call("create_account".to_string(), args, MIN_STORAGE, CALL_GAS);
  }
}
</TabItem>
</Tabs>
Read more...
What is the Deploy a Contract?
If you just created an account using the previous action, then you can deploy a contract to it using a batch action. For this, you will need to pre-load the byte-code you want to deploy in your contract.
<Tabs className="language-tabs">
<TabItem value="rs" label="🦀 - Rust">
use near_sdk::borsh::{self, BorshDeserialize, BorshSerialize};
use near_sdk::{near_bindgen, env, Promise, Balance};
#[near_bindgen]
#[derive(Default, BorshDeserialize, BorshSerialize)]
pub struct Contract { }
const MIN_STORAGE: Balance = 1_100_000_000_000_000_000_000_000; //1.1Ⓝ
const HELLO_CODE: &[u8] = include_bytes!("./hello.wasm");
#[near_bindgen]
impl Contract {
  pub fn create_hello(&self, prefix: String){
    let account_id = prefix + "." + &env::current_account_id().to_string();
    Promise::new(account_id.parse().unwrap())
    .create_account()
    .transfer(MIN_STORAGE)
    .deploy_contract(HELLO_CODE.to_vec());
  }
}
</TabItem>
</Tabs>
If an account with a contract deployed does not have any access keys, this is known as a locked contract. When the account is locked, it cannot sign transactions therefore, actions can only be performed from within the contract code.
Read more...
What are the Add Keys?
When you use actions to create a new account, the created account does not have any access keys, meaning that it cannot sign transactions (e.g. to update its contract, delete itself, transfer money).
There are two options for adding keys to the account:
add_access_key: adds a key that can only call specific methods on a specified contract.add_full_access_key: adds a key that has full access to the account.
<br/>
<Tabs className="language-tabs">
<TabItem value="rs" label="🦀 - Rust">
use near_sdk::borsh::{self, BorshDeserialize, BorshSerialize};
use near_sdk::{near_bindgen, env, Promise, Balance, PublicKey};
#[near_bindgen]
#[derive(Default, BorshDeserialize, BorshSerialize)]
pub struct Contract { }
const MIN_STORAGE: Balance = 1_100_000_000_000_000_000_000_000; //1.1Ⓝ
const HELLO_CODE: &[u8] = include_bytes!("./hello.wasm");
#[near_bindgen]
impl Contract {
  pub fn create_hello(&self, prefix: String, public_key: PublicKey){
    let account_id = prefix + "." + &env::current_account_id().to_string();
    Promise::new(account_id.parse().unwrap())
    .create_account()
    .transfer(MIN_STORAGE)
    .deploy_contract(HELLO_CODE.to_vec())
    .add_full_access_key(public_key);
  }
}
</TabItem>
</Tabs>
Notice that what you actually add is a "public key". Whoever holds its private counterpart, i.e. the private-key, will be able to use the newly access key.
If an account with a contract deployed does not have any access keys, this is known as a locked contract. When the account is locked, it cannot sign transactions therefore, actions can only be performed from within the contract code.
Read more...
What is the Delete Account?
There are two scenarios in which you can use the delete_account action:
- As the last action in a chain of actions.
- To make your smart contract delete its own account.
<Tabs className="language-tabs">
<TabItem value="rs" label="🦀 - Rust">
use near_sdk::borsh::{self, BorshDeserialize, BorshSerialize};
use near_sdk::{near_bindgen, env, Promise, Balance, AccountId};
#[near_bindgen]
#[derive(Default, BorshDeserialize, BorshSerialize)]
pub struct Contract { }

const MIN_STORAGE: Balance = 1_000_000_000_000_000_000_000; //0.001Ⓝ
#[near_bindgen]
impl Contract {
  pub fn create_delete(&self, prefix: String, beneficiary: AccountId){
    let account_id = prefix + "." + &env::current_account_id().to_string();
    Promise::new(account_id.parse().unwrap())
    .create_account()
    .transfer(MIN_STORAGE)
    .delete_account(beneficiary);
  }
  pub fn self_delete(beneficiary: AccountId){
    Promise::new(env::current_account_id())
    .delete_account(beneficiary);
  }
}
</TabItem>
</Tabs>
warning Token Loss
If the beneficiary account does not exist a the funds will be dispersed among validators.
warning Token Loss
Do not use delete to try fund a new account. Since the account doesn't exist the tokens will be lost.
Read more...
What is the Anatomy of a Donation?
Let's look at a simple contract whose main purpose is to allow users to donate $NEAR to a specific account. Particularly, the contract keeps track of a beneficiary account and exposes a donation function that forwards the money and keeps track of the donation info. Take a quick peek at the snippet bellow and then continue to the modules section.
This contract is written for educational purposes only.
<CodeTabs>
<Language value="🦀 - Rust" language="rust">
<Github fname="lib.rs"
url="https://github.com/near-examples/docs-examples/blob/main/donation-rs/contract/src/lib.rs"
start="1" end="74" />
<Github fname="views.rs"
url="https://github.com/near-examples/docs-examples/blob/main/donation-rs/contract/src/views.rs" />
</Language>
<Language value="🚀 - AssemblyScript" language="ts">
<Github fname="index.ts"
url="https://github.com/near-examples/docs-examples/blob/main/donation-as/contract/assembly/index.ts"
start="1" end="29" />
<Github fname="model.ts"
url="https://github.com/near-examples/docs-examples/blob/main/donation-as/contract/assembly/model.ts" />
</Language>
</CodeTabs>
Read more...
What are the Modules?
When writing smart contracts you will leverage imports to organize your code, and reuse third-party libraries.
The main library you will use while writing smart contracts is the NEAR SDK. This can be seen at the top of the donation smart contract.
<Tabs className="language-tabs" groupId="code-tabs">
<TabItem value={0} label="🦀 - Rust">
  use near_sdk::collections::Vector;
  use near_sdk::{env, log, near_bindgen, AccountId, Promise, Balance};
</TabItem>
<TabItem value={1} label="🚀 - AssemblyScript">
  import { u128, context, logging, ContractPromiseBatch } from "near-sdk-as";
  import { STORAGE_COST, Donation, add_donation, get_donation,
          set_beneficiary, get_beneficiary, get_number_of_donation } from "./model";
</TabItem>
</Tabs>
The NEAR SDK defines methods to, among other things:
- Understand the context of a transaction (e.g. who started it, how much money they sent, etc...).
- Handle the state (storage) of the smart contract.
- Transfer money to other users/contracts.
- Interact with other smart contracts.
Read more...
What is the Contract's Interface?
Smart contracts expose an interface so users in the blockchain can interact with them. A contract's interface is made of all the callable functions that live in the codebase.
Read more...
What are the Initialization Functions?
When smart contracts are deployed to the blockchain, the variables must be initialized with a starting value. This is done automatically by default but it's very common to overload this behavior by creating a custom initialization function.
For example, in the donation contract, a beneficiary account is stored on the contract as a string. When the contract is deployed, we wouldn't want that account to be defaulted to an empty string "". This is why we created the new method, which takes in an account ID as a parameter and sets the beneficiary variable.
<Tabs className="language-tabs" groupId="code-tabs">
<TabItem value={0} label="🦀 - Rust">
<Github fname="lib.rs" language="rust"
url="https://github.com/near-examples/docs-examples/blob/main/donation-rs/contract/src/lib.rs"
start="28" end="36" />
Notice that the new method has two macros at the top: #[init] and #[private]. #[init] limits the method to be callable only once, meanwhile #[private] makes the method only callable by the contract's account.
</TabItem>
<TabItem value={1} label="🚀 - AssemblyScript">
  const initialized: bool = storage.getPrimitive<bool>('init', false)
  assert(!initialized, "Already initialized")
  storage.set<bool>('init', true)
In AssemblyScript there is no #[init] macro. You can create one yourself, as in the example above, but be mindful that, as any other method, it could be called multiple times. You can force the function to work only once by adding the following code:
</TabItem>
</Tabs>
Read more...
What are the Public and Private methods?
All public methods that are exposed will be callable by all users in the blockchain. In the donation contract above, such methods are:
donate: A method in which the users attaches NEAR in to donate.get_donation_by_number: Returns a recorded donation, stating how much a user donated.new: Enables to initialize the contract with a specific beneficiary. This function is made private by enforcing that the caller is the contract account itself.
All the other private functions can only be called from within the contract itself.
Read more...
What are the Typed Variables?
Smart contracts store typed values within them. The data types available are: u8, u16, u32, u64, u128, and their signed counterparts. Furthermore, the SDKs expose collections such as Vector and Map to simplify handling data. We cover this topic in depth on the Storage section.
There are two things to be aware of at a high level when dealing with storage. First, underflow and overflow errors can occur and often it's a good idea to check when doing operations. Second, in Rust, the contract's attributes are stored in Self. With AssemblyScript, you need to explicitly rely on the storage object to store attributes.
In Rust, we are also relying on the env::storage object to store the contract's state. This, however, gets abstracted away by the SDK.
warning
Remember to check for possible underflow and overflows! In rust, you can do this by simply adding the overflow-checks = true flag in your Cargo.toml.
Read more...
What is the Classes, NEAR Bindgen and Serialization?
You might have notice in the examples that some structs have the #[near_bindgen] macro and in Rust, derive Borsch or serde serialization.
<CodeTabs>
<Language value="🦀 - Rust" language="rust">
<Github url="https://github.com/near-examples/docs-examples/blob/main/donation-rs/contract/src/lib.rs" start="10" end="15" />
</Language>
<Language value="🚀 - AssemblyScript" language="ts">
<Github url="https://github.com/near-examples/docs-examples/blob/main/donation-as/contract/assembly/model.ts" start="4" end="10"/>
</Language>
</CodeTabs>
The #[near_bindgen] macro is used on a struct and the function implementations to generate the necessary code to be a valid NEAR contract and expose the intended functions to be able to be called externally.
Borsch serialization is needed for optimal internal state serialization and serde for external JSON serialization.
Did you know that contracts communicate with each other using values encoded in JSON?
info Using external libraries
As a general rule of thumb for Rust, anything that supports wasm32-unknown-unknown will be compatible with your smart contract.
However, we do have a size limit for a compiled binary of a contract which is ~4.19 MB so it is possible that certain large libraries will not be compatible.
Read more...
What is the Snippet: Querying Information?
While making your contract, it is likely that you will want to query information from another contract. Below, you can see a basic example in which we query the greeting message from our Hello NEAR example.
<CodeTabs>
<Language value="🦀 - Rust" language="rust">
<Github fname="lib.rs"
url="https://github.com/near-examples/docs-examples/blob/main/cross-contract-hello-rs/contract/src/lib.rs"
start="24" end="55" />
<Github fname="external.rs"
url="https://github.com/near-examples/docs-examples/blob/main/cross-contract-hello-rs/contract/src/external.rs" />
</Language>
<Language value="🚀 - AssemblyScript" language="ts">
<Github fname="index.ts"
url="https://github.com/near-examples/docs-examples/blob/main/cross-contract-hello-as/contract/assembly/index.ts"
start="10" end="45" />
<Github fname="external.ts"
url="https://github.com/near-examples/docs-examples/blob/main/cross-contract-hello-as/contract/assembly/external.ts" />
</Language>
</CodeTabs>
Read more...
What is the Snippet: Sending Information?
Calling another contract passing information is also a common scenario. Bellow you can see a method that interacts with the Hello NEAR example to change its greeting message.
<CodeTabs>
<Language value="🦀 - Rust" language="rust">
<Github fname="lib.rs"
url="https://github.com/near-examples/docs-examples/blob/main/cross-contract-hello-rs/contract/src/lib.rs"
start="56" end="81" />
<Github fname="external.rs"
url="https://github.com/near-examples/docs-examples/blob/main/cross-contract-hello-rs/contract/src/external.rs" />
</Language>
<Language value="🚀 - AssemblyScript" language="ts">
<Github fname="index.ts"
url="https://github.com/near-examples/docs-examples/blob/main/cross-contract-hello-as/contract/assembly/index.ts"
start="47" end="79" />
<Github fname="external.ts"
url="https://github.com/near-examples/docs-examples/blob/main/cross-contract-hello-as/contract/assembly/external.ts" />
</Language>
</CodeTabs>
Read more...
What are the Promises?
In order for your contract to interact with a different one, you need to create two Promises:
- A promise to execute code in the external contract (
ContractPromise.create).
- A promise to call back a different method in your contract with the result (
ContractPromise.then). This is often referred to as the callback.
Both promises take the same arguments:
<CodeTabs>
<Language value="🦀 - Rust" language="rust">
<CodeBlock>
external_trait::ext("external_address")
.with_attached_deposit(DEPOSIT)
.with_static_gas(GAS)
.method(arguments);
</CodeBlock>
</Language>
<Language value="🚀 - AssemblyScript" language="ts">
<CodeBlock>
ContractPromise.create(
"external_address", "method", "encoded_arguments", GAS, DEPOSIT
)
</CodeBlock>
</Language>
</CodeTabs>
- The address of the contract you want to interact with
- The method that you want to execute
- The (encoded) arguments to pass to the method
- The amount of GAS to use (deducted from the attached Gas)
- The amount of NEAR to attach (deducted from your contract’s balance)
Notice that the callback could be made to any contract. This means that, if you want, the result could be potentially handled by another contract.
caution
The fact that you are creating a Promise means that both the cross-contract call and callback will not execute immediately. In fact:
- The cross-contract call will execute 1 or 2 blocks after your method finishes correctly.
- The callback will then execute 1 or 2 blocks after the external method finishes (correctly or not)
Read more...
What is the Callback Method?
If your method finishes correctly, then eventually your callback method will execute. This will happen whether the external contract finishes successfully or not. We repeat, if your original method finishes correctly, then your callback will always execute.
In the callback method you will have access to the result, which contains two important arguments:
status: Telling if the external method finished successfully or notbuffer: Having the value returned by the external method (if any)
The callback methods in your contract must be public, so it can be called when the second promise executes. However, they should be only callable by your contract. Always make sure to make it private by asserting that the predecessor is current_account_id. In rust this can be achieved using the #[private] decorator.
Read more...
What are the Checking Execution Status?
<CodeTabs>
<Language value="🦀 - Rust" language="rust">
<Github fname="lib.rs"
url="https://github.com/near-examples/docs-examples/blob/main/cross-contract-hello-rs/contract/src/lib.rs"
start="72" end="80" />
<Github fname="external.rs"
url="https://github.com/near-examples/docs-examples/blob/main/cross-contract-hello-rs/contract/src/external.rs"
start="23" end="33"/>
</Language>
<Language value="🚀 - AssemblyScript" language="ts">
<Github fname="index.ts"
url="https://github.com/near-examples/docs-examples/blob/main/cross-contract-hello-as/contract/assembly/index.ts"
start="70" end="78" />
<Github fname="external.ts"
url="https://github.com/near-examples/docs-examples/blob/main/cross-contract-hello-as/contract/assembly/external.ts"
start="9" end="19"/>
</Language>
</CodeTabs>
Read more...
What is the Successful Execution?
In case the call finishes successfully, the resulting object will have a status of 1, and the buffer will have the encoded result (if any). In order to recover the result you need to decode it from the resulting buffer:
<CodeTabs>
<Language value="🦀 - Rust" language="rust">
<Github fname="lib.ts"
url="https://github.com/near-examples/docs-examples/blob/main/cross-contract-hello-rs/contract/src/lib.rs"
start="47" end="50" />
</Language>
<Language value="🚀 - AssemblyScript" language="ts">
<Github fname="index.ts"
url="https://github.com/near-examples/docs-examples/blob/main/cross-contract-hello-as/contract/assembly/index.ts"
start="37" end="39" />
</Language>
</CodeTabs>
Read more...
What is the Failed Execution?
If the external method fails (i.e. it panics), then your callback will be executed anyway. Here you need to manually rollback any changes made in your
contract during the original call. Particularly:
- If the contract attached NEAR to the call, the funds are sent back to the contract's account.
- If the original method made any state changes (i.e. changed or stored data), they won't be automatically reverted.
warning
If your original method finishes correctly then the callback executes even if the external method panics. Your state will not rollback automatically,
and $NEAR will not be returned to the signer automatically. Always make sure to check in the callback if the external method failed, and manually rollback any
operation if necessary.
Read more...
What are the Security Concerns?
While writing cross-contract calls there is a significant aspect to keep in mind: all the calls are independent and asynchronous. In other words:
- The method in which you make the call and method for the callback are independent.
- There is a delay between the call and the callback, in which people can still interact with the contract
This has important implications on how you should handle the callbacks. Particularly:
- Make sure you don't leave the contract in a exploitable state between the call and the callback.
- Manually rollback any changes to the state in the callback if the external call failed.
We have a whole security section dedicated to these specific errors, so please go and check it.
warning
Not following these basic security guidelines could expose your contract to exploits. Please check the security section, and if still in doubt, join us in Discord.
Read more...
What are the Environment Variables?
<Tabs className="language-tabs">
<TabItem value="rs" label="🦀 Rust">
<TableRs></TableRs>
</TabItem>
<TabItem value="as" label="🚀 Assemblyscript">
<TableAs></TableAs>
</TabItem>
</Tabs>
Read more...
Who is Calling? Who am I?
The environment has information about 3 important users: the current_account, predecessor, and the signer.
Read more...
What is the Current Account?
The current_account contains the address in which your contract is deployed. This is very useful to implement ownership, e.g. making a public method only callable by the contract itself.
Read more...
What is the Predecessor and Signer?
The predecessor is the account that called the method in the contract. Meanwhile, the signer is the account that signed the initial transaction.
During a simple transaction (no cross-contract calls) the predecessor is the same as the signer. For example, if alice.near calls contract.near, from the contract's perspective, alice.near is both the signer and the predecessor. However, if contract.near creates a cross-contract call, then the predecessor changes down the line. In the example bellow, when pool.near executes, it would see contract.near as the predecessor and alice.near as the signer.
 You can access information about the users interacting with your smart contract
In most scenarios you will only need the predecessor. However, there are situations in which the signer is very useful. For example, when adding NFTs into this marketplace, the contract checks that the signer, i.e. the person who generated the transaction chain, is the NFT owner.
Read more...
What is the Balances and Attached NEAR?
During a method execution, the environment gives you access to three token-related parameters, all expressed in yoctoNEAR (1 Ⓝ = 10<sup>24</sup>yⓃ):
Read more...
What is the Attached Deposit?
attached_deposit represents the amount of yoctoNEAR the predecessor attached to the call. This amount gets deposited immediately in your contract's account,
and is automatically returned to the predecessor if your method panics.
warning
If you make a cross-contract call](../crosscontract.md) and it panics, the funds are sent back to your contract. See how to handle this situation in the callback section
Read more...
What is the Account Balance?
account_balance represents the balance of your contract (current_account). It includes the attached_deposit, since it was deposited when the method execution started.
If the contract has any locked $NEAR, it will appear in account_locked_balance.
Read more...
What is the Storage Used?
storage_used represents the amount of storage that is currently being used by your contract.
If you want to know how much storage a structure uses, print the storage before and after storing it.
Read more...
What is the Telling the Time?
The environment exposes three different ways to tell the pass of time, each representing a different dimension of the underlying blockchain:
Read more...
What is the Timestamp?
The timestamp attribute represents the approximated UNIX timestamp at which this call was executed. It quantifies time passing in a human way, enabling to check if a specific date has passed or not.
Read more...
What is the Current Epoch?
The NEAR blockchain groups blocks in Epochs. The current_epoch attribute measures how many epochs have passed so far. It is very useful to coordinate with other contracts that measure time in epochs, such as the validators
Read more...
What is the Block Index?
The block_index represents the index of the block in which this transaction will be added to the blockchain
Read more...
What are the Gas?
Your smart contract has a limited number of computational resources to use on each call. Such resources are measured in Gas. Gas can be thought of as wall time, where 1 PetaGas (1_000 TGas) is ~1 second of compute time. Each code instruction costs a certain amount of Gas, and if you run out of it, the execution halts with the error message Exceeded the prepaid gas.
Through the environment you get access to two gas-related arguments.
Read more...
What are the Prepaid Gas?
prepaid_gas represents the amount of Gas the predecessor attached to this call. It cannot exceed the limit 300TGas (300 * 10<sup>12</sup> Gas).
Read more...
What are the Used Gas?
used_gas contains the amount of Gas that has been used so far. It is useful to estimate the Gas cost of running a method.
If you already estimated the Gas a method needs, you can ensure it never runs out of Gas by using assert
<Tabs className="language-tabs">
<TabItem value="rs" label="🦀 Rust">
const REQUIRED_GAS: Gas = Gas(20_000_000_000_000); // 20 TGas
assert!(env::prepaid_gas() >= REQUIRED_GAS, "Please attach at least 20 TGas");
</TabItem>
<TabItem value="as" label="🚀 Assemblyscript">
const TGas: u64 = 1000000000000;
assert(context.prepaidGas >= 20*TGas, "Please attach at least 20 TGas");
</TabItem>
</Tabs>
warning
When doing cross-contract calls always make sure that the callback has enough Gas to fully execute any error handling.
Read more...
What are the Private Callbacks?
In order for your contract to call itself when a cross-contract call is done, you need to make the callback method public. However, most of the times you would want it to be private. You can make it private while keeping it public by asserting that the predecessor is current_account. In rust this is done automatically by adding the #[private] decorator.
Read more...
What is the User's Money?
When a method panics, the money attached to that transaction returns to the predecessor. This means that, if you make a cross-contract call and it fails, then the money returns to your contract. If the money came from a user calling your contract, then you should transfer it back during the callback.
 If the user attached money, we need to manually return it in the callback
caution
Make sure you pass have enough GAS in the callback to make the transfer
If the user attached money, we need to manually return it in the callback
caution
Make sure you pass have enough GAS in the callback to make the transfer
Read more...
What are the Async Callbacks?
Between a cross-contract call and its callback any method of your contract can be executed. Not taking this into account is one of the main sources of exploits. It is so common that it has its own name: reentrancy attacks.
Imagine that we develop a deposit_and_stake with the following wrong logic: (1) The user sends us money, (2) we add it to its balance, (3) we try to stake it in a validator, (4) if the staking fails, we remove the balance in the callback. Then, a user could schedule a call to withdraw between (2) and (4), and, if the staking failed, we would send money twice to the user.
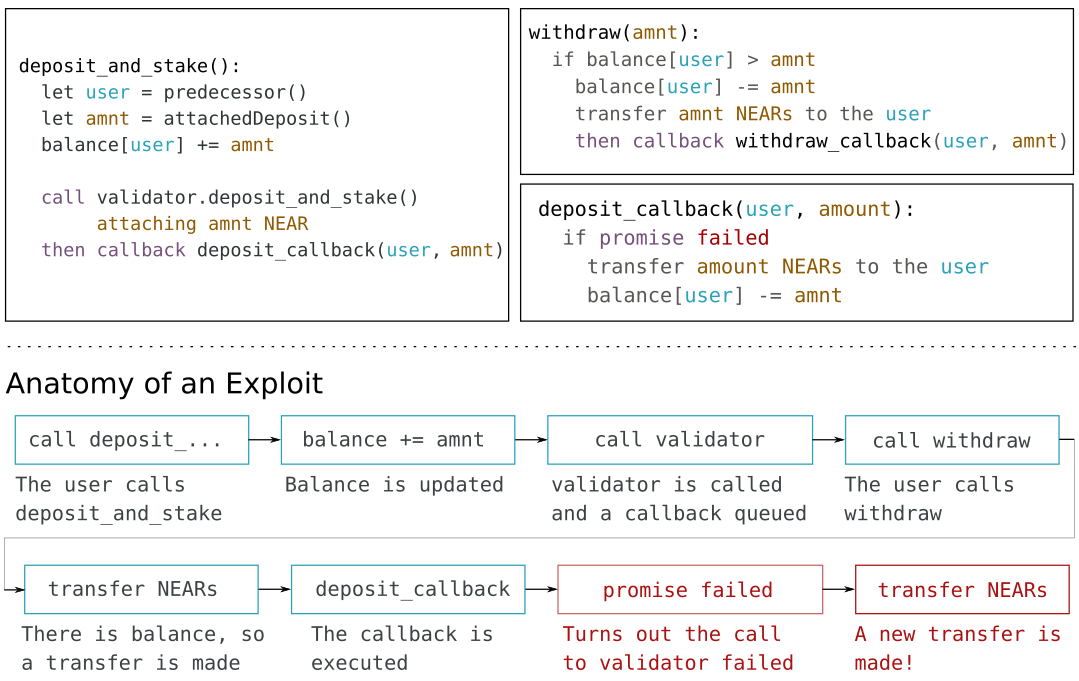 Between a cross-contract call and the callback anything could happen
Luckily for us the solution is rather simple. Instead of immediately adding the money to our user’s balance, we wait until the callback. There we check, and if the staking went well, then we add it to their balance.
Between a cross-contract call and the callback anything could happen
Luckily for us the solution is rather simple. Instead of immediately adding the money to our user’s balance, we wait until the callback. There we check, and if the staking went well, then we add it to their balance.
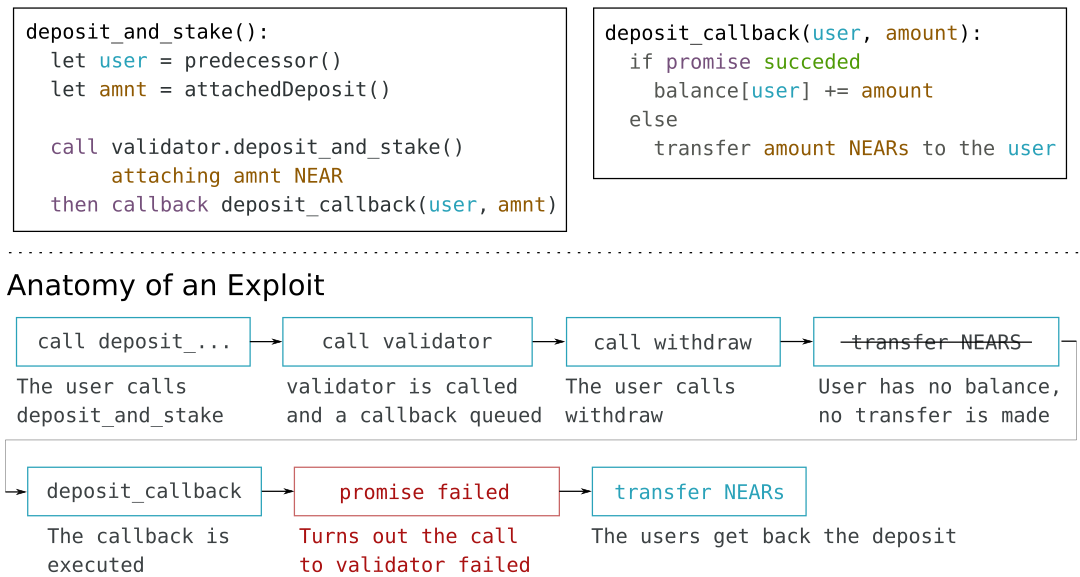 Correct way to handle deposits in a cross-contract call
Read more...
What is the Anatomy?
- There are no
private methods marked as public by mistake
Read more...
What is the Environment?
predecessor and signer are used correctly through the entire contract
Read more...
What are the Actions?
- When sending money, you left enough in the contract to cover the storage cost
Read more...
What are the Callbacks?
- All private callbacks are marked as
[#private] in Rust, or assert the caller (predecessor) is the contract (current_account)
- All cross-contract calls have a callback that checks for errors and rolls back the state if necessary
- All cross-contract calls have a callback that checks for errors and returns money to the
predecessor if necessary
- All the callbacks are given enough GAS to finish without errors
- The contract is not left in a exploitable state between a cross-contract call and its callback
Read more...
What are the Attributes and Constants?
You can store constants and define contract's attributes.
<CodeTabs>
<Language value="🦀 - Rust" language="rust">
<Github fname="lib.rs"
url="https://github.com/near-examples/docs-examples/blob/main/storage-rs/contract/src/lib.rs" start="11" end="24"/>
</Language>
<Language value="🚀 - AssemblyScript" language="ts">
<Github fname="index.ts"
url="https://github.com/near-examples/docs-examples/blob/main/storage-as/contract/assembly/index.ts"
start="10" end="29" />
</Language>
</CodeTabs>
Read more...
What are the Data Structures?
Both Rust SDK and AssemblyScript SDK expose a series of data structures to simplify handling and storing data. In this page we showcase how to use the most common ones: Vectors, Sets, Maps and Trees. For the complete documentation please refer to the SDK pages.
caution
When initializing a data structure make sure to give it a unique ID, otherwise, it could point to other structure's key-value references.
Read more...
What is the Vector?
Implements a vector/array which persists in the contract's storage. Please refer to the Rust and AS SDK's for a full reference on their interfaces.
<CodeTabs>
<Language value="🦀 - Rust" language="rust">
<Github fname="vector.rs"
url="https://github.com/near-examples/docs-examples/blob/main/storage-rs/contract/src/vector.rs" start="12" end="30"/>
<Github fname="lib.rs"
url="https://github.com/near-examples/docs-examples/blob/main/storage-rs/contract/src/lib.rs" start="7" end="24"/>
</Language>
<Language value="🚀 - AssemblyScript" language="ts">
<Github fname="vector.ts"
url="https://github.com/near-examples/docs-examples/blob/main/storage-as/contract/assembly/tests/vector.spec.ts" start="4" end="16"/>
<Github fname="index.ts"
url="https://github.com/near-examples/docs-examples/blob/main/storage-as/contract/assembly/index.ts"
start="1" end="11" />
</Language>
</CodeTabs>
<blockquote class="lesson">
<strong>How do you update a property of an object within a PersistentVector?</strong><br /><br />
This question is specific to Assemblyscript.
You have to replace the whole object. Persistent collections are ultimately just wrappers around storage.get and storage.set operating on JSON-serialized objects.
</blockquote>
Read more...
What is the Map?
Implements a map/dictionary which persists in the contract's storage. Please refer to the Rust and AS SDK's for a full reference on their interfaces.
<CodeTabs>
<Language value="🦀 - Rust" language="rust">
<Github fname="map.rs"
url="https://github.com/near-examples/docs-examples/blob/main/storage-rs/contract/src/map.rs" start="9" end="24"/>
<Github fname="lib.rs"
url="https://github.com/near-examples/docs-examples/blob/main/storage-rs/contract/src/lib.rs" start="7" end="24"/>
</Language>
<Language value="🚀 - AssemblyScript" language="ts">
<Github fname="map.ts"
url="https://github.com/near-examples/docs-examples/blob/main/storage-as/contract/assembly/tests/map.spec.ts" start="5" end="15"/>
<Github fname="index.ts"
url="https://github.com/near-examples/docs-examples/blob/main/storage-as/contract/assembly/index.ts"
start="1" end="11" />
</Language>
</CodeTabs>
<blockquote class="lesson">
<strong>How is PersistentMap used?</strong><br /><br />
This question is specific to Assemblyscript.
PersitentMap stores a key value pair, whereby the key is either a string or number and the value is usually an object. If you want to retrieve a particular value, you have to include the key to the value.
The biggest advantage of an unordered map to a vector is, it prevents duplicate keys and saves searching time. As a result, if I have two more elements linked to the key and I want one of them to be unique, one of the solutions is to set the value type to another map.
</blockquote>
<blockquote class="lesson">
<strong>Why is my call to get a value with default not passing type checks?</strong><br /><br />
You may need to use the TypeScript non-null assertion operator if you're trying to get a value, supplying a default and still failing type checks:
storage.get("my-var", "hello, default")!; // notice the ! at the end
</blockquote>
Read more...
What is the Set?
Implements a set which persists in the contract's storage. Please refer to the Rust and AS SDK's for a full reference on their interfaces.
<CodeTabs>
<Language value="🦀 - Rust" language="rust">
<Github fname="set.rs"
url="https://github.com/near-examples/docs-examples/blob/main/storage-rs/contract/src/set.rs" start="9" end="16"/>
<Github fname="lib.rs"
url="https://github.com/near-examples/docs-examples/blob/main/storage-rs/contract/src/lib.rs" start="7" end="24"/>
</Language>
<Language value="🚀 - AssemblyScript" language="ts">
<Github fname="map.ts"
url="https://github.com/near-examples/docs-examples/blob/main/storage-as/contract/assembly/tests/set.spec.ts" start="5" end="11"/>
<Github fname="index.ts"
url="https://github.com/near-examples/docs-examples/blob/main/storage-as/contract/assembly/index.ts"
start="1" end="11" />
</Language>
</CodeTabs>
Read more...
What is the Tree?
An ordered equivalent of Map. The underlying implementation is based on an AVL. You should use this structure when you need to: have a consistent order, or access the min/max keys.
<CodeTabs>
<Language value="🦀 - Rust" language="rust">
<Github fname="tree.rs"
url="https://github.com/near-examples/docs-examples/blob/main/storage-rs/contract/src/tree.rs" start="9" end="16"/>
<Github fname="lib.rs"
url="https://github.com/near-examples/docs-examples/blob/main/storage-rs/contract/src/lib.rs" start="7" end="24"/>
</Language>
<Language value="🚀 - AssemblyScript" language="ts">
<Github fname="tree.ts"
url="https://github.com/near-examples/docs-examples/blob/main/storage-as/contract/assembly/tests/tree.spec.ts" start="5" end="11"/>
<Github fname="index.ts"
url="https://github.com/near-examples/docs-examples/blob/main/storage-as/contract/assembly/index.ts"
start="1" end="11" />
</Language>
</CodeTabs>
Read more...
How to deploy a contract?
Thanks to the NEAR CLI deploying a contract is as simple as:
- Compiling the contract to wasm (done automatically through
yarn build in our templates).
- Deploy it into the desired account using the NEAR Command Line Interface (CLI):
# Login to NEAR
near login
# Deploy wasm to the <accountId> account
near deploy <accountId> <route_to_wasm>
By default the contract will be deployed to the testnet. To deploy into mainnet you can set the NEAR_ENV variable to mainnet (export NEAR_ENV=mainnet).
You can use near dev_deploy to deploy the contract into a newly created account!
Read more...
How to upgrade a contract?
If the contract's account has a Full Access Key, then
you will be able to re-deploy another contract on top of it later. On doing so, take into account that re-deploying a contract
does not wipe the state. This means that while the code will change the state will persist.
Since the state is persisted, adding/modifying methods that read the storage and returns a value will yield no problem. However,
deploying a contract with a different state will raise a Cannot deserialize the contract state error.
Read more...
How to migrate a contract?
If the new contract has a different state but you need anyway to deploy it, you have the option to implement a new method to migrate
the contract's state. Please check our migration page.
Read more...
How to lock a contract?
If you remove the full access key from the account, then the account will become
locked. When the account is locked nobody can perform a transaction in the contract account's name (e.g. update the code or transfer money).
This tends to bring more reassurance to the users, knowing that no external actor will be able to manipulate the contract's state or
balance.
Upgrading Locked Contracts
Please do note that, while no external actor can update the contract, the contract can still upgrade itself!. For example, our reference
DAO implementation includes an upgrading mechanism
governed by the community.
Read more...
What are the View methods?
View methods are those that perform read-only operations. Calling these methods is free, and do not require to specify which account is being used to make the call:
near view <accountId> <methodName>
Read more...
What are the Change methods?
Change methods are those that perform both read and write operations. For these methods we do need to specify the account being used to make the call,
since that account will expend GAS in the call.
near call <contractId> <methodName> <jsonArgs> --accountId <yourAccount> [--attachDeposit <amount>] [--gas <GAS>]
Read more...
What are the Adding NEAR API JS?
In order to use near-api-js you will need to first add it to your project.
<Tabs className="language-tabs">
<TabItem value="node" label="node">
npm i near-api-js
</TabItem>
<TabItem value="html" label="HTML">
<script src="https://cdn.jsdelivr.net/npm/near-api-js@0.44.2/dist/near-api-js.min.js" integrity="sha256-W5o4c5DRZZXMKjuL41jsaoBpE/UHMkrGvIxN9HcjNSY=" crossorigin="anonymous"></script>
</TabItem>
</Tabs>
Read more...
What is the Connecting to a Contract?
The first step on using a smart contract from a web-frontend is connecting to it. Connecting to the smart contract is actually composed by 3 simple steps:
- Connecting to the NEAR network (
testnet or mainnet)
- Initializing a Wallet, representing the user's wallet
- Initializing a Contract, representing the contract itself
In our examples we always do this within the initContract method:
<CodeTabs>
<Language value="🌐 - Javascript" language="js">
<Github fname="utils.js"
url="https://github.com/near-examples/docs-examples/blob/main/donation-rs/frontend/assets/js/near/utils.js" start="1" end="23" />
<Github fname="config.js"
url="https://github.com/near-examples/docs-examples/blob/main/donation-rs/frontend/assets/js/near/config.js" />
</Language>
</CodeTabs>
Then, we use initContract in the web-app logic to set up a "flow", i.e. a simple if where we decide what to do if the user is logged in or not.
<CodeTabs>
<Language value="🌐 - Javascript" language="js">
<Github fname="utils.js"
url="https://github.com/near-examples/docs-examples/blob/main/donation-rs/frontend/assets/js/index.js" start="44" end="54" />
</Language>
</CodeTabs>
info
When initializing the Contract object in the snippet above we are passing a dictionary: nearConfig. In that dictionary we set: the network to which we want to connect (testnet in our snippet), and where to store the user's login information (we store the user's keys in the website's local storage).
Read more...
What are the Calling View Methods?
Once we have setup the connection to the NEAR network and defined the Contract object we can readily call view methods.
View methods are those that perform read-only operations, and do not change the contract's state.
Because of their read-only nature, view methods are free to call, and do not require the user to be logged in.
<CodeTabs>
<Language value="🌐 - Javascript" language="js">
<Github fname="utils.js"
url="https://github.com/near-examples/docs-examples/blob/main/donation-rs/frontend/assets/js/near/utils.js"
start="48" end="56" />
</Language>
</CodeTabs>
The snippet above if part of our donation example. On it, we are calling total_donations and get_donation_list to retrieve the last 10 recorded donations. These methods only read from the contract, so they can be used readily without the user needing to log in.
Read more...
What is the User Sign-in?
In order to interact with non-view methods it is necessary to first sign in using a NEAR wallet. Signing in is as simple as requesting the walletConnection object to for signing in. Once we want to logout the user, we simply need to request the walletConnection to sign out.
<CodeTabs>
<Language value="🌐 - Javascript" language="js">
<Github fname="utils.js"
url="https://github.com/near-examples/docs-examples/blob/main/donation-rs/frontend/assets/js/near/utils.js"
start="35" end="35" />
</Language>
</CodeTabs>
Signing in actually means that the user's wallet creates and stores an access key in the web's local storage. By default, such key enables to expend a maximum of 0.25Ⓝ on GAS for calling our contract without asking the user to sign them.
However, if you attach money to any call, the user will be redirected to the wallet to confirm the transaction.
You can use walletConnection.account().function_call to call any method in any contract. However, the user will be redirected to the wallet and asked to accept the call.
Read more...
What are the Calling Change Methods?
Only after the user logs-in they can start calling change methods. Programmatically, calling change methods is similar to calling view methods, only that now you can attach money to the call, and specify how much GAS you want to use. It is important to notice that, if you ask for money to be attached in the call, then the user will be redirected to the NEAR wallet to accept the transaction.
<CodeTabs>
<Language value="🌐 - Javascript" language="js">
<Github fname="utils.js"
url="https://github.com/near-examples/docs-examples/blob/main/donation-rs/frontend/assets/js/near/utils.js"
start="60" end="63" />
</Language>
</CodeTabs>
Remember that you can use walletConnection.account().function_call to call methods in any contract. However, the user will be redirected to the wallet and asked to accept the call.
Read more...
What is the Wallet Redirection?
If you attach money to a change call, then the user will be redirected to their wallet to accept the transaction. After accepting, the user will be brought back to your website, with the resulting transaction hash being pass as part of the url (i.e. your-website.com/?transactionHashes=...).
If the method invoked returned a result, you can use the transaction hash to retrieve the result from the network. Assuming you created the near object as in the example above, then you query the result by doing:
<CodeTabs>
<Language value="🌐 - Javascript" language="js">
<Github fname="index.js"
url="https://github.com/near-examples/docs-examples/blob/main/donation-rs/frontend/assets/js/index.js"
start="69" end="75" />
<Github fname="utils.js"
url="https://github.com/near-examples/docs-examples/blob/main/donation-rs/frontend/assets/js/near/utils.js"
start="38" end="42" />
</Language>
</CodeTabs>
Read more...
What are the Handling Data Types?
When calling methods in a contract, or receiving results from them, you will need to correctly encode/decode parameters. For this, it is important to know how the contracts encode timestamps (u64) and money amounts (u128).
Time
The block timestamp in a smart contract is encoded using nanoseconds (i.e. 19 digits: 1655373910837593990). In contrast, Date.now() from javascript returns a timestamp in milliseconds (i.e 13 digits: 1655373910837). Make sure to convert between milliseconds and nanoseconds to properly handle time variables.
Money
Smart contracts speak in yocto NEAR, where 1Ⓝ = 10^24yocto, and the values are always encoded as strings.
- Convert from NEAR to yocto before sending it to the contract using
near-api-js.utils.format.parseNearAmount(amount.toString()).
- Convert a response in yoctoNEAR to NEAR using
near-api-js.utils.format.formatNearAmount(amount)
If the contract returns a Balance instead of a U128, you will get a "scientific notation" number instead of a string (e.g. 10^6 instead of "1000000"). In this case, you can convert the value to NEAR by doing:
function formatAmount(amount) {
  let formatted = amount.toLocaleString('fullwide', { useGrouping: false })
  formatted = utils.format.formatNearAmount(formatted)
  return Math.floor(formatted * 100) / 100
}
Read more...
What are the View Methods?
View methods are those that perform read-only operations. Calling these methods is free, and do not require to specify which account is being used to make the call:
- method:
query
- params:
request_type: call_functionfinality OR block_idaccount_id: "example.testnet"method_name: name_of_a_example.testnet_methodargs_base64: method_arguments_base_64_encoded
<Tabs>
<TabItem value="json" label="JSON" default>
{
  "jsonrpc": "2.0",
  "id": "dontcare",
  "method": "query",
  "params": {
    "request_type": "call_function",
    "finality": "final",
    "account_id": "dev-1588039999690",
    "method_name": "get_num",
    "args_base64": "e30="
  }
}
</TabItem>
<TabItem value="js" label="JavaScript">
const response = await near.connection.provider.query({
  request_type: "call_function",
  finality: "final",
  account_id: "dev-1588039999690",
  method_name: "get_num",
  args_base64: "e30=",
});
</TabItem>
<TabItem value="http" label="HTTPie">
http post https://rpc.testnet.near.org jsonrpc=2.0 id=dontcare method=query \
  params:='{
    "request_type": "call_function",
    "finality": "final",
    "account_id": "dev-1588039999690",
    "method_name": "get_num",
    "args_base64": "e30="
  }'
</TabItem>
</Tabs>
<details>
<summary>Example response: </summary>
<p>
{
  "jsonrpc": "2.0",
  "result": {
    "result": [48],
    "logs": [],
    "block_height": 17817336,
    "block_hash": "4qkA4sUUG8opjH5Q9bL5mWJTnfR4ech879Db1BZXbx6P"
  },
  "id": "dontcare"
}
Note: [48] is an array of bytes, to be specific it is an ASCII code of 0.near-sdk-rs and near-sdk-as return JSON-serialized results.
</p>
</details>
info What could go wrong?
If you encounter a error please check the RPC docs
Read more...
What are the Change Methods?
Change methods are those that perform both read and write operations. For these methods we do need to specify the account being used to make the call, since that account will expend GAS in the call.
Since calls to change methods need to be signed by an account, you will first need to create and sign the transaction that you want to send to the RPC.
For this, you currently need to make heavy use of near-api-js. Particularly, you need to:
- Create a transaction using the
near-api-js.transactions module.
- Sign the transaction using the
near-api-js.KeyStore.KeyPair
- Send the signed transaction to the RPC.
Read more...
What is the Create Transaction?
In order yo create a transaction you will use near-api-js.transactions.createTransaction which takes as input:
signerId: the account ID of the transaction originator.signerPublicKey: the signer public key, see bellow.receiverId: the account ID of the transaction recipient.nonceForPublicKey: a unique number, see bellowactions: An action, built from near-api-js.transactions.blockHash
signerPublicKey
The public key of the signer must be encoded as an object with two key value pairs: keyType and data.
Here is one possible way to get it:
const privateKey = "private-key-here";
const keyPair = nearAPI.utils.key_pair.KeyPairEd25519.fromString(privateKey);
const publicKey = keyPair.getPublicKey()
nonceForPublicKey
A unique number or nonce is required for each transaction signed with an access key. To ensure a unique number is created for each transaction, the current nonce should be queried and then incremented by 1.
const provider = new near-api-js.providers.JsonRpcProvider(
  `https://rpc.testnet.near.org`
);
const accessKey = await provider.query(
  `access_key/influencer.testnet/${publicKey.getPublicKey().toString()}`,
  ""
);
const nonce = accessKey.nonce + 1;
blockHash
Each transaction requires a current block hash (within 24hrs) to prove that the transaction was created recently. The hash must be converted to an array of bytes using the base_decode method found in near-api-js.
const recentBlockHash = near-api-js.utils.serialize.base_decode(
  accessKey.block_hash
);
Read more...
What is the Sign Transaction?
Now that the transaction is created, we sign it before sending it to the NEAR blockchain. At the lowest level, there are four steps to this process.
- Using
nearAPI, we call on serialize() to serialize the transaction in Borsh.
const serializedTx = near-api-js.utils.serialize.serialize(
  nearAPI.transactions.SCHEMA,
  transaction
);
- Hash the serialized transaction using a
sha256 cryptographic hashing algorithm.
const serializedTxHash = new Uint8Array(sha256.sha256.array(serializedTx));
- Create a signature with the
keyPair.
const signature = keyPair.sign(serializedTxHash);
- Construct the signed transaction using
near-api-js SignedTransaction class.
const signedTransaction = new nearAPI.transactions.SignedTransaction({
  transaction,
  signature: new nearAPI.transactions.Signature({
    keyType: transaction.publicKey.keyType,
    data: signature.signature,
  }),
});
Read more...
What is the Rust and Wasm?
Follow these instructions for setting up Rust. Then, add the wasm32-unknown-unknown toolchain which enables compiling Rust to Web Assembly (wasm), the low-level language used by the NEAR platform.
Linux and MacOS:
# Get rust
curl --proto '=https' --tlsv1.2 https://sh.rustup.rs -sSf | sh
source $HOME/.cargo/env
# Add the wasm toolchain
rustup target add wasm32-unknown-unknown
Read more...
What is the Using Apple M1 Machine (arm64)?
The architecture of Apple M1 machines (arm64) has been released recently, and many of the libraries on which we rely are
still not supporting it. Because of this, you might find some error while trying to develop smart contract on such a platform.
Here we list some of the workarounds you will need in order to successfully build NEAR contracts.
near-sdk-rs {#near-sdk-rs}
If you're trying to build a Rust smart contract on an Apple M1 (arm64), you'll get an unsupported platform error such as:
npm ERR! code 1
npm ERR! path /Users/near/smart-contract/node_modules/near-vm
npm ERR! command failed
npm ERR! command sh -c node ./install.js
npm ERR! /Users/near/smart-contract/node_modules/near-vm/getBinary.js:17
npm ERR!     throw new Error(`Unsupported platform: ${type} ${arch}`);
npm ERR!     ^
npm ERR!
npm ERR! Error: Unsupported platform: Darwin arm64
You can solve it with this workaround:
rustup target add x86_64-apple-darwin
rustup default stable-x86_64-apple-darwin
This will force Rust to compile to x86, and your Mac will execute the binary using Rosetta 2.
near-sdk-as {#near-sdk-as}
If you cannot install near-sdk-as and you get an Unsupported platform: Darwin arm64 error while trying to build an AssemblyScript smart contract on an Apple M1 (arm64):
error /Users/near/guest-book/node_modules/near-vm: Command failed.
Exit code: 1
Command: node ./install.js
Arguments:
Directory: /Users/near/guest-book/node_modules/near-vm
Output:
/Users/near/guest-book/node_modules/near-vm/getBinary.js:17
    throw new Error(`Unsupported platform: ${type} ${arch}`);
    ^
Error: Unsupported platform: Darwin arm64
Use this command to install the dependencies without downloading the VM:
npm install --save-dev --ignore-scripts near-sdk-as
info
If everything else installs correctly, you can disregard this error. You should still be able to build, deploy, and run the AS smart contract.
Read more...
How to start building on NEAR?
You have two options to start Hello NEAR. The first and recommended is to use the app through Gitpod (a web-based interactive environment). The second option is to start the project locally by using create-near-app, our node-based utility.
Read more...
What is the Gitpod?
| 🦀 - Rust |
🚀 - AssemblyScript |
| <a href="https://gitpod.io/#https://github.com/near-examples/hello-near-rs.git"><img src="https://gitpod.io/button/open-in-gitpod.svg" alt="Open in Gitpod" /></a> |
<a href="https://gitpod.io/#https://github.com/near-examples/hello-near-as.git"><img src="https://gitpod.io/button/open-in-gitpod.svg" alt="Open in Gitpod" /></a> |
| A new browser window will open automatically with the code, give it a minute and the frontend will pop-up (make sure the pop-up window is not blocked). |
|
Read more...
What is the Create Near App (node)?
<Tabs className="language-tabs" groupId="code-tabs">
<TabItem value={0} label="🦀 - Rust">
  npx create-near-app hello-near
  cd hello-near
  yarn && yarn start
</TabItem>
<TabItem value={1} label="🚀 - AssemblyScript">
  npx create-near-app hello-near --contract=assemblyscript
  cd hello-near
  yarn && yarn start
</TabItem>
</Tabs>
Your contract will be compiled and deployed to an account in the testnet network. When done, a browser window should open.
Read more...
What is the Creating a DAO?
To create a DAO you first need to deploy the DAO contract factory, and initialize it.
Once deployed and initialized, you can ask the factory to create a new DAO for you. On creation, you will define parameters such as the DAO's name, its purpose, and its council. Defining the right council is important since its members are the only accounts allowed to vote on proposals.
<Tabs className="language-tabs">
<TabItem value="cli" label="NEAR CLI">
# 1. Deploy the contract in a testnet account
near dev-deploy <factory-account> --wasmFile=<sputnikdao-factory> --accountId <your-account>
# 2. Initialize factory contract
near call <factory-account> new --accountId  <your-account> --gas 100000000000000
# 3. Define a council and create DAO
export COUNCIL='["<council-member-1>", "<council-member-2>"]'
export ARGS=`echo '{"config": {"name": "<name>", "purpose": "<purpose>", "metadata":"<metadata>"}, "policy": '$COUNCIL'}' | base64`
near call  <factory-account> create "{\"name\": \"<name>\", \"args\": \"$ARGS\"}" --accountId <your-account> --amount 10 --gas 150000000000000
</TabItem>
</Tabs>
Read more...
What is the Voting policy?
Currently, the DAO supports two different types of voting policies: TokenWeight, and RoleWeight.
When the vote policy is TokenWeight, the council votes using tokens. The weigh of a vote is the proportion of tokens used for voting over the token's total supply.
When the vote policy is RoleWeight(role), the vote weigh is computed as "one over the total number of people with the role".
Both voting policies further include a "threshold" for passing a proposal, which can be a ratio or a fixed number. The ratio indicates that you need a proportion of people/tokens to approve the proposal (e.g. half the people need to vote, and to vote positively). A fixed number indicated that you need a specific number of votes/tokens to pass the proposal (e.g. 3 people/tokens are enough to approve the proposal).
Read more...
What is the Adding a Proposal?
By default, anyone can add a proposal to the DAO, but a minimum of 1Ⓝ needs to be attached as a bond. This however can be changed by setting roles in the DAO. The type of proposals that can be added is predefined, and include actions such as:
- Adding a member to the council.
- Calling a method in a smart contract.
- Transferring NEAR or a FT to some account.
Each action has its own kind of arguments. The complete list of actions can be found here.
<Tabs className="language-tabs">
<TabItem value="cli" label="NEAR CLI">
near call <dao-account> add_proposal \
'{"proposal": {"description": "<description>", "kind": {"<proposalKind>": {"<argument>": "<value>", "<argument>": "<value>"}}}}' \
--accountId proposer.testnet \
--amount 1
</TabItem>
</Tabs>
Read more...
What is the Acting on a Proposal?
Once a proposal is added, council members can act on them calling the act_proposal method. The available actions are one of the following: AddProposal, RemoveProposal, VoteApprove, VoteReject, VoteRemove, Finalize, or MoveToHub.
<Tabs className="language-tabs">
<TabItem value="cli" label="NEAR CLI">
near call <dao-account> act_proposal '{"id": <proposal-id>, "action": "<action>"}' --accountId <a-council-account-id>
</TabItem>
</Tabs>
Each time somebody acts on the proposal, the DAO checks if the proposal has enough votes to be approved. If the proposal is approve, then the DAO executes the proposal (for example, adding a new member to the council).
Read more...
How to create a Fungible Token?
Creating a new FT is as simple as deploying a new FT contract and initializing it. On initialization you will define the token's metadata such as its name (e.g. Ethereum), symbol (e.g. ETH) and total supply (e.g. 10M). You will also define an owner, which will own the tokens total supply.
<Tabs className="language-tabs">
<TabItem value="cli" label="NEAR CLI">
# 1. Deploy the contract in a testnet account
near dev-deploy --wasmFile fungible_token.wasm
# 2. Initialize the contract with metadata
near call <ft-contract> new '{"owner_id": "<owner-account>", "total_supply": "1000000000000000", "metadata": { "spec": "ft-1.0.0", "name": "Example Token Name", "symbol": "EXLT", "decimals": 8 }}' --accountId <ft-contract>
</TabItem>
</Tabs>
info
On initialization you will define an owner, who will own ALL the tokens.
Read more...
How to query FT metadata?
You can query the FT's metadata by calling the ft_metadata.
<Tabs className="language-tabs">
<TabItem value="cli" label="NEAR CLI">
near view <ft-contract> ft_metadata
</TabItem>
</Tabs>
Read more...
How to register a User in FT?
In order for a user to own and transfer tokens they need to first register in the contract. This is done by calling storage_deposit and attaching 0.00125Ⓝ. This method also allows to pay for other users to register them.
<Tabs className="language-tabs">
<TabItem value="cli" label="NEAR CLI">
near call <ft-contract> storage_deposit '{"account_id": "<account-to-register>"}' --accountId <your-account> --amount 0.00125
</TabItem>
</Tabs>
info
You can make sure a user is registered by asserting they have a storage_balance_of greater than 0.00125 Ⓝ.
After you call the storage_deposit the FT will appear in the NEAR WALLET.
Read more...
Hot to get FT balance?
To know how many coins a user has you will need to query the method ft_balance_of.
<Tabs className="language-tabs">
<TabItem value="cli" label="NEAR CLI">
near view <ft-contract> ft_balance_of '{"account_id": "<users-account>"}'
</TabItem>
</Tabs>
caution
Keep in mind the decimals from the metadata. A balance of 150 FT for a token with 2 decimals actually represents 1.50 FT.
Read more...
What is the Transferring?
To send FT to another account you will use the ft_transfer method, indicating the receiver and the amount of FT you want to send.
<Tabs className="language-tabs">
<TabItem value="cli" label="NEAR CLI">
near call <ft-contract> ft_transfer '{"receiver_id": "<receiver-account>", "amount": "<amount>"}' --accountId <your-account> --depositYocto 1
</TabItem>
</Tabs>
Implement events to be able to track FT transfers in real time.
warning
In order to send a fungible token to an account, both the sender and receiver must be registered in the FT contract.
Read more...
How to attach FT to a Call?
Natively, only NEAR tokens (Ⓝ) can be attached to a method calls. However, the FT standard enables to attach fungible tokens in a call by using the FT-contract as intermediary. This means that, instead of you attaching tokens directly to the call, you ask the FT-contract to do both a transfer and a method call in your name.
<Tabs className="language-tabs">
<TabItem value="cli" label="NEAR CLI">
near call <ft-contract> ft_transfer_call '{"receiver_id": "<receiver-contract>", "amount": "<amount>", "msg": "<a-string-message>"}' --accountId <user_account_id> --depositYocto 1
</TabItem>
</Tabs>
Example
Assume you want to attach some FT (🪙) to a call on the receiver contract. The workflow is as follows:
- You call
ft_transfer_call in the 🪙-contract passing: the receiver, a message, and the amount.
- The FT contract transfers the amount to the receiver.
- The FT contract calls
receiver.ft_on_transfer(sender, msg, amount).
- The FT contract handles errors in the
ft_resolve_transfer callback.
- The FT contract returns you how much of the attached amount was actually used.
The ft_on_transfer method
From the workflow above it follows that the receiver we want to call needs to implement the ft_on_transfer method. When executed, such method will know:
- Which FT was transferred, since it is the
predecessor account.
- Who is sending the FT, since it is a parameter
- How many FT were transferred, since it is a parameter
- If there are any parameters encoded as a message
The
ft_on_transfer must return how many FT tokens it used, so the FT contract knows how many to transfer you back.
Read more...
How to track events?
You can track real time events (such as transfers) by implementing the FT Event Standards.
Events are simple to use, because they are just login messages formatted in a standardize way. Since these logged messages are public, a service
can then be built to track them in real time.
Read more...
How to mint an NFT?
In order to create a new NFT (a.k.a. mint it) you need first to deploy an NFT contract and initialize it with an owner. Currently, the owner simply sets an internal variable (Contract.owner_id), meaning it is NOT the default owner of all minted NFTs.
Once deployed and initialized, you can call the nft_mint method. You will need to pass as parameters a unique id, an owner, the token's metadata, and (optionally) royalties. The metadata will include information such as the title, a description, and an URL to associated media.
<Tabs className="language-tabs">
<TabItem value="cli" label="NEAR CLI">
# 1. Deploy the contract in a testnet account
near dev-deploy --wasmFile non_fungible_token.wasm
# 2. Initialize NFT contract
# 3. Mint an NFT
near call <nft-contract> nft_mint '{"token_id": "<token-unique-id>", "receiver_id": "<nft-owner-account>", "token_metadata": {"title": "<title>", "description": "<description>", "media": "<url>" }, "royalties": {"<account>" : <percentage>, "<account>" : <percentage>}}' --accountId <your-account>
</TabItem>
</Tabs>
info
See the metadata standard for the full list of TokenMetadata parameters.
Implement events to be able to track NFT mints in real time.
Read more...
How to mint an NFT collections?
Many times people want to create multiple 100 copies of an NFT (this is called a collection). In such cases, what you actually need to do is to mint 100 different NFTs with the same metadata (but different token-id).
Read more...
What are NFT royalties?
You might have noticed that one of the parameters is a structure called royalties. Royalties enable you to create a list of users that should get paid when the token is sell in a marketplace. For example, if anna has 5% of royalties, each time the NFT is sell, anna should get a 5% of the selling price.
Read more...
How to approve users in NFT contact?
You can authorize other users to transfer an NFT you own. This is useful, for example, to enable listing your NFT in a marketplace. In such scenario, you trust that the marketplace will only transfer the NFT upon receiving a certain amount of money in exchange.
<Tabs className="language-tabs">
<TabItem value="cli" label="NEAR CLI">
near call <nft-contract> nft_approve '{
 "token_id": "<token-unique-id>",
 "account_id": "<authorized-account>",
 "msg": "<json-structure>"
}' --accountId <your-account> --depositYocto 1
</TabItem>
</Tabs>
info
If the msg parameter is included, then a cross-contract call will be made to <authorized_account>.nft_on_approve(msg). Which in turn will make a callback to nft_resolve_transfer in your NFT contract.
Read more...
How to transfer an NFT?
Transferring an NFT can happen in two scenarios: (1) you ask to transfer an NFT, and (2) an authorized account asks to transfer the NFT. In both cases, it is necessary to invoke the nft_transfer method, indicating the token id, the receiver, and an (optionally) an approval_id.
<Tabs className="language-tabs">
<TabItem value="cli" label="NEAR CLI">
near call <nft-contract> nft_transfer '{"receiver_id": "<receiver-account>", "token_id": "<token-unique-id>"}' --accountId <your-account> --depositYocto 1
</TabItem>
</Tabs>
Implement events to be able to track NFT transfers in real time.
Read more...
How to attach NFTs to a Call?
Natively, only NEAR tokens (Ⓝ) can be attached to a method calls. However, the NFT standard enables to attach a non-fungible tokens in a call by using the NFT-contract as intermediary. This means that, instead of you attaching tokens directly to the call, you ask the NFT-contract to do both a transfer and a method call in your name.
<Tabs className="language-tabs">
<TabItem value="cli" label="NEAR CLI">
near call <nft-contract> nft_transfer_call '{"receiver_id": "<receiver-contract>", "token_id": "<token_id>", "msg": "<a-string-message>"}' --accountId <your-account> --depositYocto 1
</TabItem>
</Tabs>
info
Optionally, a memo parameter can be passed to provide more information to your contract.
Read more...
What are the NEAR Workspaces?
In NEAR, integration tests are implemented using a framework called Workspaces. Workspaces comes in two flavors: 🦀 Rust and 🌐 Typescript.
If you used one of our examples as template, then integration testing using workspaces is already implemented, and you simply need to run yarn test:integration from the project's root folder.
Read more...
What are the Programming Languages?
Smart Contracts in the NEAR blockchain are encoded using WebAssembly. However, you don't need to write WebAssembly, instead, you can use high-level languages such as Rust and AssemblyScript, which then get compiled to Web Assembly.
While it is not necessary to be an expert in either language, during these docs we will assume you have a basic knowledge of at least one of them. If you never used any we recommend you to start here with Rust and here with AssemblyScript.
Read more...
What is the Rust?
Rust is a programming language designed for performance and safety. It is syntactically similar to C++, but can guarantee memory safety without resorting to garbage collection. Rust has proven to be a mature and secure language, which makes it ideal to write smart contracts. Because of this, Rust is the preferred programming language for writing smart contracts on NEAR. While there might be a learning curve for those coming from web development, learning Rust enables to write safer and faster contracts. Furthermore, core contracts such as Fungible Tokens and DAOs are currently only available in Rust.
Read more...
What is the AssemblyScript?
AssemblyScript is a dialect of TypeScript programming language that compiles to WebAssembly. The syntax resembles JavaScript, but with strict and static typing. One can think of it as a mix of TypeScript's high level syntax and C's low-level capabilities. Thanks to this, the resulting WebAssembly modules can profit from predictable performance while guaranteeing a small binary size. However, this comes with the tradeoff of having to strictly type all variables and structures, and therefore not having any, union types or undefined variables.
caution
Because of its maturity and safety features, we strongly recommend to use Rust when writing financial contracts.
Read more...
What is the Starting the Donation Example?
You have two options to start the Donation Example. The first and recommended is to use the app through Gitpod, which will open a web-based interactive environment. The second option is to clone the repository locally, for which you will need to install all the Prerequisites.
<Tabs className="language-tabs" groupId="code-tabs">
<TabItem value={0} label="🦀 - Rust">
| Gitpod |
Clone locally |
| <a href="https://gitpod.io/#https://github.com/near-examples/docs-examples/blob/main/donation-rs"><img src="https://gitpod.io/button/open-in-gitpod.svg" alt="Open in Gitpod" /></a> |
🦀 https://github.com/near-examples/docs-examples -> donation-rs |
| </TabItem> |
|
| <TabItem value={1} label="🚀 - AssemblyScript"> |
|
| Gitpod |
Clone locally |
| ------------------------------------------------------------------------------------------------------------------------------------------------------------------------------------ |
----------------------------------------------------------------- |
| <a href="https://gitpod.io/#https://github.com/near-examples/docs-examples/blob/main/donation-as"><img src="https://gitpod.io/button/open-in-gitpod.svg" alt="Open in Gitpod" /></a> |
🚀 https://github.com/near-examples/docs-examples -> donation-as |
| </TabItem> |
|
| </Tabs> |
|
If you choose Gitpod a new browser window will open automatically with the code. Navigate to the donation-as or donation-rs folder and use yarn and yarn start. |
|
The project will compile and eventually the frontend will open in a new window/tab (make sure the pop-up window is not blocked). If you are running the app locally, enter the directory where you cloned it and use yarn to install dependencies, and yarn start to start it. |
|
cd counter
yarn
yarn start
Your contract will then be compiled and deployed to an account in the testnet network. When done, a browser window should open.
Read more...
What is the Interacting With the dApp?
Go ahead and login with your NEAR account. If you don't have one, you will be able to create one in the moment. Once logged in, input the amount of NEAR you want
to donate and press the donate button. You will be redirected to the NEAR Wallet to confirm the transaction. After confirming it, the donation will be listed
in the "Latest Donations".
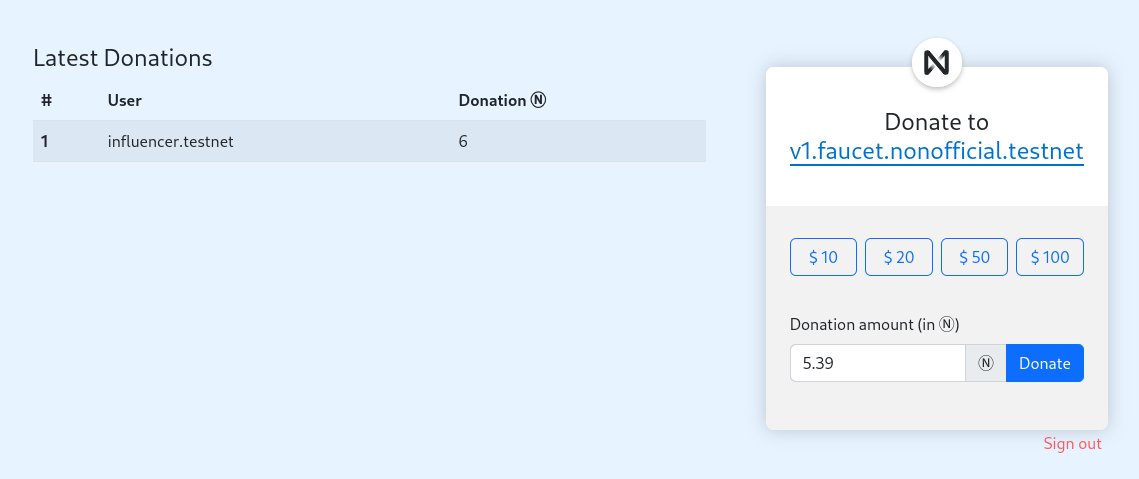 Frontend of the Donation App
Read more...
What is the Structure of a dApp?
Now that you understand what the dApp does, let us take a closer look to its structure:
- The frontend code lives in the
/frontend folder.
- The smart contract code is in the
/contract folder.
- The compiled smart contract can be found in
/out/main.wasm.
- The account's name in which the contract was deployed is in
/neardev/dev-account.
Read more...
What is the Contract?
The contract exposes methods to donate money (donate), and methods to retrieve the recorded donations (e.g. get_donation_by_number).
<CodeTabs>
<Language value="🦀 - Rust" language="rust">
<Github fname="lib.rs"
url="https://github.com/near-examples/docs-examples/blob/main/donation-rs/contract/src/lib.rs"
start="19" end="44" />
</Language>
<Language value="🚀 - AssemblyScript" language="ts">
<Github fname="index.ts"
url="https://github.com/near-examples/docs-examples/blob/main/donation-as/contract/assembly/index.ts"
start="11" end="34"/>
</Language>
</CodeTabs>
Read more...
What is the Frontend?
The frontend is composed by a single HTML file (/index.html). This file defines the components displayed in the screen.
The website's logic lives in /assets/js/index.js, which communicates with the contract through /assets/js/near/utils.js.
An interesting aspect of the donation example is that it showcases how to retrieve a result after being redirected to the
NEAR wallet to accept a transaction.
<CodeTabs>
<Language value="🌐 - Javascript" language="js">
<Github fname="index.js"
url="https://github.com/near-examples/docs-examples/blob/main/donation-rs/frontend/assets/js/index.js"
start="68" end="74" />
<Github fname="near/utils.js"
url="https://github.com/near-examples/docs-examples/blob/main/donation-rs/frontend/assets/js/near/utils.js"
start="38" end="41" />
</Language>
</CodeTabs>
Read more...
What is the Starting the Project?
You have two options to start using the project. The first and recommended is to use the app through Gitpod, which will open a web-based interactive environment. The second option is to clone the repository locally, for which you will need to install all the Prerequisites.
<Tabs className="language-tabs" groupId="code-tabs">
<TabItem value={1} label="🚀 - AssemblyScript">
| Gitpod |
Clone locally |
| <a href="https://gitpod.io/#https://github.com/near-examples/guest-book.git"><img src="https://gitpod.io/button/open-in-gitpod.svg" alt="Open in Gitpod" /></a> |
🚀 https://github.com/near-examples/guest-book |
| </TabItem> |
|
| <TabItem value={0} label="🦀 - Rust"> |
|
| Gitpod |
Clone locally |
| ------------------- |
--------------------- |
| Not Implemented yet |
🦀 Not Implemented yet |
| </TabItem> |
|
| </Tabs> |
|
If you choose Gitpod a new browser window will open automatically with the code, give it a minute and the frontend will pop-up (make sure the pop-up window is not blocked). If you are running the app locally, enter the directory where you cloned it and use yarn to install dependencies, and yarn start to start it. |
|
cd counter
yarn
yarn start
Your contract will then be compiled and deployed to an account in the testnet network. When done, a browser window should open.
Read more...
What is the Interacting With the Guest Book?
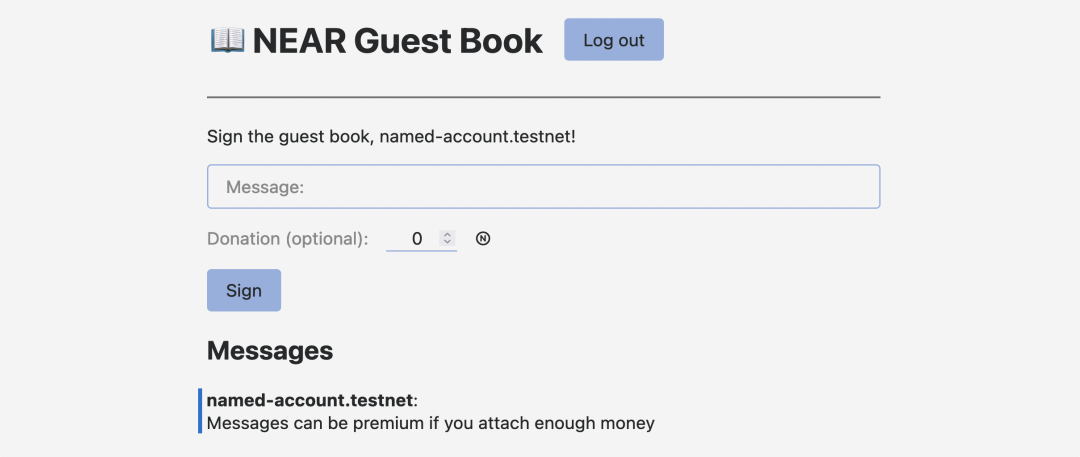 Frontend of the Guest Book app
Go ahead and login with your NEAR account. If you don't have one, you will be able to create one in the moment. Once logged in,
you will be able to sign a message in the guest book. You can further send some money alongside your message. If you attach
more than 0.01Ⓝ then your message will be marked as "premium".
Frontend of the Guest Book app
Go ahead and login with your NEAR account. If you don't have one, you will be able to create one in the moment. Once logged in,
you will be able to sign a message in the guest book. You can further send some money alongside your message. If you attach
more than 0.01Ⓝ then your message will be marked as "premium".
Read more...
What is the Interacting with the Project?
Since this example does not have a frontend, we will interact with it through the NEAR CLI.
<Tabs className="language-tabs" groupId="code-tabs">
<TabItem value={0} label="🦀 - Rust">
| Gitpod |
Clone locally |
| <a href="https://gitpod.io/#https://github.com/near-examples/docs-examples/blob/main/cross-contract-hello-rs"><img src="https://gitpod.io/button/open-in-gitpod.svg" alt="Open in Gitpod" /></a> |
🦀 https://github.com/near-examples/docs-examples -> cross-contract-hello-rs |
| </TabItem> |
|
| <TabItem value={1} label="🚀 - AssemblyScript"> |
|
| Gitpod |
Clone locally |
| ------------------------------------------------------------------------------------------------------------------------------------------------------------------------------------------------ |
----------------------------------------------------------------------------- |
| <a href="https://gitpod.io/#https://github.com/near-examples/docs-examples/blob/main/cross-contract-hello-as"><img src="https://gitpod.io/button/open-in-gitpod.svg" alt="Open in Gitpod" /></a> |
🚀 https://github.com/near-examples/docs-examples -> cross-contract-hello-as |
| </TabItem> |
|
| </Tabs> |
|
| <!-- Expand on this explanation adding snippets --> |
|
| To try the project you will need to: |
|
- Deploy the Hello NEAR contract. A compiled version is available in
/test/aux_contracts/hello-near.wasm.
- Deploy the Cross Contract Example. A compiled version is available in
/out/main.wasm.
- Initialize the cross-contract example using the account's address of the
hello-near contract deployed in (1).
- Call
set_greeting and get_greeting in the cross-contract example.
Read more...
What is the Structure of the Project?
The project is organized as follows:
- The smart contract code is in the
/contract folder.
- The compiled smart contract can be found in
/out/main.wasm.
- A compiled
Hello NEAR contract can be found in /test/aux_contracts/hello-near.wasm.
Read more...
What is the App Overview?
The app is fairly simple: the user signs in and hits the <kbd>Mint NFT</kbd> button. Once the user hits the mint button, a "Go Team" NFT is minted and sent to their NEAR Wallet.
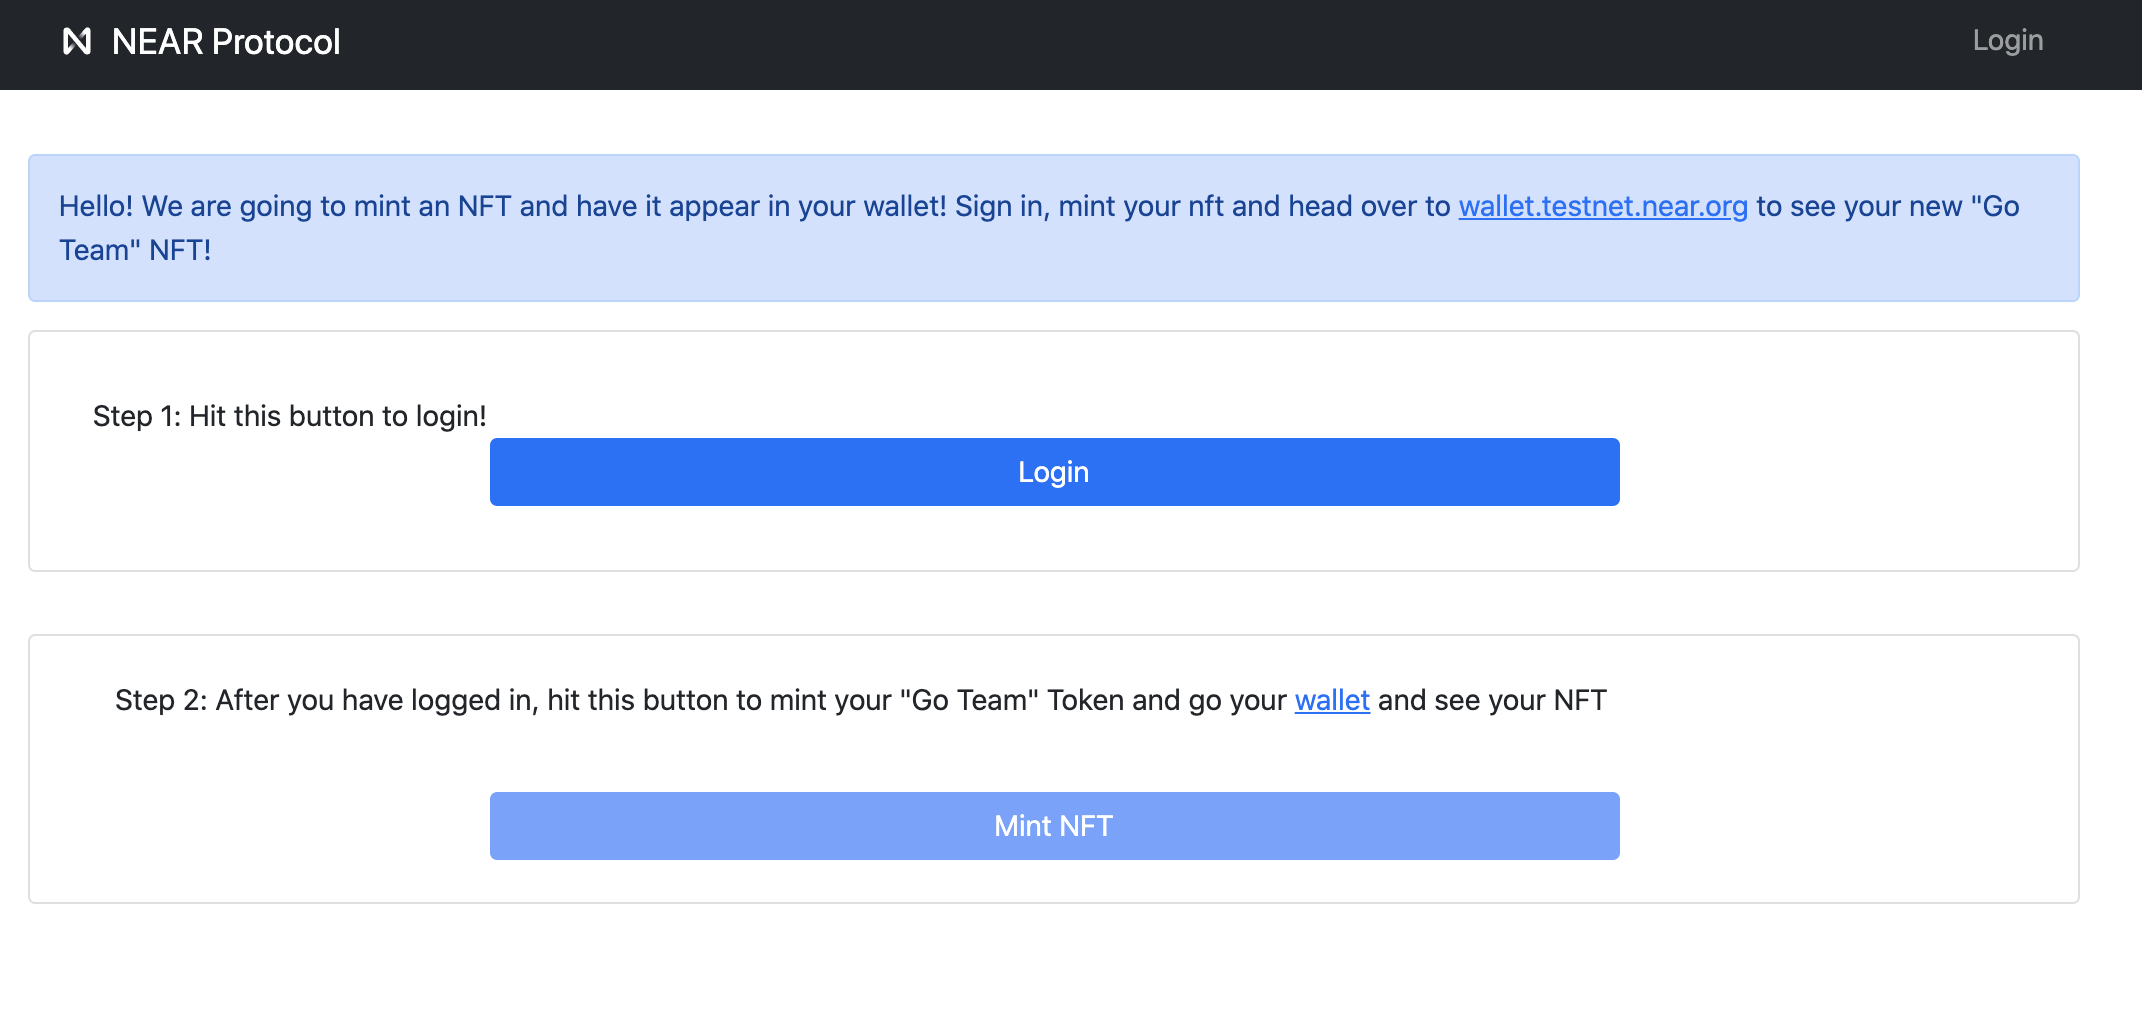
Read more...
What is the Smart Contract code?
The code for the NFT smart contract can be found in the Zero to Hero NFT tutorial's GitHub repository, under the main branch.
The contract methods used in this application are as follows:
nft_mint: Function used to mint tokens.check_token: Custom function created to check for the existence of a token. This helps to ensure one token per user.
Read more...
What is the Front-end?
The front-end of the contract was implemented using create-near-app. React Bootstrap was used for the styling of the application.
To bootstrap your React front-end, run the following command on your terminal:
npx create-near-app --frontend react --contract rust
Then, simply import the contract files from the main branch, and you'll have the needed structure to run the application.
Read more...
What is the Start?
Upon mounting the application's components, the app checks for the existence of a non-fungible token.
https://github.com/near-examples/nft-tutorial-frontend/blob/master/src/App.js#L24-L46
If no prior NFT has been minted, the mint button will be available for use.
Read more...
What is the Mint button?
Here is the function behind the mint button. The meta data has been filled out for the user already:
token_id is set by the user's account id,- and the
media link is hard-coded to a goteam-gif.gif hosted on IPFS.
https://github.com/near-examples/nft-tutorial-frontend/blob/master/src/Components/MintingTool.js#L7-L23
After hitting the <kbd>Mint NFT</kbd> button the user will be able to check out the newly minted NFT at wallet.testnet.near.org, under the Wallet's Collectibles tab.
Read more...
What are the Examples?
| Title |
Description |
| 👋 Hello NEAR |
Hello NEAR is a friendly decentralized App that stores a greeting message. It is one of the simplest contracts you can create, and the perfect gateway to introduce yourself in the world of smart contracts. |
| 🧮 Count on NEAR |
Count on NEAR is a decentralized app that stores a simple counter, enabling to increment, decrement and reset it. |
| 📖 Guest Book |
The Guest Book is a simple app that stores messages from users, allowing to attach money to them. |
| 🙏 Donation |
Our Donation example enables to forward money to an account while keeping track of it. It is one of the simplest examples on making a contract receive and send money. |
| 📞 Cross-Contract Call |
This example performs the simplest cross-contract call possible: it calls our Hello NEAR example to set and retrieve a greeting. It is the perfect gateway to the world of interoperative contracts. |
Read more...
What are the NEP-297 - Events?
In NEAR, Events use the standard logs capability of contracts, since every log is forever stored in the blockchain. In this way,
Events are normal log entries that start with the EVENT_JSON: prefix, followed by a single valid JSON string. The JSON string
must codify an object with the following interface:
interface EventLogData {
    standard: string, // name of standard, e.g. nep171
    version: string, // e.g. 1.0.0
    event: string, // type of the event, e.g. nft_mint
    data?: unknown, // event data defined in the nep171
}
See the NEP-297 page for examples.
warning
There is a known limitation of 16kb strings when capturing logs
Read more...
What is the NEAR Explorer?
What is the Stats Gallery?
Created by the community, Stats Gallery gamifies the experience of looking to an account, adding levels and badges based on the account's activity. One of its
best features is that it allows you to see the contract's methods.
 Account view in Stats Gallery
Read more...
What is the Connecting to the Database?
You can use any database manager compatible with PostgreSQL. If you don't know any, we can recommend you to try DBeaver Community.
| Network |
Host |
Port |
Database |
Username |
Password |
| mainnet |
mainnet.db.explorer.indexer.near.dev |
5432 |
mainnet_explorer |
public_readonly |
nearprotocol |
| testnet |
testnet.db.explorer.indexer.near.dev |
5432 |
testnet_explorer |
public_readonly |
nearprotocol |
Read more...
What is the Database Structure?
Please bear in mind that the structure might evolve or change with time.
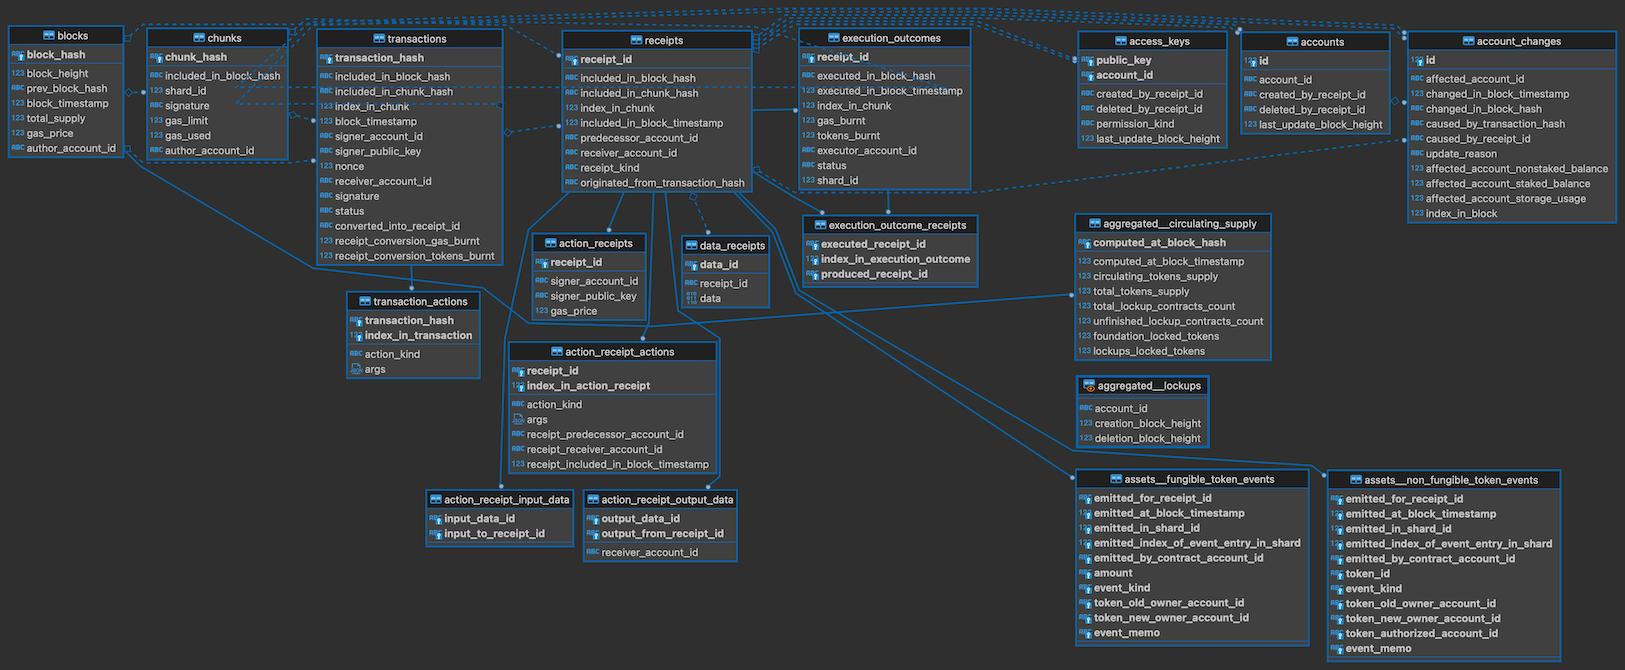
Read more...
What is the Transactions Calling a Method?
Query for all transaction that called contribute in the v1.faucet.nonofficial.testnet testnet account.
select r.predecessor_account_id, t.transaction_hash
from receipts r, action_receipt_actions ara, transactions t
where r.receiver_account_id ='v1.faucet.nonofficial.testnet'
  and ara.receipt_id = r.receipt_id
  and ara.action_kind = 'FUNCTION_CALL'
  and ara.args @> '{"method_name": "contribute"}'
  and t.transaction_hash = r.originated_from_transaction_hash
Read more...
What is the Users, Status and Attached Money?
Query for all users that called contribute in v1.faucet.nonofficial.testnet, how much they attached to the call, and the transaction status.
select t.transaction_hash, eo.status, r.predecessor_account_id , ara.args -> 'deposit' as deposit
from receipts r, action_receipt_actions ara, transactions t, execution_outcomes eo
where r.receiver_account_id ='v1.faucet.nonofficial.testnet'
  and ara.receipt_id = r.receipt_id and ara.action_kind = 'FUNCTION_CALL'
  and ara.args @> '{"method_name": "contribute"}'
  and t.transaction_hash = r.originated_from_transaction_hash
  and r.receipt_id = eo.receipt_id
Read more...
What is the Sent Money?
Query for all the transfers going out from v1.faucet.nonofficial.testnet.
select r.receiver_account_id, ara.args -> 'deposit' as deposit
from receipts r, action_receipt_actions ara
where r.predecessor_account_id  ='v1.faucet.nonofficial.testnet'
  and ara.receipt_id = r.receipt_id and ara.action_kind = 'TRANSFER'
Read more...
Can I use near-api-js on a static html page?
Yes! See examples below:
<script src="https://cdn.jsdelivr.net/npm/near-api-js@0.41.0/dist/near-api-js.min.js"></script>
<details>
<summary>Example Implementation: </summary>
<p>
<!DOCTYPE html>
<html lang="en">
<head>
  <meta charset="UTF-8">
  <meta http-equiv="X-UA-Compatible" content="IE=edge">
  <meta name="viewport" content="width=device-width, initial-scale=1.0">
  <title>Document</title>
</head>
<body>
  <ul id="messages"></ul>
  <textarea id="text" placeholder="Add Message"></textarea>
  <button id="add-text">Add Text</button>
  <script src="https://cdn.jsdelivr.net/npm/near-api-js@0.41.0/dist/near-api-js.min.js"></script>
  <script>
    // connect to NEAR
    const near = new nearApi.Near({
      keyStore: new nearApi.keyStores.BrowserLocalStorageKeyStore(),
      networkId: 'testnet',
      nodeUrl: 'https://rpc.testnet.near.org',
      walletUrl: 'https://wallet.testnet.near.org'
    });

    // connect to the NEAR Wallet
    const wallet = new nearApi.WalletConnection(near, 'my-app');
    // connect to a NEAR smart contract
    const contract = new nearApi.Contract(wallet.account(), 'guest-book.testnet', {
      viewMethods: ['getMessages'],
      changeMethods: ['addMessage']
    });
    const button = document.getElementById('add-text');
    if (!wallet.isSignedIn()) {
      button.textContent = 'SignIn with NEAR'
    }
    // call the getMessages view method
    contract.getMessages()
      .then(messages => {
        const ul = document.getElementById('messages');
        messages.forEach(message => {
          const li = document.createElement('li');
          li.textContent = `${message.sender} - ${message.text}`;
          ul.appendChild(li);
        })
      });
    // Either sign in or call the addMessage change method on button click
    document.getElementById('add-text').addEventListener('click', () => {
      if (wallet.isSignedIn()) {
        contract.addMessage({
          args: { text: document.getElementById('text').value },
          amount: nearApi.utils.format.parseNearAmount('1')
        })
      } else {
        wallet.requestSignIn({
          contractId: 'guest-book.testnet',
          methodNames: ['getMessages', 'addMessage']
        });
      }
    });
  </script>
</body>
</html>
</p>
</details>
Read more...
How do I attach gas / a deposit?
After contract is instantiated you can then call the contract and specify the amount of attached gas.
await contract.method_name(
  {
    arg_name: "value", // argument name and value - pass empty object if no args required
  },
  "300000000000000", // attached GAS (optional)
  "1000000000000000000000000" // attached deposit in yoctoNEAR (optional)
);
Read more...
What is the Missing contract method?
Missing a contract method when trying to call a contract? Check to see if you added the view or change methods when instantiating your contract.
Example:
const contract = await new nearAPI.Contract(
  walletConnection.account(),
  'guest-book.testnet',
  {
    viewMethods: ["getMessages"],
    changeMethods: ["addMessage"],
    sender: walletConnection.getAccountId(),
  }
);
Read more...
What is the regeneratorRuntime is not defined?
You are probably using Parcel like we do in other examples. Please make sure you have this line at the top of your main JS file. (Most likely index.js):
import "regenerator-runtime/runtime";
- Also, ensure the dependencies for this are added to the project by checking the dev dependencies in your
package.json. If not found you can install this by running the following in your terminal:
npm install regenerator-runtime --save-dev
Read more...
What is the Window error using Node.js?
You maybe using a KeyStore that's for the browser. Instead use a filesystem key or private key string. See methods here
Browser KeyStore:
const { keyStores } = require("near-api-js");
const keyStore = new keyStores.BrowserLocalStorageKeyStore();
FileSystem KeyStore:
const { keyStores } = require("near-api-js");
const KEY_PATH = "~./near-credentials/testnet/example-account.json";
const keyStore = new keyStores.UnencryptedFileSystemKeyStore(KEY_PATH);
Read more...
What is the What is near-api-js?
near-api-js is a complete library to interact with the NEAR blockchain. You can use it in the browser, or in Node.js runtime.
You'll typically first create a connection to NEAR with connect. If you need to sign transaction, you also create a KeyStore.
With the connection object you now can:
- Interact with the Wallet in a browser.
- Instantiate an Account object to inspect, create or delete accounts, and also send tokens, deploy contracts and manage keys for accounts.
- Instantiate an Contract object to call smart contract methods.
The library also contains some utils functions.
info
Note the difference between
near-api-js and near-sdk-js:
The JavaScript SDK is a library for developing smart contracts. It contains classes and functions you use to write your smart contract code.
The JavaScript API is a complete library for all possible commands to interact with NEAR. It’s a wrapper for the RPC endpoints, a library to interact with NEAR Wallet in the browser, and a tool for keys management.
Read more...
What is the Install?
Include near-api-js as a dependency in your package.
npm i --save near-api-js
Read more...
What is the Import?
You can use the API library in the browser, or in Node.js runtime. Some features are available only in one of the environments.
For example, the WalletConnection is only for the browser, and there are different KeyStore providers for each environment.
<Tabs>
<TabItem value="Browser" label="Browser" default>
import * as nearAPI from "near-api-js";
</TabItem>
<TabItem value="Node" label="Node">
const nearAPI = require("near-api-js");
</TabItem>
</Tabs>
Read more...
What is the Key Store?
If you sign transactions you need to create a Key Store. In the browser, the LocalStorage KeyStore will be used once you ask your user to Sign In with the Wallet.
<Tabs>
<TabItem value="browser" label="Using Browser" default>
// creates keyStore using private key in local storage
const { keyStores } = nearAPI;
const myKeyStore = new keyStores.BrowserLocalStorageKeyStore();
</TabItem>
<TabItem value="dir" label="Using Credentials Directory">
// creates a keyStore that searches for keys in .near-credentials
// requires credentials stored locally by using a NEAR-CLI command: `near login`
// https://docs.near.org/tools/cli#near-login
const { keyStores } = nearAPI;
const homedir = require("os").homedir();
const CREDENTIALS_DIR = ".near-credentials";
const credentialsPath = require("path").join(homedir, CREDENTIALS_DIR);
const myKeyStore = new keyStores.UnencryptedFileSystemKeyStore(credentialsPath);
</TabItem>
<TabItem value="file" label="Using a File">
// creates keyStore from a provided file
// you will need to pass the location of the .json key pair
const { KeyPair, keyStores } = require("near-api-js");
const fs = require("fs");
const homedir = require("os").homedir();
const ACCOUNT_ID = "near-example.testnet";  // NEAR account tied to the keyPair
const NETWORK_ID = "testnet";
// path to your custom keyPair location (ex. function access key for example account)
const KEY_PATH = '/.near-credentials/near-example-testnet/get_token_price.json';
const credentials = JSON.parse(fs.readFileSync(homedir + KEY_PATH));
const myKeyStore = new keyStores.InMemoryKeyStore();
myKeyStore.setKey(NETWORK_ID, ACCOUNT_ID, KeyPair.fromString(credentials.private_key));
</TabItem>
<TabItem value="key" label="Using a private key string">
// creates keyStore from a private key string
// you can define your key here or use an environment variable
const { keyStores, KeyPair } = nearAPI;
const myKeyStore = new keyStores.InMemoryKeyStore();
const PRIVATE_KEY =
  "by8kdJoJHu7uUkKfoaLd2J2Dp1q1TigeWMG123pHdu9UREqPcshCM223kWadm";
// creates a public / private key pair using the provided private key
const keyPair = KeyPair.fromString(PRIVATE_KEY);
// adds the keyPair you created to keyStore
await myKeyStore.setKey("testnet", "example-account.testnet", keyPair);
</TabItem>
</Tabs>
Key store is not required if you are not signing transactions (meaning - you are only calling read-only view methods on a contract)
Read more...
What is the Connecting to NEAR?
The object returned from connect is your entry-point for all commands in the API.
If you need to sign transaction, you'll need a KeyStore to create a connection.
<Tabs>
<TabItem value="testnet" label="TestNet" default>
const { connect } = nearAPI;
const connectionConfig = {
  networkId: "testnet",
  keyStore: myKeyStore, // first create a key store
  nodeUrl: "https://rpc.testnet.near.org",
  walletUrl: "https://wallet.testnet.near.org",
  helperUrl: "https://helper.testnet.near.org",
  explorerUrl: "https://explorer.testnet.near.org",
};
const nearConnection = await connect(connectionConfig);
</TabItem>
<TabItem value="mainnet" label="MainNet">
const { connect } = nearAPI;
const connectionConfig = {
  networkId: "mainnet",
  keyStore: myKeyStore, // first create a key store
  nodeUrl: "https://rpc.mainnet.near.org",
  walletUrl: "https://wallet.mainnet.near.org",
  helperUrl: "https://helper.mainnet.near.org",
  explorerUrl: "https://explorer.mainnet.near.org",
};
const nearConnection = await connect(connectionConfig);
</TabItem>
<TabItem value="betanet" label="BetaNet">
const { connect } = nearAPI;
const connectionConfig = {
  networkId: "betanet",
  keyStore: myKeyStore, // first create a key store
  nodeUrl: "https://rpc.betanet.near.org",
  walletUrl: "https://wallet.betanet.near.org",
  helperUrl: "https://helper.betanet.near.org",
  explorerUrl: "https://explorer.betanet.near.org",
};
const nearConnection = await connect(connectionConfig);
</TabItem>
<TabItem value="localnet" label="LocalNet">
const { connect } = nearAPI;
const connectionConfig = {
  networkId: "local",
  nodeUrl: "http://localhost:3030",
  walletUrl: "http://localhost:4000/wallet",
};
const nearConnection = await connect(connectionConfig);
</TabItem>
</Tabs>
Read more...
What is the Interacting with the Wallet?
Wallet interaction is possible only in the browser, because NEAR's Wallet is web-based.
Read more...
What is the Creating Wallet Connection?
In Wallet connection you use a LocalStorage KeyStore.
<Tabs>
<TabItem value="testnet" label="TestNet" default>
const { connect, keyStores, WalletConnection } = nearAPI;
const connectionConfig = {
  networkId: "testnet",
  keyStore: new keyStores.BrowserLocalStorageKeyStore(),
  nodeUrl: "https://rpc.testnet.near.org",
  walletUrl: "https://wallet.testnet.near.org",
  helperUrl: "https://helper.testnet.near.org",
  explorerUrl: "https://explorer.testnet.near.org",
};
// connect to NEAR
const nearConnection = await connect(connectionConfig);
// create wallet connection
const walletConnection = new WalletConnection(nearConnection);
</TabItem>
<TabItem value="mainnet" label="MainNet">
const { connect, keyStores, WalletConnection } = nearAPI;
const connectionConfig = {
  networkId: "mainnet",
  keyStore: new keyStores.BrowserLocalStorageKeyStore(),
  nodeUrl: "https://rpc.mainnet.near.org",
  walletUrl: "https://wallet.mainnet.near.org",
  helperUrl: "https://helper.mainnet.near.org",
  explorerUrl: "https://explorer.mainnet.near.org",
};
// connect to NEAR
const nearConnection = await connect(connectionConfig);
// create wallet connection
const walletConnection = new WalletConnection(nearConnection);
</TabItem>
<TabItem value="betanet" label="BetaNet">
const { connect, keyStores, WalletConnection } = nearAPI;
const connectionConfig = {
  networkId: "betanet",
  keyStore: new keyStores.BrowserLocalStorageKeyStore(),
  nodeUrl: "https://rpc.betanet.near.org",
  walletUrl: "https://wallet.betanet.near.org",
  helperUrl: "https://helper.betanet.near.org",
  explorerUrl: "https://explorer.betanet.near.org",
};
// connect to NEAR
const nearConnection = await connect(connectionConfig);
// create wallet connection
const walletConnection = new WalletConnection(nearConnection);
</TabItem>
</Tabs>
Read more...
What is the Ask your user to Sign In?
You first create a WalletConnection, and then call requestSignIn.
This will redirect the current page to the Wallet authentication page.
You can configure success and failure redirect URLs.
This action creates an access key that will be stored in the browser's local storage.
The access key can then be used to connect to NEAR and sign transactions via the KeyStore.
// const walletConnection = new WalletConnection(nearConnection);
walletConnection.requestSignIn(
  "example-contract.testnet", // contract requesting access
  "Example App", // optional title
  "http://YOUR-URL.com/success", // optional redirect URL on success
  "http://YOUR-URL.com/failure" // optional redirect URL on failure
);
Sign In is not required if you are using an alternative key store to local storage, or you are not signing transactions (meaning - you are only calling read-only view methods on a contract)
Read more...
What is the Sign Out on behalf of your user?
// const walletConnection = new WalletConnection(nearConnection);
walletConnection.signOut();
Read more...
What is the Check if Signed In?
// const walletConnection = new WalletConnection(nearConnection);
if (walletConnection.isSignedIn()) {
	// user is signed in
}
Read more...
What is the Get Authorized Account Id?
// const walletConnection = new WalletConnection(nearConnection);
const walletAccountId = walletConnection.getAccountId();
Read more...
What is the Get Authorized Account Object?
This will return an instance of Account that this wallet is authorized for.
// const walletConnection = new WalletConnection(nearConnection);
const walletAccountObj = walletConnection.account();
Read more...
What is the Account?
You can create, delete and interact with accounts with the Account module.
Read more...
What is the Load Account?
This will return an Account object for you to interact with.
const account = await nearConnection.account("example-account.testnet");
Read more...
What is the Create Account?
// create a new account using funds from the account used to create it.
const account = await nearConnection.account("example-account.testnet");
await account.createAccount(
  "example-account2.testnet", // new account name
  "8hSHprDq2StXwMtNd43wDTXQYsjXcD4MJTXQYsjXcc", // public key for new account
  "10000000000000000000" // initial balance for new account in yoctoNEAR
);
Read more...
What is the Get Account Balance?
// gets account balance
const account = await nearConnection.account("example-account.testnet");
await account.getAccountBalance();
Read more...
What are the Get Account details?
// gets account details in terms of authorized apps and transactions
const account = await nearConnection.account("example-account.testnet");
await account.getAccountDetails();
Read more...
What are the Send Tokens?
// sends NEAR tokens
const account = await nearConnection.account("sender-account.testnet");
await account.sendMoney(
  "receiver-account.testnet", // receiver account
  "1000000000000000000000000" // amount in yoctoNEAR
);
Read more...
What is the State?
// gets the state of the account
const account = await nearConnection.account("example-account.testnet");
const response = await account.state();
console.log(response);
Read more...
What are the Access Keys?
Add Full Access Key {#add-full-access-key}
// takes public key as string for argument
const account = await nearConnection.account("example-account.testnet");
await account.addKey("8hSHprDq2StXwMtNd43wDTXQYsjXcD4MJTXQYsjXcc");
Add Function Access Key {#add-function-access-key}
// adds function access key
const account = await nearConnection.account("example-account.testnet");
await account.addKey(
  "8hSHprDq2StXwMtNd43wDTXQYsjXcD4MJTXQYsjXcc", // public key for new account
  "example-account.testnet", // contract this key is allowed to call (optional)
  "example_method", // methods this key is allowed to call (optional)
  "2500000000000" // allowance key can use to call methods (optional)
);
Get All Access Keys {#get-all-access-keys}
// returns all access keys associated with an account
const account = await nearConnection.account("example-account.testnet");
await account.getAccessKeys();
Delete Access Key {#delete-access-key}
// takes public key as string for argument
const account = await nearConnection.account("example-account.testnet");
await account.deleteKey("8hSHprDq2StXwMtNd43wDTXQYsjXcD4MJTXQYsjXcc");
Read more...
What is the Load Contract?
<Tabs>
<TabItem value="Standard" label="Standard" default>
const { Contract } = nearAPI;
const contract = new Contract(
  account, // the account object that is connecting
  "example-contract.testnet",
  {
    // name of contract you're connecting to
    viewMethods: ["getMessages"], // view methods do not change state but usually return a value
    changeMethods: ["addMessage"], // change methods modify state
    sender: account, // account object to initialize and sign transactions.
  }
);
</TabItem>
<TabItem value="wallet" label="Using Wallet">
const { Contract } = nearAPI;
const contract = new Contract(
  wallet.account(), // the account object that is connecting
  "example-contract.testnet",
  {
    // name of contract you're connecting to
    viewMethods: ["getMessages"], // view methods do not change state but usually return a value
    changeMethods: ["addMessage"], // change methods modify state
    sender: wallet.account(), // account object to initialize and sign transactions.
  }
);
</TabItem>
</Tabs>
Read more...
What is the Call Contract?
<Tabs>
<TabItem value="method" label="Change Method" default>
await contract.method_name(
  {
    arg_name: "value", // argument name and value - pass empty object if no args required
  },
  "300000000000000", // attached GAS (optional)
  "1000000000000000000000000" // attached deposit in yoctoNEAR (optional)
);
</TabItem>
<TabItem value="callback" label="Change Method w/ callbackUrl and meta">
await contract.method_name(
  {
    callbackUrl: 'https://example.com/callback', // callbackUrl after the transaction approved (optional)
    meta: 'some info', // meta information NEAR Wallet will send back to the application. `meta` will be attached to the `callbackUrl` as a url search param
    args: {
        arg_name: "value" // argument name and value - pass empty object if no args required
    },
    gas: 300000000000000, // attached GAS (optional)
    amount: 1000000000000000000000000 // attached deposit in yoctoNEAR (optional)
  }
);
</TabItem>
<TabItem value="view" label="View Method">
const response = await contract.view_method_name();
console.log(response);
</TabItem>
<TabItem value="args" label="View Method w/ args">
const response = await contract.view_method_name({ arg_name: "arg_value" });
console.log(response);
</TabItem>
</Tabs>
Read more...
What is the NEAR => yoctoNEAR?
// converts NEAR amount into yoctoNEAR (10^-24)
const { utils } = nearAPI;
const amountInYocto = utils.format.parseNearAmount("1");
Read more...
What is the Integrating Contracts into a Web App?
If you are developing a website (or a web-app), then you will be using near-api-js to communicate with the blockchain. Go to the website for more information about it.
Read more...
What is the Command Line Interface?
You can use NEAR CLI to automatize tasks from the command line such as:
- Creating sub-accounts
- Deploying contracts to them
- Calling initialization methods
Read more...
What is the Querying Post Hoc Information?
The NEAR Indexer enables you to query information from a deployed contract such as:
- Which users called a specific method?
- How much money they attached?
- How much GAS was used?
It is very useful for analyzing scenarios that happened in the past.
Read more...
What is the View access key?
Returns information about a single access key for given account.
If permission of the key is FunctionCall, it will return more details such as the allowance, receiver_id, and method_names.
- method:
query
- params:
request_type: view_access_keyfinality OR block_idaccount_id: "example.testnet"public_key: "example.testnet's public key"
<Tabs>
<TabItem value="json" label="JSON" default>
{
  "jsonrpc": "2.0",
  "id": "dontcare",
  "method": "query",
  "params": {
    "request_type": "view_access_key",
    "finality": "final",
    "account_id": "client.chainlink.testnet",
    "public_key": "ed25519:H9k5eiU4xXS3M4z8HzKJSLaZdqGdGwBG49o7orNC4eZW"
  }
}
</TabItem>
<TabItem value="js" label="JavaScript">
const response = await near.connection.provider.query({
  request_type: "view_access_key",
  finality: "final",
  account_id: "client.chainlink.testnet",
  public_key: "ed25519:H9k5eiU4xXS3M4z8HzKJSLaZdqGdGwBG49o7orNC4eZW",
});
</TabItem>
<TabItem value="http" label="HTTPie">
http post https://rpc.testnet.near.org jsonrpc=2.0 id=dontcare method=query \
  params:='{
    "request_type": "view_access_key",
    "finality": "final",
    "account_id": "client.chainlink.testnet",
    "public_key": "ed25519:H9k5eiU4xXS3M4z8HzKJSLaZdqGdGwBG49o7orNC4eZW"
  }'
</TabItem>
</Tabs>
<details>
<summary>Example response: </summary>
<p>
{
  "jsonrpc": "2.0",
  "result": {
    "nonce": 85,
    "permission": {
      "FunctionCall": {
        "allowance": "18501534631167209000000000",
        "receiver_id": "client.chainlink.testnet",
        "method_names": ["get_token_price"]
      }
    },
    "block_height": 19884918,
    "block_hash": "GGJQ8yjmo7aEoj8ZpAhGehnq9BSWFx4xswHYzDwwAP2n"
  },
  "id": "dontcare"
}
</p>
</details>
What Could Go Wrong?
When API request fails, RPC server returns a structured error response with a limited number of well-defined error variants, so client code can exhaustively handle all the possible error cases. Our JSON-RPC errors follow verror convention for structuring the error response:
{
    "error": {
        "name": <ERROR_TYPE>,
        "cause": {
            "info": {..},
            "name": <ERROR_CAUSE>
        },
        "code": -32000,
        "data": String,
        "message": "Server error",
    },
    "id": "dontcare",
    "jsonrpc": "2.0"
}
Heads up
The fields code, data, and message in the structure above are considered legacy ones and might be deprecated in the future. Please, don't rely on them.
Here is the exhaustive list of the error variants that can be returned by view_access_key request type:
<table class="custom-stripe">
<thead>
<tr>
<th>
ERROR_TYPE<br />
<code>error.name</code>
</th>
<th>ERROR_CAUSE<br /><code>error.cause.name</code></th>
<th>Reason</th>
<th>Solution</th>
</tr>
</thead>
<tbody>
<tr>
<td rowspan="6">HANDLER_ERROR</td>
<td>UNKNOWN_BLOCK</td>
<td>The requested block has not been produced yet or it has been garbage-collected (cleaned up to save space on the RPC node)</td>
<td>
<ul>
<li>Check that the requested block is legit</li>
<li>If the block had been produced more than 5 epochs ago, try to send your request to <a href="https://near-nodes.io/intro/node-types#archival-node">an archival node</a></li>
</ul>
</td>
</tr>
<tr>
<td>INVALID_ACCOUNT</td>
<td>The requested <code>account_id</code> is invalid</td>
<td>
<ul>
<li>Provide a valid <code>account_id</code></li>
</ul>
</td>
</tr>
<tr>
<td>UNKNOWN_ACCOUNT</td>
<td>The requested <code>account_id</code> has not been found while viewing since the account has not been created or has been already deleted</td>
<td>
<ul>
<li>Check the <code>account_id</code></li>
<li>Specify a different block or retry if you request the latest state</li>
</ul>
</td>
</tr>
<tr>
<td>UNKNOWN_ACCESS_KEY</td>
<td>The requested <code>public_key</code> has not been found while viewing since the public key has not been created or has been already deleted</td>
<td>
<ul>
<li>Check the <code>public_key</code></li>
<li>Specify a different block or retry if you request the latest state</li>
</ul>
</td>
</tr>
<tr>
<td>UNAVAILABLE_SHARD</td>
<td>The node was unable to found the requested data because it does not track the shard where data is present</td>
<td>
<ul>
<li>Send a request to a different node which might track the shard</li>
</ul>
</td>
</tr>
<tr>
<td>NO_SYNCED_BLOCKS</td>
<td>The node is still syncing and the requested block is not in the database yet</td>
<td>
<ul>
<li>Wait until the node finish syncing</li>
<li>Send a request to a different node which is synced</li>
</ul>
</td>
</tr>
<tr class="stripe">
<td>REQUEST_VALIDATION_ERROR</td>
<td>PARSE_ERROR</td>
<td>Passed arguments can't be parsed by JSON RPC server (missing arguments, wrong format, etc.)</td>
<td>
<ul>
<li>Check the arguments passed and pass the correct ones</li>
<li>Check <code>error.cause.info</code> for more details</li>
</ul>
</td>
</tr>
<tr>
<td>INTERNAL_ERROR</td>
<td>INTERNAL_ERROR</td>
<td>Something went wrong with the node itself or overloaded</td>
<td>
<ul>
<li>Try again later</li>
<li>Send a request to a different node</li>
<li>Check <code>error.cause.info</code> for more details</li>
</ul>
</td>
</tr>
</tbody>
</table>
Read more...
What is the View access key list?
You can query <strong>all</strong> access keys for a given account.
- method:
query
- params:
request_type: view_access_key_listfinality OR block_idaccount_id: "example.testnet"
Example:
<Tabs>
<TabItem value="json" label="JSON" default>
{
  "jsonrpc": "2.0",
  "id": "dontcare",
  "method": "query",
  "params": {
    "request_type": "view_access_key_list",
    "finality": "final",
    "account_id": "example.testnet"
  }
}
</TabItem>
<TabItem value="js" label="JavaScript">
const response = await near.connection.provider.query({
  request_type: "view_access_key_list",
  finality: "final",
  account_id: "example.testnet",
});
</TabItem>
<TabItem value="http" label="HTTPie">
http post https://rpc.testnet.near.org jsonrpc=2.0 id=dontcare method=query \
  params:='{
    "request_type": "view_access_key_list",
    "finality": "final",
    "account_id": "example.testnet"
  }'
</TabItem>
</Tabs>
<details>
<summary>Example response: </summary>
<p>
{
  "jsonrpc": "2.0",
  "result": {
    "keys": [
      {
        "public_key": "ed25519:2j6qujbkPFuTstQLLTxKZUw63D5Wu3SG79Gop5JQrNJY",
        "access_key": {
          "nonce": 17,
          "permission": {
            "FunctionCall": {
              "allowance": "9999203942481156415000",
              "receiver_id": "place.meta",
              "method_names": []
            }
          }
        }
      },
      {
        "public_key": "ed25519:46etzhzZHN4NSQ8JEQtbHCX7sT8WByS3vmSEb3fbmSgf",
        "access_key": {
          "nonce": 2,
          "permission": {
            "FunctionCall": {
              "allowance": "9999930655034196535000",
              "receiver_id": "dev-1596616186817-8588944",
              "method_names": []
            }
          }
        }
      },
      {
        "public_key": "ed25519:4F9TwuSqWwvoyu7JVZDsupPhC7oYbYNsisBV2yQvyXFn",
        "access_key": {
          "nonce": 0,
          "permission": "FullAccess"
        }
      },
      {
        "public_key": "ed25519:4bZqp6nm1btr92UfKbyADDzJ4oPK9JetHXqEYqbYZmkD",
        "access_key": {
          "nonce": 2,
          "permission": "FullAccess"
        }
      },
      {
        "public_key": "ed25519:6ZPzX7hS37jiU9dRxbV1Waf8HSyKKFypJbrnZXzNhqjs",
        "access_key": {
          "nonce": 2,
          "permission": {
            "FunctionCall": {
              "allowance": "9999922083697042955000",
              "receiver_id": "example.testnet",
              "method_names": []
            }
          }
        }
      },
      {
        "public_key": "ed25519:81RKfuo7mBbsaviTmBsq18t6Eq4YLnSi3ye2CBLcKFUX",
        "access_key": {
          "nonce": 8,
          "permission": "FullAccess"
        }
      },
      {
        "public_key": "ed25519:B4W1oAYTcG8GxwKev8jQtsYWkGwGdqP24W7eZ6Fmpyzc",
        "access_key": {
          "nonce": 0,
          "permission": {
            "FunctionCall": {
              "allowance": "10000000000000000000000",
              "receiver_id": "dev-1594144238344",
              "method_names": []
            }
          }
        }
      },
      {
        "public_key": "ed25519:BA3AZbACoEzAsxKeToFd36AVpPXFSNhSMW2R6UYeGRwM",
        "access_key": {
          "nonce": 0,
          "permission": {
            "FunctionCall": {
              "allowance": "10000000000000000000000",
              "receiver_id": "new-corgis",
              "method_names": []
            }
          }
        }
      },
      {
        "public_key": "ed25519:BRyHUGAJjRKVTc9ZqXTTSJnFmSca8WLj8TuVe1wXK3LZ",
        "access_key": {
          "nonce": 17,
          "permission": "FullAccess"
        }
      },
      {
        "public_key": "ed25519:DjytaZ1HZ5ZFmH3YeJeMCiC886K1XPYeGsbz2E1AZj2J",
        "access_key": {
          "nonce": 31,
          "permission": "FullAccess"
        }
      },
      {
        "public_key": "ed25519:DqJn5UCq6vdNAvfhnbpdAeuui9a6Hv9DKYDxeRACPUDP",
        "access_key": {
          "nonce": 0,
          "permission": "FullAccess"
        }
      },
      {
        "public_key": "ed25519:FFxG8x6cDDyiErFtRsdw4dBNtCmCtap4tMTjuq3umvSq",
        "access_key": {
          "nonce": 0,
          "permission": "FullAccess"
        }
      }
    ],
    "block_height": 17798231,
    "block_hash": "Gm7YSdx22wPuciW1jTTeRGP9mFqmon69ErFQvgcFyEEB"
  },
  "id": "dontcare"
}
</p>
</details>
What Could Go Wrong?
When API request fails, RPC server returns a structured error response with a limited number of well-defined error variants, so client code can exhaustively handle all the possible error cases. Our JSON-RPC errors follow verror convention for structuring the error response:
{
    "error": {
        "name": <ERROR_TYPE>,
        "cause": {
            "info": {..},
            "name": <ERROR_CAUSE>
        },
        "code": -32000,
        "data": String,
        "message": "Server error",
    },
    "id": "dontcare",
    "jsonrpc": "2.0"
}
Heads up
The fields code, data, and message in the structure above are considered legacy ones and might be deprecated in the future. Please, don't rely on them.
Here is the exhaustive list of the error variants that can be returned by view_access_key_list request type:
<table class="custom-stripe">
<thead>
<tr>
<th>
ERROR_TYPE<br />
<code>error.name</code>
</th>
<th>ERROR_CAUSE<br /><code>error.cause.name</code></th>
<th>Reason</th>
<th>Solution</th>
</tr>
</thead>
<tbody>
<tr>
<td rowspan="5">HANDLER_ERROR</td>
<td>UNKNOWN_BLOCK</td>
<td>The requested block has not been produced yet or it has been garbage-collected (cleaned up to save space on the RPC node)</td>
<td>
<ul>
<li>Check that the requested block is legit</li>
<li>If the block had been produced more than 5 epochs ago, try to send your request to <a href="https://near-nodes.io/intro/node-types#archival-node">an archival node</a></li>
</ul>
</td>
</tr>
<tr>
<td>INVALID_ACCOUNT</td>
<td>The requested <code>account_id</code> is invalid</td>
<td>
<ul>
<li>Provide a valid <code>account_id</code></li>
</ul>
</td>
</tr>
<tr>
<td>UNKNOWN_ACCOUNT</td>
<td>The requested <code>account_id</code> has not been found while viewing since the account has not been created or has been already deleted</td>
<td>
<ul>
<li>Check the <code>account_id</code></li>
<li>Specify a different block or retry if you request the latest state</li>
</ul>
</td>
</tr>
<tr>
<td>UNAVAILABLE_SHARD</td>
<td>The node was unable to find the requested data because it does not track the shard where data is present</td>
<td>
<ul>
<li>Send a request to a different node which might track the shard</li>
</ul>
</td>
</tr>
<tr>
<td>NO_SYNCED_BLOCKS</td>
<td>The node is still syncing and the requested block is not in the database yet</td>
<td>
<ul>
<li>Wait until the node finish syncing</li>
<li>Send a request to a different node which is synced</li>
</ul>
</td>
</tr>
<tr class="stripe">
<td>REQUEST_VALIDATION_ERROR</td>
<td>PARSE_ERROR</td>
<td>Passed arguments can't be parsed by JSON RPC server (missing arguments, wrong format, etc.)</td>
<td>
<ul>
<li>Check the arguments passed and pass the correct ones</li>
<li>Check <code>error.cause.info</code> for more details</li>
</ul>
</td>
</tr>
<tr>
<td>INTERNAL_ERROR</td>
<td>INTERNAL_ERROR</td>
<td>Something went wrong with the node itself or overloaded</td>
<td>
<ul>
<li>Try again later</li>
<li>Send a request to a different node</li>
<li>Check <code>error.cause.info</code> for more details</li>
</ul>
</td>
</tr>
</tbody>
</table>
Read more...
What is the View access key changes (single)?
Returns individual access key changes in a specific block. You can query multiple keys by passing an array of objects containing the account_id and public_key.
- method:
EXPERIMENTAL_changes
- params:
changes_type: single_access_key_changeskeys: [{ account_id, public_key }]finality OR block_id
Example:
<Tabs>
<TabItem value="json" label="JSON" default>
{
  "jsonrpc": "2.0",
  "id": "dontcare",
  "method": "EXPERIMENTAL_changes",
  "params": {
    "changes_type": "single_access_key_changes",
    "keys": [
      {
        "account_id": "example-acct.testnet",
        "public_key": "ed25519:25KEc7t7MQohAJ4EDThd2vkksKkwangnuJFzcoiXj9oM"
      }
    ],
    "finality": "final"
  }
}
</TabItem>
<TabItem value="js" label="JavaScript">
const response = await near.connection.provider.experimental_changes({
  changes_type: "single_access_key_changes",
  keys: [
    {
      account_id: "example-acct.testnet",
      public_key: "ed25519:25KEc7t7MQohAJ4EDThd2vkksKkwangnuJFzcoiXj9oM",
    },
  ],
  finality: "final",
});
</TabItem>
<TabItem value="http" label="HTTPie">
http post https://rpc.testnet.near.org jsonrpc=2.0 id=dontcare method=EXPERIMENTAL_changes \
  params:='{
    "changes_type": "single_access_key_changes",
    "keys": [
      {
        "account_id": "example-acct.testnet",
        "public_key": "ed25519:25KEc7t7MQohAJ4EDThd2vkksKkwangnuJFzcoiXj9oM"
      }
    ],
    "finality": "final"
  }'
</TabItem>
</Tabs>
<details>
<summary>Example response: </summary>
<p>
{
  "jsonrpc": "2.0",
  "result": {
    "block_hash": "4kvqE1PsA6ic1LG7S5SqymSEhvjqGqumKjAxnVdNN3ZH",
    "changes": [
      {
        "cause": {
          "type": "transaction_processing",
          "tx_hash": "HshPyqddLxsganFxHHeH9LtkGekXDCuAt6axVgJLboXV"
        },
        "type": "access_key_update",
        "change": {
          "account_id": "example-acct.testnet",
          "public_key": "ed25519:25KEc7t7MQohAJ4EDThd2vkksKkwangnuJFzcoiXj9oM",
          "access_key": {
            "nonce": 1,
            "permission": "FullAccess"
          }
        }
      }
    ]
  },
  "id": "dontcare"
}
</p>
</details>
What Could Go Wrong?{#what-could-go-wrong-2}
When API request fails, RPC server returns a structured error response with a limited number of well-defined error variants, so client code can exhaustively handle all the possible error cases. Our JSON-RPC errors follow verror convention for structuring the error response:
{
    "error": {
        "name": <ERROR_TYPE>,
        "cause": {
            "info": {..},
            "name": <ERROR_CAUSE>
        },
        "code": -32000,
        "data": String,
        "message": "Server error",
    },
    "id": "dontcare",
    "jsonrpc": "2.0"
}
Heads up
The fields code, data, and message in the structure above are considered legacy ones and might be deprecated in the future. Please, don't rely on them.
Here is the exhaustive list of the error variants that can be returned by EXPERIMENTAL_changes_in_block method:
<table class="custom-stripe">
<thead>
<tr>
<th>
ERROR_TYPE<br />
<code>error.name</code>
</th>
<th>ERROR_CAUSE<br /><code>error.cause.name</code></th>
<th>Reason</th>
<th>Solution</th>
</tr>
</thead>
<tbody>
<tr>
<td rowspan="2">HANDLER_ERROR</td>
<td>UNKNOWN_BLOCK</td>
<td>The requested block has not been produced yet or it has been garbage-collected (cleaned up to save space on the RPC node)</td>
<td>
<ul>
<li>Check that the requested block is legit</li>
<li>If the block had been produced more than 5 epochs ago, try to send your request to <a href="https://near-nodes.io/intro/node-types#archival-node">an archival node</a></li>
</ul>
</td>
</tr>
<tr>
<td>NOT_SYNCED_YET</td>
<td>The node is still syncing and the requested block is not in the database yet</td>
<td>
<ul>
<li>Wait until the node finish syncing</li>
<li>Send a request to a different node which is synced</li>
</ul>
</td>
</tr>
<tr class="stripe">
<td>REQUEST_VALIDATION_ERROR</td>
<td>PARSE_ERROR</td>
<td>Passed arguments can't be parsed by JSON RPC server (missing arguments, wrong format, etc.)</td>
<td>
<ul>
<li>Check the arguments passed and pass the correct ones</li>
<li>Check <code>error.cause.info</code> for more details</li>
</ul>
</td>
</tr>
<tr>
<td>INTERNAL_ERROR</td>
<td>INTERNAL_ERROR</td>
<td>Something went wrong with the node itself or overloaded</td>
<td>
<ul>
<li>Try again later</li>
<li>Send a request to a different node</li>
<li>Check <code>error.cause.info</code> for more details</li>
</ul>
</td>
</tr>
</tbody>
</table>
Read more...
What are the Block details?
Queries network and returns block for given height or hash. You can also use finality param to return latest block details.
Note: You may choose to search by a specific block or finality, you can not choose both.
- method:
block
- params:
finality OR block_id
finality example:
<Tabs>
<TabItem value="json" label="JSON" default>
{
  "jsonrpc": "2.0",
  "id": "dontcare",
  "method": "block",
  "params": {
    "finality": "final"
  }
}
</TabItem>
<TabItem value="js" label="JavaScript">
const response = await near.connection.provider.block({
  finality: "final",
});
</TabItem>
<TabItem value="http" label="HTTPie">
http post https://rpc.testnet.near.org jsonrpc=2.0 id=dontcare method=block \
  params:='{
    "finality": "final"
  }'
</TabItem>
</Tabs>
[block_id]
<Tabs>
<TabItem value="json" label="JSON" default>
{
  "jsonrpc": "2.0",
  "id": "dontcare",
  "method": "block",
  "params": {
    "block_id": 17821130
  }
}
</TabItem>
<TabItem value="js" label="JavaScript">
const response = await near.connection.provider.block(17821130);
</TabItem>
<TabItem value="http" label="HTTPie">
http post https://rpc.testnet.near.org jsonrpc=2.0 id=dontcare method=block \
  params:='{
    "block_id": 17821130
  }'
</TabItem>
</Tabs>
[block_hash]
<Tabs>
<TabItem value="json" label="JSON" default>
{
  "jsonrpc": "2.0",
  "id": "dontcare",
  "method": "block",
  "params": {
    "block_id": "7nsuuitwS7xcdGnD9JgrE22cRB2vf2VS4yh1N9S71F4d"
  }
}
</TabItem>
<TabItem value="js" label="JavaScript">
const response = await near.connection.provider.block(
  "7nsuuitwS7xcdGnD9JgrE22cRB2vf2VS4yh1N9S71F4d"
);
</TabItem>
<TabItem value="http" label="HTTPie">
http post https://rpc.testnet.near.org jsonrpc=2.0 id=dontcare method=block \
  params:='{
    "block_id": "7nsuuitwS7xcdGnD9JgrE22cRB2vf2VS4yh1N9S71F4d"
  }'
</TabItem>
</Tabs>
<details>
<summary>Example response:</summary>
<p>
{
  "jsonrpc": "2.0",
  "result": {
    "author": "bitcat.pool.f863973.m0",
    "header": {
      "height": 17821130,
      "epoch_id": "7Wr3GFJkYeCxjVGz3gDaxvAMUzXuzG8MjFXTFoAXB6ZZ",
      "next_epoch_id": "A5AdnxEn7mfHieQ5fRxx9AagCkHNJz6wr61ppEXiWvvh",
      "hash": "CLo31YCUhzz8ZPtS5vXLFskyZgHV5qWgXinBQHgu9Pyd",
      "prev_hash": "2yUTTubrv1gJhTUVnHXh66JG3qxStBqySoN6wzRzgdVD",
      "prev_state_root": "5rSz37fySS8XkVgEy3FAZwUncX4X1thcSpuvCgA6xmec",
      "chunk_receipts_root": "9ETNjrt6MkwTgSVMMbpukfxRshSD1avBUUa4R4NuqwHv",
      "chunk_headers_root": "HMpEoBhPvThWZvppLwrXQSSfumVdaDW7WfZoCAPtjPfo",
      "chunk_tx_root": "7tkzFg8RHBmMw1ncRJZCCZAizgq4rwCftTKYLce8RU8t",
      "outcome_root": "7tkzFg8RHBmMw1ncRJZCCZAizgq4rwCftTKYLce8RU8t",
      "chunks_included": 1,
      "challenges_root": "11111111111111111111111111111111",
      "timestamp": 1601280114229875635,
      "timestamp_nanosec": "1601280114229875635",
      "random_value": "ACdUSF3nehbMTwT7qjUB6Mm4Ynck5TVAWbNH3DR1cjQ7",
      "validator_proposals": [],
      "chunk_mask": [true],
      "gas_price": "100000000",
      "rent_paid": "0",
      "validator_reward": "0",
      "total_supply": "1042339182040791154864822502764857",
      "challenges_result": [],
      "last_final_block": "AaxTqjYND5WAKbV2UZaFed6DH1DShN9fEemtnpTsv3eR",
      "last_ds_final_block": "2yUTTubrv1gJhTUVnHXh66JG3qxStBqySoN6wzRzgdVD",
      "next_bp_hash": "3ZNEoFYh2CQeJ9dc1pLBeUd1HWG8657j2c1v72ENE45Q",
      "block_merkle_root": "H3912Nkw6rtamfjsjmafe2uV2p1XmUKDou5ywgxb1gJr",
      "approvals": [
        "ed25519:4hNtc9vLhn2PQhktWtLKJV9g8SBfpm6NBT1w4syNFqoKE7ZMts2WwKA9x1ZUSBGVKYCuDGEqogLvwCF25G7e1UR3",
        "ed25519:2UNmbTqysMMevVPqJEKSq57hkcxVFcAMdGq7CFhpW65yBKFxYwpoziiWsAtARusLn9Sy1eXM7DkGTXwAqFiSooS6",
        "ed25519:4sumGoW9dnQCsJRpzkd4FQ5NSJypGQRCppWp7eQ9tpsEcJXjHZN8GVTCyeEk19WmbbMEJ5KBNypryyHzaH2gBxd4",
        "ed25519:3fP2dri6GjYkmHgEqQWWP9GcoQEgakbaUtfr3391tXtYBgxmiJUEymRe54m7D8bQrSJ3LhKD8gTFT7qqdemRnizR",
        "ed25519:3mwdqSWNm6RiuZAoZhD6pqsirC2cL48nEZAGoKixpqbrsBpAzqV3W2paH4KtQQ4JPLvk5pnzojaint2kNBCcUyq1",
        "ed25519:D4hMnxqLyQW4Wo29MRNMej887GH46yJXDKNN4es8UDSi9shJ9Y4FcGqkxdV4AZhn1yUjwN5LwfgAgY6fyczk5L3",
        null,
        "ed25519:4WCVm4dn88VJxTkUgcvdS7vs34diBqtQY4XWMRctSN1NpbgdkwwVyxg7d2SbGC22SuED7w4nrToMhcpJXrkhkDmF",
        "ed25519:JqtC7TFP7U14s7YhRKQEqwbc2RUxoctq75mrBdX91f7DuCWsPpe6ZTTnfHPmuJPjTzFHVZTsaQJWzwfSrrgNpnc",
        "ed25519:ngGUpWc2SyHmMCkWGTNNNfvZAJQ5z7P92JCmDqB7JW3j8fNH6LobvFFXb2zVdssibJKgnjwBj8CRe6qiZtuYQZM",
        "ed25519:5kzW6RbjukyJZiw9NTzTPPsQdoqN6EecafjVFEoWmTxQ4uSv1uSXhQYcHK2eq4m84oMmPABQDz2mm73Qx8mDdCQX",
        "ed25519:5wHnuuxwJJiZ4bXNq5cESnr4YovFU2yaUcuHRDUw3DnLoxkqc15CsegoyUSQKEwtCZ4yETv8Z9QcD6Wr9zHV4AUk",
        "ed25519:3F9XzWBxto31e8RAcBShAJBzJPgSJQsWbPXR38AfQnJn6AiveGz3JjebQm9Ye63BrnNA57QrPshwknxpzSrcNEZW",
        "ed25519:2g5s4SKsHt9PMdekkDqVtwwtz14v4edhqdBX1MYA8tB6nDpj3vDCDCTy9pEU8dX31PoQe5ygnf88aTZukMBMK1Yt",
        "ed25519:3Xz4jqhdyS3qs6xTmWdgjwt5gJraU5czMA89hPhmvbAN4aA7SUKL1HkevpmutRQqqxe7c7uCFeGiDHvDcxhhmD8W",
        null,
        "ed25519:55xs3vwPEys39egf9Z8SNyn1JsHPRMgj9HCX1GE7GJsVTcAuutQUCo91E12ZdXkuToYRXb9KzoT8n9XQRCNuLpwY",
        null,
        "ed25519:28JrFw7KnhnQPN89qZnnw17KDBjS6CDN7zB1hTg7KGg8qQPoCzakz9DNnaSnx39ji7e2fQSpZt4cNJaD7K7Yu7yo",
        "ed25519:41hAr5qhtvUYpdD2NK9qqTVnpG325ZoAiwrcmk1MJH7fdpxm7oSKXvXZqh7bTmPhv61hH2RpHnhcGuN4QqLzK2zt",
        "ed25519:4QacMsQ5FJgvecAYDFq8QBh19BBjh4qU8oeD5bV7p6Zhhu3e6r2iSHTvDBU2Q62RZAaWQQkkEwDUC9rsXdkGVhAt",
        "ed25519:27smtCZ3WobEvBuD5DggY6kkGxjB9qRVY6kPixgwqvBT1eKbRVoV8cLj1z51S8RTcp7YzAr1vhHJUHgksatR9Udz",
        "ed25519:4wspCWoAbhYxb3th2eX6ZXvKep1Fsco7mFP5zBodXBR8Wr344ANXSUCri3gUgNCCSoQ2CKSdqDEsvE6Y2jQ9hmbB",
        "ed25519:46XpYf9ZB9gjDfdnJLHqqhYJpQCuvCgB9tzKWS88GANMCb2j9BM3KXyjaEzynSsaPK8VrKFXQuTsTzgQSeo9cWGW",
        null,
        "ed25519:Y5ehsrhEpTRGjG6fHJHsEXj2NYPGMmKguiJHXP7TqsCWHBvNzaJbieR7UDp78hJ1ib7C18J5MB2kCzTXBCF9c3b",
        "ed25519:3P9363Dc8Kqvgjt3TsNRncUrncCHid7aSRnuySjF4JYmQbApkAxomyMu8xm9Rgo3mj9rqXb16PM7Xjn7hKP6TyVr",
        null,
        null,
        "ed25519:65ATjGsigZ3vMp7sGcp1c4ptxoqhHPkBeAaZ5GWJguVDLyrRLPJrtXhLGjH9DpXd7CZswjyMYq5aRtorLnmmJ7GW",
        null,
        "ed25519:5SvqSViXbtsLoFMdtCufyyDgZnrEK7LheFi38X5M2ic17gfV5cz37r85RyixjUv98MbAmgVdmkxVFDGfSbeoHW7X",
        null,
        null,
        "ed25519:2n3fQiBEiDKkB84biXWyQmvnupKX7B8faugY37jVi8hVXuWLggJmaEjqub511RCYwFnwW1RBxYpuJQ455KaniCd4",
        "ed25519:2K9xKFLJ2fW74tddXtghFGFurKWomAqaJmkKYVZKHQT6zHe5wNSYT3vzMotLQcez5JD1Ta57N9zQ4H1RysB2s5DZ",
        null,
        null,
        "ed25519:3qeCRtcLAqLtQ2YSQLcHDa26ykKX1BvAhP9jshLLYapxSEGGgZJY8sU72p9E78AkXwHP3X2Eq74jvts7gTRzNgMg",
        null,
        "ed25519:2czSQCF8wBDomEeSdDRH4gFoyJrp2ppZqR6JDaDGoYpaFkpWxZf2oGDkKfQLZMbfvU6LXkQjJssVHcLCJRMzG8co"
      ],
      "signature": "ed25519:58sdWd6kxzhQdCGvHzxqvdtDLJzqspe74f3gytnqdxDLHf4eesXi7B3nYq2YaosCHZJYmcR4HPHKSoFm3WE4MbxT",
      "latest_protocol_version": 35
    },
    "chunks": [
      {
        "chunk_hash": "EBM2qg5cGr47EjMPtH88uvmXHDHqmWPzKaQadbWhdw22",
        "prev_block_hash": "2yUTTubrv1gJhTUVnHXh66JG3qxStBqySoN6wzRzgdVD",
        "outcome_root": "11111111111111111111111111111111",
        "prev_state_root": "HqWDq3f5HJuWnsTfwZS6jdAUqDjGFSTvjhb846vV27dx",
        "encoded_merkle_root": "9zYue7drR1rhfzEEoc4WUXzaYRnRNihvRoGt1BgK7Lkk",
        "encoded_length": 8,
        "height_created": 17821130,
        "height_included": 17821130,
        "shard_id": 0,
        "gas_used": 0,
        "gas_limit": 1000000000000000,
        "rent_paid": "0",
        "validator_reward": "0",
        "balance_burnt": "0",
        "outgoing_receipts_root": "H4Rd6SGeEBTbxkitsCdzfu9xL9HtZ2eHoPCQXUeZ6bW4",
        "tx_root": "11111111111111111111111111111111",
        "validator_proposals": [],
        "signature": "ed25519:4iPgpYAcPztAvnRHjfpegN37Rd8dTJKCjSd1gKAPLDaLcHUySJHjexMSSfC5iJVy28vqF9VB4psz13x2nt92cbR7"
      }
    ]
  },
  "id": "dontcare"
}
</p>
</details>
What Could Go Wrong?? {#what-could-go-wrong}
When API request fails, RPC server returns a structured error response with a limited number of well-defined error variants, so client code can exhaustively handle all the possible error cases. Our JSON-RPC errors follow verror convention for structuring the error response:
{
    "error": {
        "name": <ERROR_TYPE>,
        "cause": {
            "info": {..},
            "name": <ERROR_CAUSE>
        },
        "code": -32000,
        "data": String,
        "message": "Server error",
    },
    "id": "dontcare",
    "jsonrpc": "2.0"
}
Heads up
The fields code, data, and message in the structure above are considered legacy ones and might be deprecated in the future. Please, don't rely on them.
Here is the exhaustive list of the error variants that can be returned by block method:
<table class="custom-stripe">
<thead>
<tr>
<th>
ERROR_TYPE<br />
<code>error.name</code>
</th>
<th>ERROR_CAUSE<br /><code>error.cause.name</code></th>
<th>Reason</th>
<th>Solution</th>
</tr>
</thead>
<tbody>
<tr>
<td rowspan="2">HANDLER_ERROR</td>
<td>UNKNOWN_BLOCK</td>
<td>The requested block has not been produced yet or it has been garbage-collected (cleaned up to save space on the RPC node)</td>
<td>
<ul>
<li>Check that the requested block is legit</li>
<li>If the block had been produced more than 5 epochs ago, try to send your request to <a href="https://near-nodes.io/intro/node-types#archival-node">an archival node</a></li>
</ul>
</td>
</tr>
<tr>
<td>NOT_SYNCED_YET</td>
<td>The node is still syncing and the requested block is not in the database yet</td>
<td>
<ul>
<li>Wait until the node finish syncing</li>
<li>Send a request to a different node which is synced</li>
</ul>
</td>
</tr>
<tr class="stripe">
<td>REQUEST_VALIDATION_ERROR</td>
<td>PARSE_ERROR</td>
<td>Passed arguments can't be parsed by JSON RPC server (missing arguments, wrong format, etc.)</td>
<td>
<ul>
<li>Check the arguments passed and pass the correct ones</li>
<li>Check <code>error.cause.info</code> for more details</li>
</ul>
</td>
</tr>
<tr>
<td>INTERNAL_ERROR</td>
<td>INTERNAL_ERROR</td>
<td>Something went wrong with the node itself or overloaded</td>
<td>
<ul>
<li>Try again later</li>
<li>Send a request to a different node</li>
<li>Check <code>error.cause.info</code> for more details</li>
</ul>
</td>
</tr>
</tbody>
</table>
Read more...
What is the Changes in Block?
Returns changes in block for given block height or hash. You can also use finality param to return latest block details.
Note: You may choose to search by a specific block or finality, you can not choose both.
- method:
EXPERIMENTAL_changes_in_block
- params:
finality OR block_id
finality
<Tabs>
<TabItem value="json" label="JSON" default>
{
  "jsonrpc": "2.0",
  "id": "dontcare",
  "method": "EXPERIMENTAL_changes_in_block",
  "params": {
    "finality": "final"
  }
}
</TabItem>
<TabItem value="js" label="JavaScript">
const response = await near.connection.provider.experimental_changes_in_block({
  finality: "final",
});
</TabItem>
<TabItem value="http" label="HTTPie">
http post https://rpc.testnet.near.org jsonrpc=2.0 id=dontcare method=EXPERIMENTAL_changes_in_block \
  params:='{
    "finality": "final"
  }'
</TabItem>
</Tabs>
[block_id]
<Tabs>
<TabItem value="json" label="JSON" default>
{
  "jsonrpc": "2.0",
  "id": "dontcare",
  "method": "EXPERIMENTAL_changes_in_block",
  "params": {
    "block_id": 17821135
  }
}
</TabItem>
<TabItem value="js" label="JavaScript">
const response = await near.connection.provider.experimental_changes_in_block(
  17821135
);
</TabItem>
<TabItem value="http" label="HTTPie">
http post https://rpc.testnet.near.org jsonrpc=2.0 id=dontcare method=EXPERIMENTAL_changes_in_block \
  params:='{
    "block_id": 17821135
  }'
</TabItem>
</Tabs>
block_hash
<Tabs>
<TabItem value="json" label="JSON" default>
{
  "jsonrpc": "2.0",
  "id": "dontcare",
  "method": "EXPERIMENTAL_changes_in_block",
  "params": {
    "block_id": "81k9ked5s34zh13EjJt26mxw5npa485SY4UNoPi6yYLo"
  }
}
</TabItem>
<TabItem value="js" label="JavaScript">
const response = await near.connection.provider.experimental_changes_in_block(
  "81k9ked5s34zh13EjJt26mxw5npa485SY4UNoPi6yYLo"
);
</TabItem>
<TabItem value="http" label="HTTPie">
http post https://rpc.testnet.near.org jsonrpc=2.0 id=dontcare method=EXPERIMENTAL_changes_in_block \
  params:='{
    "block_id": "81k9ked5s34zh13EjJt26mxw5npa485SY4UNoPi6yYLo"
  }'
</TabItem>
</Tabs>
<details>
<summary>Example response: </summary>
<p>
{
  "jsonrpc": "2.0",
  "result": {
    "block_hash": "81k9ked5s34zh13EjJt26mxw5npa485SY4UNoPi6yYLo",
    "changes": [
      {
        "type": "account_touched",
        "account_id": "lee.testnet"
      },
      {
        "type": "contract_code_touched",
        "account_id": "lee.testnet"
      },
      {
        "type": "access_key_touched",
        "account_id": "lee.testnet"
      }
    ]
  },
  "id": "dontcare"
}
</p>
</details>
What Could Go Wrong?? {#what-could-go-wrong-1}
When API request fails, RPC server returns a structured error response with a limited number of well-defined error variants, so client code can exhaustively handle all the possible error cases. Our JSON-RPC errors follow verror convention for structuring the error response:
{
    "error": {
        "name": <ERROR_TYPE>,
        "cause": {
            "info": {..},
            "name": <ERROR_CAUSE>
        },
        "code": -32000,
        "data": String,
        "message": "Server error",
    },
    "id": "dontcare",
    "jsonrpc": "2.0"
}
Heads up
The fields code, data, and message in the structure above are considered legacy ones and might be deprecated in the future. Please, don't rely on them.
Here is the exhaustive list of the error variants that can be returned by EXPERIMENTAL_changes_in_block method:
<table class="custom-stripe">
<thead>
<tr>
<th>
ERROR_TYPE<br />
<code>error.name</code>
</th>
<th>ERROR_CAUSE<br /><code>error.cause.name</code></th>
<th>Reason</th>
<th>Solution</th>
</tr>
</thead>
<tbody>
<tr>
<td rowspan="2">HANDLER_ERROR</td>
<td>UNKNOWN_BLOCK</td>
<td>The requested block has not been produced yet or it has been garbage-collected (cleaned up to save space on the RPC node)</td>
<td>
<ul>
<li>Check that the requested block is legit</li>
<li>If the block had been produced more than 5 epochs ago, try to send your request to <a href="https://near-nodes.io/intro/node-types#archival-node">an archival node</a></li>
</ul>
</td>
</tr>
<tr>
<td>NOT_SYNCED_YET</td>
<td>The node is still syncing and the requested block is not in the database yet</td>
<td>
<ul>
<li>Wait until the node finish syncing</li>
<li>Send a request to a different node which is synced</li>
</ul>
</td>
</tr>
<tr class="stripe">
<td>REQUEST_VALIDATION_ERROR</td>
<td>PARSE_ERROR</td>
<td>Passed arguments can't be parsed by JSON RPC server (missing arguments, wrong format, etc.)</td>
<td>
<ul>
<li>Check the arguments passed and pass the correct ones</li>
<li>Check <code>error.cause.info</code> for more details</li>
</ul>
</td>
</tr>
<tr>
<td>INTERNAL_ERROR</td>
<td>INTERNAL_ERROR</td>
<td>Something went wrong with the node itself or overloaded</td>
<td>
<ul>
<li>Try again later</li>
<li>Send a request to a different node</li>
<li>Check <code>error.cause.info</code> for more details</li>
</ul>
</td>
</tr>
</tbody>
</table>
Read more...
What is the View account?
Returns basic account information.
- method:
query
- params:
request_type: view_accountfinality OR block_idaccount_id: "example.testnet"
Example:
<Tabs>
<TabItem value="json" label="JSON" default>
{
  "jsonrpc": "2.0",
  "id": "dontcare",
  "method": "query",
  "params": {
    "request_type": "view_account",
    "finality": "final",
    "account_id": "nearkat.testnet"
  }
}
</TabItem>
<TabItem value="js" label="JavaScript">
const response = await near.connection.provider.query({
  request_type: "view_account",
  finality: "final",
  account_id: "nearkat.testnet",
});
</TabItem>
<TabItem value="http" label="HTTPie">
http post https://rpc.testnet.near.org jsonrpc=2.0 id=dontcare method=query \
  params:='{
    "request_type": "view_account",
    "finality": "final",
    "account_id": "nearkat.testnet"
  }'
</TabItem>
</Tabs>
<details>
<summary>Example response: </summary>
<p>
{
  "jsonrpc": "2.0",
  "result": {
    "amount": "399992611103597728750000000",
    "locked": "0",
    "code_hash": "11111111111111111111111111111111",
    "storage_usage": 642,
    "storage_paid_at": 0,
    "block_height": 17795474,
    "block_hash": "9MjpcnwW3TSdzGweNfPbkx8M74q1XzUcT1PAN8G5bNDz"
  },
  "id": "dontcare"
}
</p>
</details>
What Could Go Wrong? {#what-could-go-wrong}
When API request fails, RPC server returns a structured error response with a limited number of well-defined error variants, so client code can exhaustively handle all the possible error cases. Our JSON-RPC errors follow verror convention for structuring the error response:
{
    "error": {
        "name": <ERROR_TYPE>,
        "cause": {
            "info": {..},
            "name": <ERROR_CAUSE>
        },
        "code": -32000,
        "data": String,
        "message": "Server error",
    },
    "id": "dontcare",
    "jsonrpc": "2.0"
}
Heads up
The fields code, data, and message in the structure above are considered legacy ones and might be deprecated in the future. Please, don't rely on them.
Here is the exhaustive list of the error variants that can be returned by view_account request type:
<table class="custom-stripe">
<thead>
<tr>
<th>
ERROR_TYPE<br />
<code>error.name</code>
</th>
<th>ERROR_CAUSE<br /><code>error.cause.name</code></th>
<th>Reason</th>
<th>Solution</th>
</tr>
</thead>
<tbody>
<tr>
<td rowspan="5">HANDLER_ERROR</td>
<td>UNKNOWN_BLOCK</td>
<td>The requested block has not been produced yet or it has been garbage-collected (cleaned up to save space on the RPC node)</td>
<td>
<ul>
<li>Check that the requested block is legit</li>
<li>If the block had been produced more than 5 epochs ago, try to send your request to <a href="https://near-nodes.io/intro/node-types#archival-node">an archival node</a></li>
</ul>
</td>
</tr>
<tr>
<td>INVALID_ACCOUNT</td>
<td>The requested <code>account_id</code> is invalid</td>
<td>
<ul>
<li>Provide a valid <code>account_id</code></li>
</ul>
</td>
</tr>
<tr>
<td>UNKNOWN_ACCOUNT</td>
<td>The requested <code>account_id</code> has not been found while viewing since the account has not been created or has been already deleted</td>
<td>
<ul>
<li>Check the <code>account_id</code></li>
<li>Specify a different block or retry if you request the latest state</li>
</ul>
</td>
</tr>
<tr>
<td>UNAVAILABLE_SHARD</td>
<td>The node was unable to find the requested data because it does not track the shard where data is present</td>
<td>
<ul>
<li>Send a request to a different node which might track the shard</li>
</ul>
</td>
</tr>
<tr>
<td>NO_SYNCED_BLOCKS</td>
<td>The node is still syncing and the requested block is not in the database yet</td>
<td>
<ul>
<li>Wait until the node finish syncing</li>
<li>Send a request to a different node which is synced</li>
</ul>
</td>
</tr>
<tr class="stripe">
<td>REQUEST_VALIDATION_ERROR</td>
<td>PARSE_ERROR</td>
<td>Passed arguments can't be parsed by JSON RPC server (missing arguments, wrong format, etc.)</td>
<td>
<ul>
<li>Check the arguments passed and pass the correct ones</li>
<li>Check <code>error.cause.info</code> for more details</li>
</ul>
</td>
</tr>
<tr>
<td>INTERNAL_ERROR</td>
<td>INTERNAL_ERROR</td>
<td>Something went wrong with the node itself or overloaded</td>
<td>
<ul>
<li>Try again later</li>
<li>Send a request to a different node</li>
<li>Check <code>error.cause.info</code> for more details</li>
</ul>
</td>
</tr>
</tbody>
</table>
Read more...
What are the View account changes?
Returns account changes from transactions in a given account.
- method:
EXPERIMENTAL_changes
- params:
changes_type: account_changesaccount_ids: ["example.testnet"]finality OR block_id
Example:
<Tabs>
<TabItem value="json" label="JSON" default>
{
  "jsonrpc": "2.0",
  "id": "dontcare",
  "method": "EXPERIMENTAL_changes",
  "params": {
    "changes_type": "account_changes",
    "account_ids": ["your_account.testnet"],
    "block_id": 19703467
  }
}
</TabItem>
<TabItem value="js" label="JavaScript">
const response = await near.connection.provider.experimental_changes({
  changes_type: "account_changes",
  account_ids: ["nearkat.testnet"],
  block_id: 19703467,
});
</TabItem>
<TabItem value="http" label="HTTPie">
http post https://rpc.testnet.near.org jsonrpc=2.0 id=dontcare method=EXPERIMENTAL_changes \
  params:='{
    "changes_type": "account_changes",
    "account_ids": ["your_account.testnet"],
    "block_id": 19703467
  }'
</TabItem>
</Tabs>
<details>
<summary>Example response: </summary>
<p>
{
  "jsonrpc": "2.0",
  "result": {
    "block_hash": "6xsfPSG89s6fCMShxxxQTP6D4ZHM9xkGCgubayTDRzAP",
    "changes": [
      {
        "cause": {
          "type": "transaction_processing",
          "tx_hash": "HLvxLKFM7gohFSqXPp5SpyydNEVpAno352qJJbnddsz3"
        },
        "type": "account_update",
        "change": {
          "account_id": "your_account.testnet",
          "amount": "499999959035075000000000000",
          "locked": "0",
          "code_hash": "11111111111111111111111111111111",
          "storage_usage": 182,
          "storage_paid_at": 0
        }
      },
      {
        "cause": {
          "type": "receipt_processing",
          "receipt_hash": "CPenN1dp4DNKnb9LiL5hkPmu1WiKLMuM7msDjEZwDmwa"
        },
        "type": "account_update",
        "change": {
          "account_id": "your_account.testnet",
          "amount": "499999959035075000000000000",
          "locked": "0",
          "code_hash": "11111111111111111111111111111111",
          "storage_usage": 264,
          "storage_paid_at": 0
        }
      }
    ]
  },
  "id": "dontcare"
}
</p>
</details>
What Could Go Wrong? {#what-could-go-wrong-1}
When API request fails, RPC server returns a structured error response with a limited number of well-defined error variants, so client code can exhaustively handle all the possible error cases. Our JSON-RPC errors follow verror convention for structuring the error response:
{
    "error": {
        "name": <ERROR_TYPE>,
        "cause": {
            "info": {..},
            "name": <ERROR_CAUSE>
        },
        "code": -32000,
        "data": String,
        "message": "Server error",
    },
    "id": "dontcare",
    "jsonrpc": "2.0"
}
Heads up
The fields code, data, and message in the structure above are considered legacy ones and might be deprecated in the future. Please, don't rely on them.
Here is the exhaustive list of the error variants that can be returned by EXPERIMENTAL_changes method:
<table class="custom-stripe">
<thead>
<tr>
<th>
ERROR_TYPE<br />
<code>error.name</code>
</th>
<th>ERROR_CAUSE<br /><code>error.cause.name</code></th>
<th>Reason</th>
<th>Solution</th>
</tr>
</thead>
<tbody>
<tr>
<td rowspan="2">HANDLER_ERROR</td>
<td>UNKNOWN_BLOCK</td>
<td>The requested block has not been produced yet or it has been garbage-collected (cleaned up to save space on the RPC node)</td>
<td>
<ul>
<li>Check that the requested block is legit</li>
<li>If the block had been produced more than 5 epochs ago, try to send your request to <a href="https://near-nodes.io/intro/node-types#archival-node">an archival node</a></li>
</ul>
</td>
</tr>
<tr>
<td>NOT_SYNCED_YET</td>
<td>The node is still syncing and the requested block is not in the database yet</td>
<td>
<ul>
<li>Wait until the node finish syncing</li>
<li>Send a request to a different node which is synced</li>
</ul>
</td>
</tr>
<tr class="stripe">
<td>REQUEST_VALIDATION_ERROR</td>
<td>PARSE_ERROR</td>
<td>Passed arguments can't be parsed by JSON RPC server (missing arguments, wrong format, etc.)</td>
<td>
<ul>
<li>Check the arguments passed and pass the correct ones</li>
<li>Check <code>error.cause.info</code> for more details</li>
</ul>
</td>
</tr>
<tr>
<td>INTERNAL_ERROR</td>
<td>INTERNAL_ERROR</td>
<td>Something went wrong with the node itself or overloaded</td>
<td>
<ul>
<li>Try again later</li>
<li>Send a request to a different node</li>
<li>Check <code>error.cause.info</code> for more details</li>
</ul>
</td>
</tr>
</tbody>
</table>
Read more...
What is the View contract code?
Returns the contract code (Wasm binary) deployed to the account. Please note that the returned code will be encoded in base64.
- method:
query
- params:
request_type: view_codefinality OR block_idaccount_id: "guest-book.testnet",
Example:
<Tabs>
<TabItem value="json" label="JSON" default>
{
  "jsonrpc": "2.0",
  "id": "dontcare",
  "method": "query",
  "params": {
    "request_type": "view_code",
    "finality": "final",
    "account_id": "guest-book.testnet"
  }
}
</TabItem>
<TabItem value="js" label="JavaScript">
const response = await near.connection.provider.query({
  request_type: "view_code",
  finality: "final",
  account_id: "guest-book.testnet",
});
</TabItem>
<TabItem value="http" label="HTTPie">
http post https://rpc.testnet.near.org jsonrpc=2.0 id=dontcare method=query \
  params:='{
    "request_type": "view_code",
    "finality": "final",
    "account_id": "guest-book.testnet"
  }'
</TabItem>
</Tabs>
<details>
<summary>Example response: </summary>
<p>
{
  "jsonrpc": "2.0",
  "result": {
    "code_base64": "47DEQpj8HBSa+/TImW+5JCeuQeRkm5NMpJWZG3hSuFU=",
    "hash": "7KoFshMQkdyo5iTx8P2LbLu9jQpxRn24d27FrKShNVXs",
    "block_height": 17814234,
    "block_hash": "GT1D8nweVQU1zyCUv399x8vDv2ogVq71w17MyR66hXBB"
  },
  "id": "dontcare"
}
</p>
</details>
What Could Go Wrong? {#what-could-go-wrong-2}
When API request fails, RPC server returns a structured error response with a limited number of well-defined error variants, so client code can exhaustively handle all the possible error cases. Our JSON-RPC errors follow verror convention for structuring the error response:
{
    "error": {
        "name": <ERROR_TYPE>,
        "cause": {
            "info": {..},
            "name": <ERROR_CAUSE>
        },
        "code": -32000,
        "data": String,
        "message": "Server error",
    },
    "id": "dontcare",
    "jsonrpc": "2.0"
}
Heads up
The fields code, data, and message in the structure above are considered legacy ones and might be deprecated in the future. Please, don't rely on them.
Here is the exhaustive list of the error variants that can be returned by view_code request type:
<table class="custom-stripe">
<thead>
<tr>
<th>
ERROR_TYPE<br />
<code>error.name</code>
</th>
<th>ERROR_CAUSE<br /><code>error.cause.name</code></th>
<th>Reason</th>
<th>Solution</th>
</tr>
</thead>
<tbody>
<tr>
<td rowspan="6">HANDLER_ERROR</td>
<td>UNKNOWN_BLOCK</td>
<td>The requested block has not been produced yet or it has been garbage-collected (cleaned up to save space on the RPC node)</td>
<td>
<ul>
<li>Check that the requested block is legit</li>
<li>If the block had been produced more than 5 epochs ago, try to send your request to <a href="https://near-nodes.io/intro/node-types#archival-node">an archival node</a></li>
</ul>
</td>
</tr>
<tr>
<td>INVALID_ACCOUNT</td>
<td>The requested <code>account_id</code> is invalid</td>
<td>
<ul>
<li>Provide a valid <code>account_id</code></li>
</ul>
</td>
</tr>
<tr>
<td>UNKNOWN_ACCOUNT</td>
<td>The requested <code>account_id</code> has not been found while viewing since the account has not been created or has been already deleted</td>
<td>
<ul>
<li>Check the <code>account_id</code></li>
<li>Specify a different block or retry if you request the latest state</li>
</ul>
</td>
</tr>
<tr>
<td>NO_CONTRACT_CODE</td>
<td>The account does not have any <code>contract</code> deployed on it</td>
<td>
<ul>
<li>Use different account</li>
<li>Specify a different block or retry if you request the latest state</li>
</ul>
</td>
</tr>
<tr>
<td>UNAVAILABLE_SHARD</td>
<td>The node was unable to find the requested data because it does not track the shard where data is present</td>
<td>
<ul>
<li>Send a request to a different node which might track the shard</li>
</ul>
</td>
</tr>
<tr>
<td>NO_SYNCED_BLOCKS</td>
<td>The node is still syncing and the requested block is not in the database yet</td>
<td>
<ul>
<li>Wait until the node finish syncing</li>
<li>Send a request to a different node which is synced</li>
</ul>
</td>
</tr>
<tr class="stripe">
<td>REQUEST_VALIDATION_ERROR</td>
<td>PARSE_ERROR</td>
<td>Passed arguments can't be parsed by JSON RPC server (missing arguments, wrong format, etc.)</td>
<td>
<ul>
<li>Check the arguments passed and pass the correct ones</li>
<li>Check <code>error.cause.info</code> for more details</li>
</ul>
</td>
</tr>
<tr>
<td>INTERNAL_ERROR</td>
<td>INTERNAL_ERROR</td>
<td>Something went wrong with the node itself or overloaded</td>
<td>
<ul>
<li>Try again later</li>
<li>Send a request to a different node</li>
<li>Check <code>error.cause.info</code> for more details</li>
</ul>
</td>
</tr>
</tbody>
</table>
Read more...
What is the View contract state?
Returns the state (key value pairs) of a contract based on the key prefix (base64 encoded). Pass an empty string for prefix_base64 if you would like to return the entire state. Please note that the returned state will be base64 encoded as well.
- method:
query
- params:
request_type: view_statefinality OR block_idaccount_id: "guest-book.testnet",prefix_base64: ""
Example:
<Tabs>
<TabItem value="json" label="JSON" default>
{
  "jsonrpc": "2.0",
  "id": "dontcare",
  "method": "query",
  "params": {
    "request_type": "view_state",
    "finality": "final",
    "account_id": "guest-book.testnet",
    "prefix_base64": ""
  }
}
</TabItem>
<TabItem value="js" label="JavaScript">
const response = await near.connection.provider.query({
  request_type: "view_state",
  finality: "final",
  account_id: "guest-book.testnet",
  prefix_base64: "",
});
</TabItem>
<TabItem value="http" label="HTTPie">
http post https://rpc.testnet.near.org jsonrpc=2.0 id=dontcare method=query \
  params:='{
    "request_type": "view_state",
    "finality": "final",
    "account_id": "guest-book.testnet",
    "prefix_base64": ""
  }'
</TabItem>
</Tabs>
<details>
<summary>Example response: </summary>
<p>
{
  "jsonrpc": "2.0",
  "result": {
    "values": [
      {
        "key": "bTo6MA==",
        "value": "eyJwcmVtaXVtIjp0cnVlLCJzZW5kZXIiOiJqb3NoZm9yZC50ZXN0bmV0IiwidGV4dCI6ImhlbGxvIn0=",
        "proof": []
      },
      {
        "key": "bTo6MQ==",
        "value": "eyJwcmVtaXVtIjpmYWxzZSwic2VuZGVyIjoiY2hhZG9oIiwidGV4dCI6ImhlbGxvIGVyeWJvZHkifQ==",
        "proof": []
      },
      {
        "key": "bTo6MTA=",
        "value": "eyJwcmVtaXVtIjpmYWxzZSwic2VuZGVyIjoic2F0b3NoaWYudGVzdG5ldCIsInRleHQiOiJIaWxsbyEifQ==",
        "proof": []
      },
      {
        "key": "bTo6MTE=",
        "value": "eyJwcmVtaXVtIjpmYWxzZSwic2VuZGVyIjoidmFsZW50aW5lc29rb2wudGVzdG5ldCIsInRleHQiOiJIaSEifQ==",
        "proof": []
      },
      {
        "key": "bTo6MTI=",
        "value": "eyJwcmVtaXVtIjp0cnVlLCJzZW5kZXIiOiJobngudGVzdG5ldCIsInRleHQiOiJoZWxsbyJ9",
        "proof": []
      },
      {
        "key": "bTo6MTM=",
        "value": "eyJwcmVtaXVtIjp0cnVlLCJzZW5kZXIiOiJobngudGVzdG5ldCIsInRleHQiOiJzZCJ9",
        "proof": []
      },
      {
        "key": "bTo6MTQ=",
        "value": "eyJwcmVtaXVtIjpmYWxzZSwic2VuZGVyIjoiamdoZy50ZXN0bmV0IiwidGV4dCI6IktoZyJ9",
        "proof": []
      },
      {
        "key": "bTo6MTU=",
        "value": "eyJwcmVtaXVtIjpmYWxzZSwic2VuZGVyIjoiYWNjb3VudC50ZXN0bmV0IiwidGV4dCI6IldoZW4gSUNPPyJ9",
        "proof": []
      },
      {
        "key": "bTo6MTY=",
        "value": "eyJwcmVtaXVtIjpmYWxzZSwic2VuZGVyIjoiYWNjb3VudC50ZXN0bmV0IiwidGV4dCI6IlRlc3QgMiJ9",
        "proof": []
      },
      {
        "key": "bTo6MTc=",
        "value": "eyJwcmVtaXVtIjpmYWxzZSwic2VuZGVyIjoidGVzdC1kcm9wLTEwLnRlc3RuZXQiLCJ0ZXh0IjoiRnJlZSBtZXNzYWdlcyBhcmUgdGhlIGJlc3QifQ==",
        "proof": []
      },
      {
        "key": "bTo6MTg=",
        "value": "eyJwcmVtaXVtIjpmYWxzZSwic2VuZGVyIjoidGVzdC1kcm9wLTEwLnRlc3RuZXQiLCJ0ZXh0IjoiV2hlbiBJQ08/In0=",
        "proof": []
      },
      {
        "key": "bTo6MTk=",
        "value": "eyJwcmVtaXVtIjpmYWxzZSwic2VuZGVyIjoidGVzdC1kcm9wLTEwLnRlc3RuZXQiLCJ0ZXh0IjoiV2hlbiBJQ08/In0=",
        "proof": []
      },
      {
        "key": "bTo6Mg==",
        "value": "eyJwcmVtaXVtIjpmYWxzZSwic2VuZGVyIjoibnVsbCIsInRleHQiOiJ1bmRlZmluZWQifQ==",
        "proof": []
      },
      {
        "key": "bTo6MjA=",
        "value": "eyJwcmVtaXVtIjpmYWxzZSwic2VuZGVyIjoidGVzdC04NDEudGVzdG5ldCIsInRleHQiOiJXaGVuIElDTz8ifQ==",
        "proof": []
      },
      {
        "key": "bTo6MjE=",
        "value": "eyJwcmVtaXVtIjpmYWxzZSwic2VuZGVyIjoidGVzdC04NDEudGVzdG5ldCIsInRleHQiOiJoZXkgaGV5IGhleSJ9",
        "proof": []
      },
      {
        "key": "bTo6MjI=",
        "value": "eyJwcmVtaXVtIjpmYWxzZSwic2VuZGVyIjoiam9zaGZvcmQudGVzdG5ldCIsInRleHQiOiJoaSJ9",
        "proof": []
      },
      {
        "key": "bTo6MjM=",
        "value": "eyJwcmVtaXVtIjpmYWxzZSwic2VuZGVyIjoiam9zaGZvcmQudGVzdG5ldCIsInRleHQiOiJoaSB4MiJ9",
        "proof": []
      },
      {
        "key": "bTo6MjQ=",
        "value": "eyJwcmVtaXVtIjpmYWxzZSwic2VuZGVyIjoibWFzdGVydGh5c2VsZi50ZXN0bmV0IiwidGV4dCI6ImhhbmRzaGFrZS5oYWNrbWVkb21haW4vICJ9",
        "proof": []
      },
      {
        "key": "bTo6MjU=",
        "value": "eyJwcmVtaXVtIjp0cnVlLCJzZW5kZXIiOiJtYXN0ZXJ0aHlzZWxmLnRlc3RuZXQiLCJ0ZXh0IjoiSGVsbG8gQ29zbW9zLCBob21lLmNvc21hdHJpeGNvbm5lY3Rpb25zLyJ9",
        "proof": []
      },
      {
        "key": "bTo6MjY=",
        "value": "eyJwcmVtaXVtIjp0cnVlLCJzZW5kZXIiOiJtYXN0ZXJ0aHlzZWxmLnRlc3RuZXQiLCJ0ZXh0IjoiYnVpbGQsIGJ1aWxkLCBidWlsZCBpIGNhbWUgdG8gYnVpbGQgYSBicmlkZ2UgaW4gUEVBQ0UsIHNvIGNvbWUgbGV0cyBidWlsZC4uLnNvbmcgYnkgXCJOYWhrbyBCZWFyXCIgIn0=",
        "proof": []
      },
      {
        "key": "bTo6Mjc=",
        "value": "eyJwcmVtaXVtIjp0cnVlLCJzZW5kZXIiOiJtYXN0ZXJ0aHlzZWxmLnRlc3RuZXQiLCJ0ZXh0IjoiYnVpbGQgYSBicmlkZ2UgKGh0dHBzOi8vd3d3Lmdvb2dsZS5jb20vdXJsP3NhPXQmcmN0PWomcT0mZXNyYz1zJnNvdXJjZT13ZWImY2Q9JmNhZD1yamEmdWFjdD04JnZlZD0yYWhVS0V3ajA0ZGlnMTlqckFoV05tbGtLSGR5X0FnUVEzeXd3QUhvRUNBVVFBZyZ1cmw9aHR0cHMlM0ElMkYlMkZ3d3cueW91dHViZS5jb20lMkZ3YXRjaCUzRnYlM0Rlb1RYNWZmOVplMCZ1c2c9QU92VmF3MFoxZzFIMkZzeF85d3FJSmg5RTk2UCkifQ==",
        "proof": []
      },
      {
        "key": "bTo6Mjg=",
        "value": "eyJwcmVtaXVtIjp0cnVlLCJzZW5kZXIiOiJtYXN0ZXJ0aHlzZWxmLnRlc3RuZXQiLCJ0ZXh0IjoiaHR0cDovL3RyaXBweS7wn42EbWFnaWMvIn0=",
        "proof": []
      },
      {
        "key": "bTo6Mjk=",
        "value": "eyJwcmVtaXVtIjp0cnVlLCJzZW5kZXIiOiJtYXN0ZXJ0aHlzZWxmLnRlc3RuZXQiLCJ0ZXh0IjoiaHR0cDovL3VuaXRlLnJhaW5ib3d0cmliZXMvIn0=",
        "proof": []
      },
      {
        "key": "bTo6Mw==",
        "value": "eyJwcmVtaXVtIjpmYWxzZSwic2VuZGVyIjoiam9zaGZvcmQudGVzdG5ldCIsInRleHQiOiJobW1tbW1tIn0=",
        "proof": []
      },
      {
        "key": "bTo6MzA=",
        "value": "eyJwcmVtaXVtIjpmYWxzZSwic2VuZGVyIjoiZXhlbXBsYXJ5LnRlc3RuZXQiLCJ0ZXh0IjoiaGVsbG8ifQ==",
        "proof": []
      },
      {
        "key": "bTo6MzE=",
        "value": "eyJwcmVtaXVtIjpmYWxzZSwic2VuZGVyIjoiYWRpMjMudGVzdG5ldCIsInRleHQiOiJobW0ifQ==",
        "proof": []
      },
      {
        "key": "bTo6MzI=",
        "value": "eyJwcmVtaXVtIjpmYWxzZSwic2VuZGVyIjoiYWRpMjMudGVzdG5ldCIsInRleHQiOiJ3aGF0In0=",
        "proof": []
      },
      {
        "key": "bTo6MzM=",
        "value": "eyJwcmVtaXVtIjpmYWxzZSwic2VuZGVyIjoidmxhZGJhc2gudGVzdG5ldCIsInRleHQiOiJIaSJ9",
        "proof": []
      },
      {
        "key": "bTo6NA==",
        "value": "eyJwcmVtaXVtIjpmYWxzZSwic2VuZGVyIjoibnVsbCIsInRleHQiOiIgIn0=",
        "proof": []
      },
      {
        "key": "bTo6NQ==",
        "value": "eyJwcmVtaXVtIjp0cnVlLCJzZW5kZXIiOiJ0ZXN0YWNjb3VudDEudGVzdG5ldCIsInRleHQiOiJ0ZXN0In0=",
        "proof": []
      },
      {
        "key": "bTo6Ng==",
        "value": "eyJwcmVtaXVtIjpmYWxzZSwic2VuZGVyIjoiZXVnZW5ldGhlZHJlYW0iLCJ0ZXh0IjoibnVsbCJ9",
        "proof": []
      },
      {
        "key": "bTo6Nw==",
        "value": "eyJwcmVtaXVtIjpmYWxzZSwic2VuZGVyIjoiZGVtby50ZXN0bmV0IiwidGV4dCI6Ikkgb25seSB3cml0ZSBmcmVlIG1lc3NhZ2VzLiJ9",
        "proof": []
      },
      {
        "key": "bTo6OA==",
        "value": "eyJwcmVtaXVtIjp0cnVlLCJzZW5kZXIiOiJqb3NoZm9yZC50ZXN0bmV0IiwidGV4dCI6IkkgcHJlZmVyIHByZW1pdW0gbWVzc2FnZXMifQ==",
        "proof": []
      },
      {
        "key": "bTo6OQ==",
        "value": "eyJwcmVtaXVtIjp0cnVlLCJzZW5kZXIiOiJuZXdsZWRnZXIzLnRlc3RuZXQiLCJ0ZXh0IjoiTGVkZ2VyIn0=",
        "proof": []
      },
      {
        "key": "bTpsZW4=",
        "value": "MzQ=",
        "proof": []
      }
    ],
    "proof": [],
    "block_height": 17814234,
    "block_hash": "GT1D8nweVQU1zyCUv399x8vDv2ogVq71w17MyR66hXBB"
  },
  "id": "dontcare"
}
</p>
</details>
Heads up
There is a limitation on default RPC nodes. You won't be able to get the contract state if it is too big. The default limit of for contract state is 50kb of state size. You're able to change the limits if you run your own RPC node with adjusted trie_viewer_state_size_limit value in config.json
What Could Go Wrong? {#what-could-go-wrong-3}
When API request fails, RPC server returns a structured error response with a limited number of well-defined error variants, so client code can exhaustively handle all the possible error cases. Our JSON-RPC errors follow verror convention for structuring the error response:
{
    "error": {
        "name": <ERROR_TYPE>,
        "cause": {
            "info": {..},
            "name": <ERROR_CAUSE>
        },
        "code": -32000,
        "data": String,
        "message": "Server error",
    },
    "id": "dontcare",
    "jsonrpc": "2.0"
}
Heads up
The fields code, data, and message in the structure above are considered legacy ones and might be deprecated in the future. Please, don't rely on them.
Here is the exhaustive list of the error variants that can be returned by view_state request type:
<table class="custom-stripe">
<thead>
<tr>
<th>
ERROR_TYPE<br />
<code>error.name</code>
</th>
<th>ERROR_CAUSE<br /><code>error.cause.name</code></th>
<th>Reason</th>
<th>Solution</th>
</tr>
</thead>
<tbody>
<tr>
<td rowspan="7">HANDLER_ERROR</td>
<td>UNKNOWN_BLOCK</td>
<td>The requested block has not been produced yet or it has been garbage-collected (cleaned up to save space on the RPC node)</td>
<td>
<ul>
<li>Check that the requested block is legit</li>
<li>If the block had been produced more than 5 epochs ago, try to send your request to <a href="https://near-nodes.io/intro/node-types#archival-node">an archival node</a></li>
</ul>
</td>
</tr>
<tr>
<td>INVALID_ACCOUNT</td>
<td>The requested <code>account_id</code> is invalid</td>
<td>
<ul>
<li>Provide a valid <code>account_id</code></li>
</ul>
</td>
</tr>
<tr>
<td>UNKNOWN_ACCOUNT</td>
<td>The requested <code>account_id</code> has not been found while viewing since the account has not been created or has been already deleted</td>
<td>
<ul>
<li>Check the <code>account_id</code></li>
<li>Specify a different block or retry if you request the latest state</li>
</ul>
</td>
</tr>
<tr>
<td>NO_CONTRACT_CODE</td>
<td>The account does not have any <code>contract</code> deployed on it</td>
<td>
<ul>
<li>Query and account with contract deployed</li>
<li>Specify a different block or retry if you request the latest state</li>
</ul>
</td>
</tr>
<tr>
<td>TOO_LARGE_CONTRACT_STATE</td>
<td>The requested contract state is too large to be returned from this node (the default limit is 50kb of state size)</td>
<td>
<ul>
<li>Send the request to a node with larger limits in order to view the requested state</li>
<li>Spin up your own node where you can increase the limits to view state</li>
</ul>
</td>
</tr>
<tr>
<td>UNAVAILABLE_SHARD</td>
<td>The node was unable to find the requested data because it does not track the shard where data is present</td>
<td>
<ul>
<li>Send a request to a different node which might track the shard</li>
</ul>
</td>
</tr>
<tr>
<td>NO_SYNCED_BLOCKS</td>
<td>The node is still syncing and the requested block is not in the database yet</td>
<td>
<ul>
<li>Wait until the node finish syncing</li>
<li>Send a request to a different node which is synced</li>
</ul>
</td>
</tr>
<tr class="stripe">
<td>REQUEST_VALIDATION_ERROR</td>
<td>PARSE_ERROR</td>
<td>Passed arguments can't be parsed by JSON RPC server (missing arguments, wrong format, etc.)</td>
<td>
<ul>
<li>Check the arguments passed and pass the correct ones</li>
<li>Check <code>error.cause.info</code> for more details</li>
</ul>
</td>
</tr>
<tr>
<td>INTERNAL_ERROR</td>
<td>INTERNAL_ERROR</td>
<td>Something went wrong with the node itself or overloaded</td>
<td>
<ul>
<li>Try again later</li>
<li>Send a request to a different node</li>
<li>Check <code>error.cause.info</code> for more details</li>
</ul>
</td>
</tr>
</tbody>
</table>
Read more...
What are the View contract state changes?
Returns the state change details of a contract based on the key prefix (encoded to base64). Pass an empty string for this param if you would like to return all state changes.
- method:
EXPERIMENTAL_changes
- params:
changes_type: data_changesaccount_ids: ["example.testnet"],key_prefix_base64: "base64 encoded key value",finality OR block_id
Example:
<Tabs>
<TabItem value="json" label="JSON" default>
{
  "jsonrpc": "2.0",
  "id": "dontcare",
  "method": "EXPERIMENTAL_changes",
  "params": {
    "changes_type": "data_changes",
    "account_ids": ["guest-book.testnet"],
    "key_prefix_base64": "",
    "block_id": 19450732
  }
}
</TabItem>
<TabItem value="js" label="JavaScript">
const response = await near.connection.provider.experimental_changes({
  changes_type: "data_changes",
  account_ids: ["guest-book.testnet"],
  key_prefix_base64: "",
  block_id: 19450732,
});
</TabItem>
<TabItem value="http" label="HTTPie">
http post https://rpc.testnet.near.org jsonrpc=2.0 id=dontcare method=EXPERIMENTAL_changes \
  params:='{
    "changes_type": "data_changes",
    "account_ids": ["guest-book.testnet"],
    "key_prefix_base64": "",
    "block_id": 19450732
  }'
</TabItem>
</Tabs>
<details>
<summary>Example response: </summary>
<p>
{
  "jsonrpc": "2.0",
  "result": {
    "block_hash": "6U8Yd4JFZwJUNfqkD4KaKgTKmpNSmVRTSggpjmsRWdKY",
    "changes": [
      {
        "cause": {
          "type": "receipt_processing",
          "receipt_hash": "9ewznXgs2t7vRCssxW4thgaiwggnMagKybZ7ryLNTT2z"
        },
        "type": "data_update",
        "change": {
          "account_id": "guest-book.testnet",
          "key_base64": "bTo6Mzk=",
          "value_base64": "eyJwcmVtaXVtIjpmYWxzZSwic2VuZGVyIjoiZmhyLnRlc3RuZXQiLCJ0ZXh0IjoiSGkifQ=="
        }
      },
      {
        "cause": {
          "type": "receipt_processing",
          "receipt_hash": "9ewznXgs2t7vRCssxW4thgaiwggnMagKybZ7ryLNTT2z"
        },
        "type": "data_update",
        "change": {
          "account_id": "guest-book.testnet",
          "key_base64": "bTpsZW4=",
          "value_base64": "NDA="
        }
      }
    ]
  },
  "id": "dontcare"
}
</p>
</details>
What Could Go Wrong? {#what-could-go-wrong-4}
When API request fails, RPC server returns a structured error response with a limited number of well-defined error variants, so client code can exhaustively handle all the possible error cases. Our JSON-RPC errors follow verror convention for structuring the error response:
{
    "error": {
        "name": <ERROR_TYPE>,
        "cause": {
            "info": {..},
            "name": <ERROR_CAUSE>
        },
        "code": -32000,
        "data": String,
        "message": "Server error",
    },
    "id": "dontcare",
    "jsonrpc": "2.0"
}
Heads up
The fields code, data, and message in the structure above are considered legacy ones and might be deprecated in the future. Please, don't rely on them.
Here is the exhaustive list of the error variants that can be returned by EXPERIMENTAL_changes method:
<table class="custom-stripe">
<thead>
<tr>
<th>
ERROR_TYPE<br />
<code>error.name</code>
</th>
<th>ERROR_CAUSE<br /><code>error.cause.name</code></th>
<th>Reason</th>
<th>Solution</th>
</tr>
</thead>
<tbody>
<tr>
<td rowspan="2">HANDLER_ERROR</td>
<td>UNKNOWN_BLOCK</td>
<td>The requested block has not been produced yet or it has been garbage-collected (cleaned up to save space on the RPC node)</td>
<td>
<ul>
<li>Check that the requested block is legit</li>
<li>If the block had been produced more than 5 epochs ago, try to send your request to <a href="https://near-nodes.io/intro/node-types#archival-node">an archival node</a></li>
</ul>
</td>
</tr>
<tr>
<td>NOT_SYNCED_YET</td>
<td>The node is still syncing and the requested block is not in the database yet</td>
<td>
<ul>
<li>Wait until the node finish syncing</li>
<li>Send a request to a different node which is synced</li>
</ul>
</td>
</tr>
<tr class="stripe">
<td>REQUEST_VALIDATION_ERROR</td>
<td>PARSE_ERROR</td>
<td>Passed arguments can't be parsed by JSON RPC server (missing arguments, wrong format, etc.)</td>
<td>
<ul>
<li>Check the arguments passed and pass the correct ones</li>
<li>Check <code>error.cause.info</code> for more details</li>
</ul>
</td>
</tr>
<tr>
<td>INTERNAL_ERROR</td>
<td>INTERNAL_ERROR</td>
<td>Something went wrong with the node itself or overloaded</td>
<td>
<ul>
<li>Try again later</li>
<li>Send a request to a different node</li>
<li>Check <code>error.cause.info</code> for more details</li>
</ul>
</td>
</tr>
</tbody>
</table>
Read more...
What are the View contract code changes?
Returns code changes made when deploying a contract. Change is returned is a base64 encoded WASM file.
- method:
EXPERIMENTAL_changes
- params:
changes_type: contract_code_changesaccount_ids: ["example.testnet"],finality OR block_id
Example:
<Tabs>
<TabItem value="json" label="JSON" default>
{
  "jsonrpc": "2.0",
  "id": "dontcare",
  "method": "EXPERIMENTAL_changes",
  "params": {
    "changes_type": "contract_code_changes",
    "account_ids": ["dev-1602714453032-7566969"],
    "block_id": 20046655
  }
}
</TabItem>
<TabItem value="js" label="JavaScript">
const response = await near.connection.provider.experimental_changes({
  changes_type: "contract_code_changes",
  account_ids: ["dev-1602714453032-7566969"],
  block_id: 20046655,
});
</TabItem>
<TabItem value="http" label="HTTPie">
http post https://rpc.testnet.near.org jsonrpc=2.0 id=dontcare method=EXPERIMENTAL_changes \
  params:='{
    "changes_type": "contract_code_changes",
    "account_ids": ["dev-1602714453032-7566969"],
    "block_id": 20046655
  }'
</TabItem>
</Tabs>
<details>
<summary>Example response: </summary>
<p>
{
  "jsonrpc": "2.0",
  "result": {
    "block_hash": "3yLNV5zdpzRJ8HP5xTXcF7jdFxuHnmKNUwWcok4616WZ",
    "changes": [
      {
        "cause": {
          "type": "receipt_processing",
          "receipt_hash": "CEm3NNaNdu9cijh9NvZMM1srbtEYSsBVwGbZxFQYKt5B"
        },
        "type": "contract_code_update",
        "change": {
          "account_id": "dev-1602714453032-7566969",
          "code_base64": "AGFzbQEAAAABpAM3YAF/AGAAAX9gAn9+AGADf35+AGAEf35+fgF+YAZ/fn5+fn4BfmADf35+AX5gAn9+AX5gAn9/AX9gAn9/AGADf39/AX9gAX8BfmACfn4AYAF+AX5gAX4AYAABfmADfn5+AGAAAGAIfn5+fn5+fn4BfmAJfn5+fn5+fn5+AX5gAn5+AX5gA35+fgF+YAd+fn5+fn5+AGAEfn5+fgBgCX5+fn5+fn5+fgBgBX5+fn5+AX5gA39/fwBgAX8Bf2ACf3wAYAR/f39+AGAFf39/fn8AYAV/f39/fwBgBH9/f38AYAN/f38BfmADf39+AGACf38BfmAFf39/f38Bf2AEf39/fwF/YAZ/f39/f38AYAV/f35/fwBgBH9+f38Bf2ACf34Bf2AHf35+f39+fwBgBX9/f39+AGAEf35+fgBgCX9+fn5+fn5+fgF+YAp/fn5+fn5+fn5+AX5gCH9+fn5+fn5+AGAFf35+fn4AYAp/fn5+fn5+fn5+AGAHf39/f39/fwBgBH98f38Bf2AGf39/f39..."
        }
      }
    ]
  },
  "id": "dontcare"
}
</p>
</details>
What Could Go Wrong? {#what-could-go-wrong-5}
When API request fails, RPC server returns a structured error response with a limited number of well-defined error variants, so client code can exhaustively handle all the possible error cases. Our JSON-RPC errors follow verror convention for structuring the error response:
{
    "error": {
        "name": <ERROR_TYPE>,
        "cause": {
            "info": {..},
            "name": <ERROR_CAUSE>
        },
        "code": -32000,
        "data": String,
        "message": "Server error",
    },
    "id": "dontcare",
    "jsonrpc": "2.0"
}
Heads up
The fields code, data, and message in the structure above are considered legacy ones and might be deprecated in the future. Please, don't rely on them.
Here is the exhaustive list of the error variants that can be returned by EXPERIMENTAL_changes method:
<table class="custom-stripe">
<thead>
<tr>
<th>
ERROR_TYPE<br />
<code>error.name</code>
</th>
<th>ERROR_CAUSE<br /><code>error.cause.name</code></th>
<th>Reason</th>
<th>Solution</th>
</tr>
</thead>
<tbody>
<tr>
<td rowspan="2">HANDLER_ERROR</td>
<td>UNKNOWN_BLOCK</td>
<td>The requested block has not been produced yet or it has been garbage-collected (cleaned up to save space on the RPC node)</td>
<td>
<ul>
<li>Check that the requested block is legit</li>
<li>If the block had been produced more than 5 epochs ago, try to send your request to <a href="https://near-nodes.io/intro/node-types#archival-node">an archival node</a></li>
</ul>
</td>
</tr>
<tr>
<td>NOT_SYNCED_YET</td>
<td>The node is still syncing and the requested block is not in the database yet</td>
<td>
<ul>
<li>Wait until the node finish syncing</li>
<li>Send a request to a different node which is synced</li>
</ul>
</td>
</tr>
<tr class="stripe">
<td>REQUEST_VALIDATION_ERROR</td>
<td>PARSE_ERROR</td>
<td>Passed arguments can't be parsed by JSON RPC server (missing arguments, wrong format, etc.)</td>
<td>
<ul>
<li>Check the arguments passed and pass the correct ones</li>
<li>Check <code>error.cause.info</code> for more details</li>
</ul>
</td>
</tr>
<tr>
<td>INTERNAL_ERROR</td>
<td>INTERNAL_ERROR</td>
<td>Something went wrong with the node itself or overloaded</td>
<td>
<ul>
<li>Try again later</li>
<li>Send a request to a different node</li>
<li>Check <code>error.cause.info</code> for more details</li>
</ul>
</td>
</tr>
</tbody>
</table>
Read more...
What are the Table of Resources?
| API |
Description |
| Access Keys |
Retrieve information about an account's access keys. |
| Accounts / Contracts |
View details about accounts and contracts as well as perform contract calls. |
| Block / Chunk |
Query the network and get details about specific blocks or chunks. |
| Gas |
Get gas price for a specific block or hash. |
| Protocol |
Retrieve current genesis and protocol configuration. |
| Network |
Return status information for nodes and validators. |
| Transactions |
Send transactions and query their status. |
You can access the JSON RPC 2.0 endpoints using Postman,
JavaScript, and HTTPie.
Read more...
What are the Node Status?
Returns general status of a given node (sync status, nearcore node version, protocol version, etc), and the current set of validators.
- method:
status
- params:
[]
Example:
<Tabs>
<TabItem value="json" label="JSON" default>
{
  "jsonrpc": "2.0",
  "id": "dontcare",
  "method": "status",
  "params": []
}
</TabItem>
<TabItem value="js" label="JavaScript">
const response = await near.connection.provider.status();
</TabItem>
<TabItem value="http" label="HTTPie">
http post https://rpc.testnet.near.org jsonrpc=2.0 method=status params:='[]' id=dontcare
</TabItem>
</Tabs>
<details>
<summary>Example response: </summary>
<p>
{
  "jsonrpc": "2.0",
  "result": {
    "version": {
      "version": "1.14.0-rc.1",
      "build": "effa3b7a-modified"
    },
    "chain_id": "testnet",
    "protocol_version": 35,
    "latest_protocol_version": 35,
    "rpc_addr": "0.0.0.0:3030",
    "validators": [
      {
        "account_id": "node3",
        "is_slashed": false
      },
      {
        "account_id": "node0",
        "is_slashed": false
      },
      {
        "account_id": "staked.pool.f863973.m0",
        "is_slashed": false
      },
      {
        "account_id": "01node.pool.f863973.m0",
        "is_slashed": false
      },
      {
        "account_id": "node2",
        "is_slashed": false
      },
      {
        "account_id": "dokia.pool.f863973.m0",
        "is_slashed": false
      },
      {
        "account_id": "node1",
        "is_slashed": false
      },
      {
        "account_id": "lowfeevalidation.pool.f863973.m0",
        "is_slashed": false
      },
      {
        "account_id": "sl1sub.pool.f863973.m0",
        "is_slashed": false
      },
      {
        "account_id": "zainy.pool.f863973.m0",
        "is_slashed": false
      },
      {
        "account_id": "chorus-one.pool.f863973.m0",
        "is_slashed": false
      },
      {
        "account_id": "thepassivetrust.pool.f863973.m0",
        "is_slashed": false
      },
      {
        "account_id": "certusone.pool.f863973.m0",
        "is_slashed": false
      },
      {
        "account_id": "joe1.pool.f863973.m0",
        "is_slashed": false
      },
      {
        "account_id": "bisontrails.pool.f863973.m0",
        "is_slashed": false
      },
      {
        "account_id": "valeraverim.pool.f863973.m0",
        "is_slashed": false
      },
      {
        "account_id": "lunanova.pool.f863973.m0",
        "is_slashed": false
      },
      {
        "account_id": "bazilik.pool.f863973.m0",
        "is_slashed": false
      },
      {
        "account_id": "dsrvlabs.pool.f863973.m0",
        "is_slashed": false
      },
      {
        "account_id": "kronos.pool.f863973.m0",
        "is_slashed": false
      },
      {
        "account_id": "nodeasy.pool.f863973.m0",
        "is_slashed": false
      },
      {
        "account_id": "kytzu.pool.f863973.m0",
        "is_slashed": false
      },
      {
        "account_id": "bitcat.pool.f863973.m0",
        "is_slashed": false
      },
      {
        "account_id": "pool_easy2stake.pool.f863973.m0",
        "is_slashed": false
      },
      {
        "account_id": "fresh_lockup.pool.f863973.m0",
        "is_slashed": false
      },
      {
        "account_id": "staking-power.pool.f863973.m0",
        "is_slashed": false
      },
      {
        "account_id": "syncnode.pool.f863973.m0",
        "is_slashed": false
      },
      {
        "account_id": "inotel.pool.f863973.m0",
        "is_slashed": false
      },
      {
        "account_id": "zpool.pool.f863973.m0",
        "is_slashed": false
      },
      {
        "account_id": "aquarius.pool.f863973.m0",
        "is_slashed": false
      },
      {
        "account_id": "cloudpost.pool.f863973.m0",
        "is_slashed": false
      },
      {
        "account_id": "staked.pool.6fb1358",
        "is_slashed": false
      },
      {
        "account_id": "moonlet.pool.f863973.m0",
        "is_slashed": false
      },
      {
        "account_id": "jazza.pool.f863973.m0",
        "is_slashed": false
      },
      {
        "account_id": "orangeclub.pool.f863973.m0",
        "is_slashed": false
      },
      {
        "account_id": "blazenet.pool.f863973.m0",
        "is_slashed": false
      },
      {
        "account_id": "pathrock.pool.f863973.m0",
        "is_slashed": false
      },
      {
        "account_id": "stakin.pool.f863973.m0",
        "is_slashed": false
      },
      {
        "account_id": "northernlights.stakingpool",
        "is_slashed": false
      },
      {
        "account_id": "alexandruast.pool.f863973.m0",
        "is_slashed": false
      },
      {
        "account_id": "top.pool.f863973.m0",
        "is_slashed": false
      }
    ],
    "sync_info": {
      "latest_block_hash": "44kieHwr7Gg5r72V3DgU7cpgV2aySkk5qbBCdvwens8T",
      "latest_block_height": 17774278,
      "latest_state_root": "3MD3fQqnm3JYa9UQgenEJsR6UHoWuHV4Tpr4hZY7QwfY",
      "latest_block_time": "2020-09-27T23:59:38.008063088Z",
      "syncing": false
    },
    "validator_account_id": "nearup-node8"
  },
  "id": "dontcare"
}
</p>
</details>
What could go wrong? {#what-could-go-wrong}
When API request fails, RPC server returns a structured error response with a limited number of well-defined error variants, so client code can exhaustively handle all the possible error cases. Our JSON-RPC errors follow verror convention for structuring the error response:
{
    "error": {
        "name": <ERROR_TYPE>,
        "cause": {
            "info": {..},
            "name": <ERROR_CAUSE>
        },
        "code": -32000,
        "data": String,
        "message": "Server error",
    },
    "id": "dontcare",
    "jsonrpc": "2.0"
}
Heads up
The fields code, data, and message in the structure above are considered legacy ones and might be deprecated in the future. Please, don't rely on them.
Here is the exhaustive list of the error variants that can be returned by status method:
<table>
<thead>
<tr>
<th>
ERROR_TYPE<br />
<code>error.name</code>
</th>
<th>ERROR_CAUSE<br /><code>error.cause.name</code></th>
<th>Reason</th>
<th>Solution</th>
</tr>
</thead>
<tbody>
<tr>
<td>INTERNAL_ERROR</td>
<td>INTERNAL_ERROR</td>
<td>Something went wrong with the node itself or overloaded</td>
<td>
<ul>
<li>Try again later</li>
<li>Send a request to a different node</li>
<li>Check <code>error.cause.info</code> for more details</li>
</ul>
</td>
</tr>
</tbody>
</table>
Read more...
What is the Network Info?
Returns the current state of node network connections (active peers, transmitted data, etc.)
- method:
network_info
- params: none
Example:
<Tabs>
<TabItem value="json" label="JSON" default>
{
  "jsonrpc": "2.0",
  "id": "dontcare",
  "method": "network_info",
  "params": []
}
</TabItem>
<TabItem value="http" label="HTTPie">
http post https://rpc.testnet.near.org jsonrpc=2.0 method=network_info params:='[]' id=dontcare
</TabItem>
</Tabs>
<details>
<summary>Example response:</summary>
<p>
{
  "jsonrpc": "2.0",
  "result": {
    "active_peers": [
      {
        "id": "ed25519:GkDv7nSMS3xcqA45cpMvFmfV1o4fRF6zYo1JRR6mNqg5",
        "addr": "35.193.24.121:24567",
        "account_id": null
      }
    ],
    "num_active_peers": 34,
    "peer_max_count": 40,
    "sent_bytes_per_sec": 17754754,
    "received_bytes_per_sec": 492116,
    "known_producers": [
      {
        "account_id": "node0",
        "addr": null,
        "peer_id": "ed25519:7PGseFbWxvYVgZ89K1uTJKYoKetWs7BJtbyXDzfbAcqX"
      }
    ]
  },
  "id": "dontcare"
}
</p>
</details>
What could go wrong? {#what-could-go-wrong-1}
When API request fails, RPC server returns a structured error response with a limited number of well-defined error variants, so client code can exhaustively handle all the possible error cases. Our JSON-RPC errors follow verror convention for structuring the error response:
{
    "error": {
        "name": <ERROR_TYPE>,
        "cause": {
            "info": {..},
            "name": <ERROR_CAUSE>
        },
        "code": -32000,
        "data": String,
        "message": "Server error",
    },
    "id": "dontcare",
    "jsonrpc": "2.0"
}
Heads up
The fields code, data, and message in the structure above are considered legacy ones and might be deprecated in the future. Please, don't rely on them.
Here is the exhaustive list of the error variants that can be returned by network_info method:
<table>
<thead>
<tr>
<th>
ERROR_TYPE<br />
<code>error.name</code>
</th>
<th>ERROR_CAUSE<br /><code>error.cause.name</code></th>
<th>Reason</th>
<th>Solution</th>
</tr>
</thead>
<tbody>
<tr>
<td>INTERNAL_ERROR</td>
<td>INTERNAL_ERROR</td>
<td>Something went wrong with the node itself or overloaded</td>
<td>
<ul>
<li>Try again later</li>
<li>Send a request to a different node</li>
<li>Check <code>error.cause.info</code> for more details</li>
</ul>
</td>
</tr>
</tbody>
</table>
Read more...
What is the Genesis Config?
Returns current genesis configuration.
- method:
EXPERIMENTAL_genesis_config
- params: none
Example:
<Tabs>
<TabItem value="json" label="JSON" default>
{
  "jsonrpc": "2.0",
  "id": "dontcare",
  "method": "EXPERIMENTAL_genesis_config"
}
</TabItem>
<TabItem value="js" label="JavaScript">
const response = await near.connection.provider.experimental_genesisConfig();
</TabItem>
<TabItem value="http" label="HTTPie">
http post https://rpc.testnet.near.org jsonrpc=2.0 id=dontcare method=EXPERIMENTAL_genesis_config
</TabItem>
</Tabs>
<details>
<summary>Example response: </summary>
<p>
{
  "jsonrpc": "2.0",
  "result": {
    "protocol_version": 29,
    "genesis_time": "2020-07-31T03:39:42.911378Z",
    "chain_id": "testnet",
    "genesis_height": 10885359,
    "num_block_producer_seats": 100,
    "num_block_producer_seats_per_shard": [100],
    "avg_hidden_validator_seats_per_shard": [0],
    "dynamic_resharding": false,
    "protocol_upgrade_stake_threshold": [4, 5],
    "protocol_upgrade_num_epochs": 2,
    "epoch_length": 43200,
    "gas_limit": 1000000000000000,
    "min_gas_price": "5000",
    "max_gas_price": "10000000000000000000000",
    "block_producer_kickout_threshold": 80,
    "chunk_producer_kickout_threshold": 90,
    "online_min_threshold": [90, 100],
    "online_max_threshold": [99, 100],
    "gas_price_adjustment_rate": [1, 100],
    "runtime_config": {
      "storage_amount_per_byte": "90949470177292823791",
      "transaction_costs": {
        "action_receipt_creation_config": {
          "send_sir": 108059500000,
          "send_not_sir": 108059500000,
          "execution": 108059500000
        },
        "data_receipt_creation_config": {
          "base_cost": {
            "send_sir": 4697339419375,
            "send_not_sir": 4697339419375,
            "execution": 4697339419375
          },
          "cost_per_byte": {
            "send_sir": 59357464,
            "send_not_sir": 59357464,
            "execution": 59357464
          }
        },
        "action_creation_config": {
          "create_account_cost": {
            "send_sir": 99607375000,
            "send_not_sir": 99607375000,
            "execution": 99607375000
          },
          "deploy_contract_cost": {
            "send_sir": 184765750000,
            "send_not_sir": 184765750000,
            "execution": 184765750000
          },
          "deploy_contract_cost_per_byte": {
            "send_sir": 6812999,
            "send_not_sir": 6812999,
            "execution": 6812999
          },
          "function_call_cost": {
            "send_sir": 2319861500000,
            "send_not_sir": 2319861500000,
            "execution": 2319861500000
          },
          "function_call_cost_per_byte": {
            "send_sir": 2235934,
            "send_not_sir": 2235934,
            "execution": 2235934
          },
          "transfer_cost": {
            "send_sir": 115123062500,
            "send_not_sir": 115123062500,
            "execution": 115123062500
          },
          "stake_cost": {
            "send_sir": 141715687500,
            "send_not_sir": 141715687500,
            "execution": 102217625000
          },
          "add_key_cost": {
            "full_access_cost": {
              "send_sir": 101765125000,
              "send_not_sir": 101765125000,
              "execution": 101765125000
            },
            "function_call_cost": {
              "send_sir": 102217625000,
              "send_not_sir": 102217625000,
              "execution": 102217625000
            },
            "function_call_cost_per_byte": {
              "send_sir": 1925331,
              "send_not_sir": 1925331,
              "execution": 1925331
            }
          },
          "delete_key_cost": {
            "send_sir": 94946625000,
            "send_not_sir": 94946625000,
            "execution": 94946625000
          },
          "delete_account_cost": {
            "send_sir": 147489000000,
            "send_not_sir": 147489000000,
            "execution": 147489000000
          }
        },
        "storage_usage_config": {
          "num_bytes_account": 100,
          "num_extra_bytes_record": 40
        },
        "burnt_gas_reward": [3, 10],
        "pessimistic_gas_price_inflation_ratio": [103, 100]
      },
      "wasm_config": {
        "ext_costs": {
          "base": 264768111,
          "contract_compile_base": 35445963,
          "contract_compile_bytes": 216750,
          "read_memory_base": 2609863200,
          "read_memory_byte": 3801333,
          "write_memory_base": 2803794861,
          "write_memory_byte": 2723772,
          "read_register_base": 2517165186,
          "read_register_byte": 98562,
          "write_register_base": 2865522486,
          "write_register_byte": 3801564,
          "utf8_decoding_base": 3111779061,
          "utf8_decoding_byte": 291580479,
          "utf16_decoding_base": 3543313050,
          "utf16_decoding_byte": 163577493,
          "sha256_base": 4540970250,
          "sha256_byte": 24117351,
          "keccak256_base": 5879491275,
          "keccak256_byte": 21471105,
          "keccak512_base": 5811388236,
          "keccak512_byte": 36649701,
          "log_base": 3543313050,
          "log_byte": 13198791,
          "storage_write_base": 64196736000,
          "storage_write_key_byte": 70482867,
          "storage_write_value_byte": 31018539,
          "storage_write_evicted_byte": 32117307,
          "storage_read_base": 56356845750,
          "storage_read_key_byte": 30952533,
          "storage_read_value_byte": 5611005,
          "storage_remove_base": 53473030500,
          "storage_remove_key_byte": 38220384,
          "storage_remove_ret_value_byte": 11531556,
          "storage_has_key_base": 54039896625,
          "storage_has_key_byte": 30790845,
          "storage_iter_create_prefix_base": 0,
          "storage_iter_create_prefix_byte": 0,
          "storage_iter_create_range_base": 0,
          "storage_iter_create_from_byte": 0,
          "storage_iter_create_to_byte": 0,
          "storage_iter_next_base": 0,
          "storage_iter_next_key_byte": 0,
          "storage_iter_next_value_byte": 0,
          "touching_trie_node": 16101955926,
          "promise_and_base": 1465013400,
          "promise_and_per_promise": 5452176,
          "promise_return": 560152386,
          "validator_stake_base": 911834726400,
          "validator_total_stake_base": 911834726400
        },
        "grow_mem_cost": 1,
        "regular_op_cost": 3856371,
        "limit_config": {
          "max_gas_burnt": 200000000000000,
          "max_gas_burnt_view": 200000000000000,
          "max_stack_height": 16384,
          "initial_memory_pages": 1024,
          "max_memory_pages": 2048,
          "registers_memory_limit": 1073741824,
          "max_register_size": 104857600,
          "max_number_registers": 100,
          "max_number_logs": 100,
          "max_total_log_length": 16384,
          "max_total_prepaid_gas": 300000000000000,
          "max_actions_per_receipt": 100,
          "max_number_bytes_method_names": 2000,
          "max_length_method_name": 256,
          "max_arguments_length": 4194304,
          "max_length_returned_data": 4194304,
          "max_contract_size": 4194304,
          "max_length_storage_key": 4194304,
          "max_length_storage_value": 4194304,
          "max_promises_per_function_call_action": 1024,
          "max_number_input_data_dependencies": 128
        }
      },
      "account_creation_config": {
        "min_allowed_top_level_account_length": 0,
        "registrar_account_id": "registrar"
      }
    },
    "validators": [
      {
        "account_id": "node0",
        "public_key": "ed25519:7PGseFbWxvYVgZ89K1uTJKYoKetWs7BJtbyXDzfbAcqX",
        "amount": "1000000000000000000000000000000"
      },
      {
        "account_id": "node1",
        "public_key": "ed25519:6DSjZ8mvsRZDvFqFxo8tCKePG96omXW7eVYVSySmDk8e",
        "amount": "1000000000000000000000000000000"
      },
      {
        "account_id": "node2",
        "public_key": "ed25519:GkDv7nSMS3xcqA45cpMvFmfV1o4fRF6zYo1JRR6mNqg5",
        "amount": "1000000000000000000000000000000"
      },
      {
        "account_id": "node3",
        "public_key": "ed25519:ydgzeXHJ5Xyt7M1gXLxqLBW1Ejx6scNV5Nx2pxFM8su",
        "amount": "1000000000000000000000000000000"
      }
    ],
    "transaction_validity_period": 86400,
    "protocol_reward_rate": [1, 10],
    "max_inflation_rate": [1, 20],
    "total_supply": "1031467299046044096035532756810080",
    "num_blocks_per_year": 31536000,
    "protocol_treasury_account": "near",
    "fishermen_threshold": "10000000000000000000",
    "minimum_stake_divisor": 10
  },
  "id": "dontcare"
}
</p>
</details>
What could go wrong? {#what-could-go-wrong}
When API request fails, RPC server returns a structured error response with a limited number of well-defined error variants, so client code can exhaustively handle all the possible error cases. Our JSON-RPC errors follow verror convention for structuring the error response:
{
    "error": {
        "name": <ERROR_TYPE>,
        "cause": {
            "info": {..},
            "name": <ERROR_CAUSE>
        },
        "code": -32000,
        "data": String,
        "message": "Server error",
    },
    "id": "dontcare",
    "jsonrpc": "2.0"
}
Heads up
The fields code, data, and message in the structure above are considered legacy ones and might be deprecated in the future. Please, don't rely on them.
Here is the exhaustive list of the error variants that can be returned by EXPERIMENTAL_genesis_config method:
<table>
<thead>
<tr>
<th>
ERROR_TYPE<br />
<code>error.name</code>
</th>
<th>ERROR_CAUSE<br /><code>error.cause.name</code></th>
<th>Reason</th>
<th>Solution</th>
</tr>
</thead>
<tbody>
<tr>
<td>INTERNAL_ERROR</td>
<td>INTERNAL_ERROR</td>
<td>Something went wrong with the node itself or overloaded</td>
<td>
<ul>
<li>Try again later</li>
<li>Send a request to a different node</li>
<li>Check <code>error.cause.info</code> for more details</li>
</ul>
</td>
</tr>
</tbody>
</table>
Read more...
What is the Postman Setup?
An easy way to test the queries in this documentation page is to use an API request tool such as Postman.
You only need to configure two things:
- Make sure you add a header with a key of
Content-Type and value of application/json.
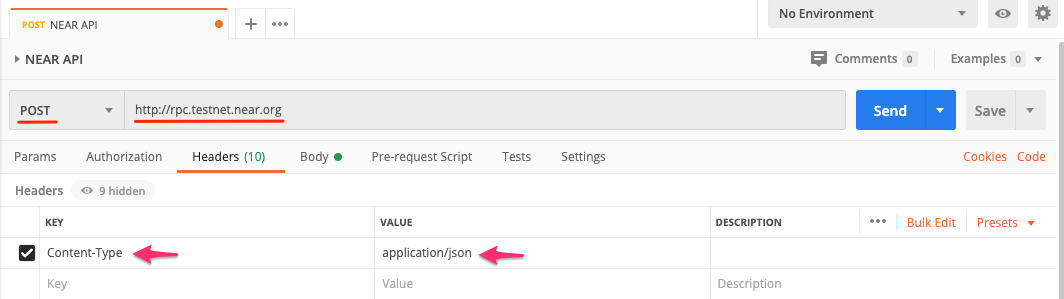
- Then select the
Body tab and choose the raw radio button and ensure JSON is the selected format.
 After that is set up, just copy/paste the
 JSON object example snippets below into the body of your request, on Postman, and click send.
Read more...
What is the JavaScript Setup?
What is the HTTPie Setup?
If you prefer to use a command line interface, we have provided RPC examples you can use with HTTPie. Please note that params take
either an object or array passed as a string.
http post https://rpc.testnet.near.org jsonrpc=2.0 id=dontcare method=network_info params:='[]'
Read more...
What is the Using block_id param?
The block_id param can take either the block number (e.g. 27912554) or the block hash (e.g. '3Xz2wM9rigMXzA2c5vgCP8wTgFBaePucgUmVYPkMqhRL' ) as an argument.
caution
The block IDs of transactions shown in <a href="https://explorer.testnet.near.org">NEAR Explorer</a> are not necessarily the block ID of the executed transaction. Transactions may execute a block or two after its recorded, and in some cases, can take place over several blocks. Due to this, it is important to to check subsequent blocks to be sure all results related to the queried transaction are discovered.
Read more...
What is the Send transaction (async)?
Sends a transaction and immediately returns transaction hash.
- method:
broadcast_tx_async
- params: [SignedTransaction encoded in base64]
Example:
<Tabs>
<TabItem value="json" label="JSON" default>
{
  "jsonrpc": "2.0",
  "id": "dontcare",
  "method": "broadcast_tx_async",
  "params": [
    "DgAAAHNlbmRlci50ZXN0bmV0AOrmAai64SZOv9e/naX4W15pJx0GAap35wTT1T/DwcbbDwAAAAAAAAAQAAAAcmVjZWl2ZXIudGVzdG5ldNMnL7URB1cxPOu3G8jTqlEwlcasagIbKlAJlF5ywVFLAQAAAAMAAACh7czOG8LTAAAAAAAAAGQcOG03xVSFQFjoagOb4NBBqWhERnnz45LY4+52JgZhm1iQKz7qAdPByrGFDQhQ2Mfga8RlbysuQ8D8LlA6bQE="
  ]
}
</TabItem>
<TabItem value="http" label="HTTPie">
http post https://rpc.testnet.near.org jsonrpc=2.0 id=dontcare method=broadcast_tx_async \
    params:='[
        "DgAAAHNlbmRlci50ZXN0bmV0AOrmAai64SZOv9e/naX4W15pJx0GAap35wTT1T/DwcbbDwAAAAAAAAAQAAAAcmVjZWl2ZXIudGVzdG5ldNMnL7URB1cxPOu3G8jTqlEwlcasagIbKlAJlF5ywVFLAQAAAAMAAACh7czOG8LTAAAAAAAAAGQcOG03xVSFQFjoagOb4NBBqWhERnnz45LY4+52JgZhm1iQKz7qAdPByrGFDQhQ2Mfga8RlbysuQ8D8LlA6bQE="
    ]'
</TabItem>
</Tabs>
Example response:
{
  "jsonrpc": "2.0",
  "result": "6zgh2u9DqHHiXzdy9ouTP7oGky2T4nugqzqt9wJZwNFm",
  "id": "dontcare"
}
Final transaction results can be queried using Transaction Status
or NEAR Explorer using the above result hash returning a result similar to the example below.
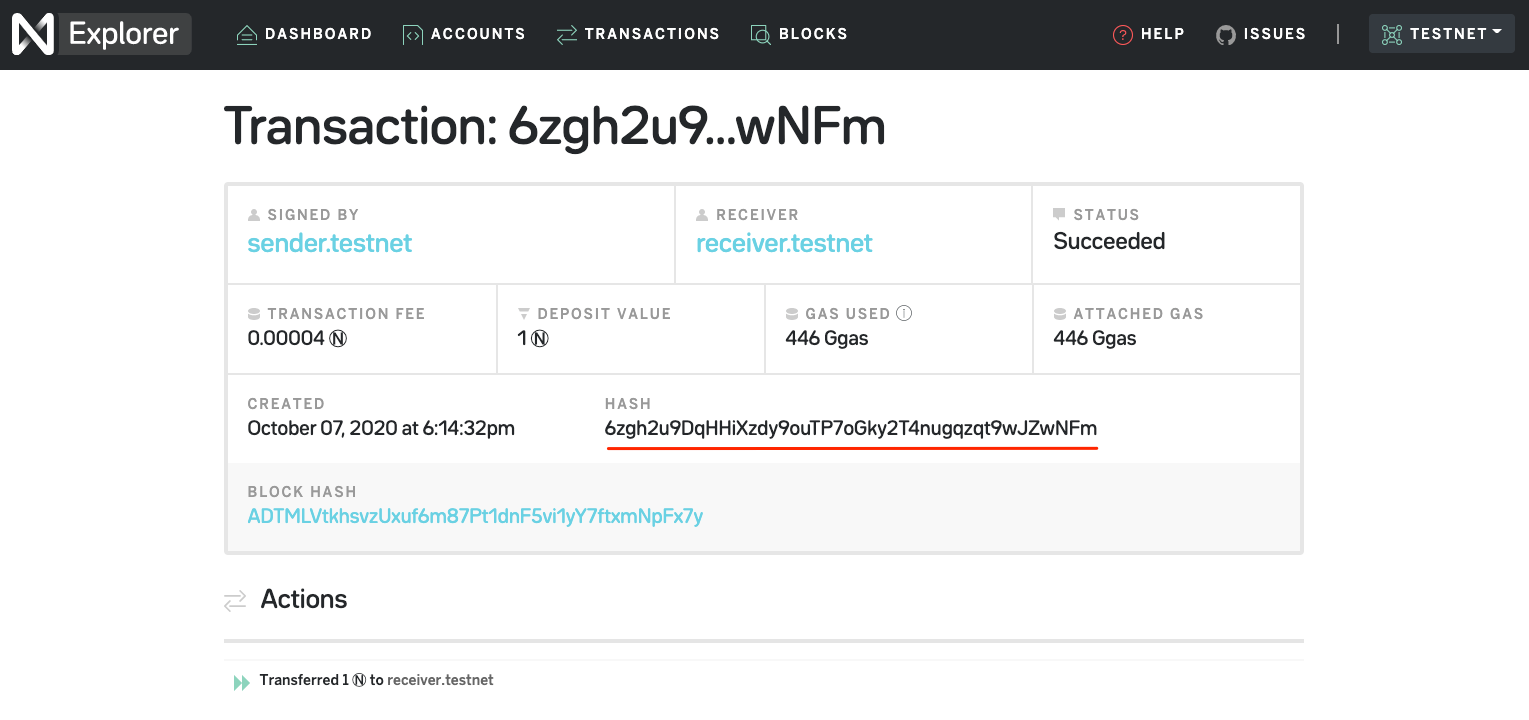
What could go wrong? {#what-could-go-wrong}
When API request fails, RPC server returns a structured error response with a limited number of well-defined error variants, so client code can exhaustively handle all the possible error cases. Our JSON-RPC errors follow verror convention for structuring the error response:
{
    "error": {
        "name": <ERROR_TYPE>,
        "cause": {
            "info": {..},
            "name": <ERROR_CAUSE>
        },
        "code": -32000,
        "data": String,
        "message": "Server error",
    },
    "id": "dontcare",
    "jsonrpc": "2.0"
}
Heads up
The fields code, data, and message in the structure above are considered legacy ones and might be deprecated in the future. Please, don't rely on them.
Here is the exhaustive list of the error variants that can be returned by broadcast_tx_async method:
<table class="custom-stripe">
<thead>
<tr>
<th>
ERROR_TYPE<br />
<code>error.name</code>
</th>
<th>ERROR_CAUSE<br /><code>error.cause.name</code></th>
<th>Reason</th>
<th>Solution</th>
</tr>
</thead>
<tbody>
<tr class="stripe">
<td>REQUEST_VALIDATION_ERROR</td>
<td>PARSE_ERROR</td>
<td>Passed arguments can't be parsed by JSON RPC server (missing arguments, wrong format, etc.)</td>
<td>
<ul>
<li>Check the arguments passed and pass the correct ones</li>
<li>Check <code>error.cause.info</code> for more details</li>
</ul>
</td>
</tr>
</tbody>
</table>
Read more...
What is the Send transaction (await)?
Sends a transaction and waits until transaction is fully complete. (Has a 10 second timeout)
- method:
broadcast_tx_commit
- params:
[SignedTransaction encoded in base64]
Example:
<Tabs>
<TabItem value="json" label="JSON" default>
{
  "jsonrpc": "2.0",
  "id": "dontcare",
  "method": "broadcast_tx_commit",
  "params": [
    "DgAAAHNlbmRlci50ZXN0bmV0AOrmAai64SZOv9e/naX4W15pJx0GAap35wTT1T/DwcbbDQAAAAAAAAAQAAAAcmVjZWl2ZXIudGVzdG5ldIODI4YfV/QS++blXpQYT+bOsRblTRW4f547y/LkvMQ9AQAAAAMAAACh7czOG8LTAAAAAAAAAAXcaTJzu9GviPT7AD4mNJGY79jxTrjFLoyPBiLGHgBi8JK1AnhK8QknJ1ourxlvOYJA2xEZE8UR24THmSJcLQw="
  ]
}
</TabItem>
<TabItem value="http" label="HTTPie">
http post https://rpc.testnet.near.org jsonrpc=2.0 id=dontcare method=broadcast_tx_commit \
    params:='[
        "DwAAAG5lYXJrYXQudGVzdG5ldABuTi5L1rwnlb35hc9tn5WELkxfiGfGh1Q5aeGNQDejo0QAAAAAAAAAEAAAAGpvc2hmb3JkLnRlc3RuZXSiWAc6W9KlqXS5fK+vjFRDV5pAxHRKU0srKX/cmdRTBgEAAAADAAAAoe3MzhvC0wAAAAAAAAB9rOE9zc5zQYLL1j6VTh3I4fQbERs6I07gJfrAC6jo8DB4HolR9Xps3v4qrZxkgZjwv6wB0QOROM4UEbeOaBoB"
    ]'
</TabItem>
</Tabs>
<details>
<summary>Example response: </summary>
<p>
{
  "jsonrpc": "2.0",
  "result": {
    "status": {
      "SuccessValue": ""
    },
    "transaction": {
      "signer_id": "sender.testnet",
      "public_key": "ed25519:Gowpa4kXNyTMRKgt5W7147pmcc2PxiFic8UHW9rsNvJ6",
      "nonce": 13,
      "receiver_id": "receiver.testnet",
      "actions": [
        {
          "Transfer": {
            "deposit": "1000000000000000000000000"
          }
        }
      ],
      "signature": "ed25519:7oCBMfSHrZkT7tzPDBxxCd3tWFhTES38eks3MCZMpYPJRfPWKxJsvmwQiVBBxRLoxPTnXVaMU2jPV3MdFKZTobH",
      "hash": "ASS7oYwGiem9HaNwJe6vS2kznx2CxueKDvU9BAYJRjNR"
    },
    "transaction_outcome": {
      "proof": [],
      "block_hash": "9MzuZrRPW1BGpFnZJUJg6SzCrixPpJDfjsNeUobRXsLe",
      "id": "ASS7oYwGiem9HaNwJe6vS2kznx2CxueKDvU9BAYJRjNR",
      "outcome": {
        "logs": [],
        "receipt_ids": ["BLV2q6p8DX7pVgXRtGtBkyUNrnqkNyU7iSksXG7BjVZh"],
        "gas_burnt": 223182562500,
        "tokens_burnt": "22318256250000000000",
        "executor_id": "sender.testnet",
        "status": {
          "SuccessReceiptId": "BLV2q6p8DX7pVgXRtGtBkyUNrnqkNyU7iSksXG7BjVZh"
        }
      }
    },
    "receipts_outcome": [
      {
        "proof": [],
        "block_hash": "5Hpj1PeCi32ZkNXgiD1DrW4wvW4Xtic74DJKfyJ9XL3a",
        "id": "BLV2q6p8DX7pVgXRtGtBkyUNrnqkNyU7iSksXG7BjVZh",
        "outcome": {
          "logs": [],
          "receipt_ids": ["3sawynPNP8UkeCviGqJGwiwEacfPyxDKRxsEWPpaUqtR"],
          "gas_burnt": 223182562500,
          "tokens_burnt": "22318256250000000000",
          "executor_id": "receiver.testnet",
          "status": {
            "SuccessValue": ""
          }
        }
      },
      {
        "proof": [],
        "block_hash": "CbwEqMpPcu6KwqVpBM3Ry83k6M4H1FrJjES9kBXThcRd",
        "id": "3sawynPNP8UkeCviGqJGwiwEacfPyxDKRxsEWPpaUqtR",
        "outcome": {
          "logs": [],
          "receipt_ids": [],
          "gas_burnt": 0,
          "tokens_burnt": "0",
          "executor_id": "sender.testnet",
          "status": {
            "SuccessValue": ""
          }
        }
      }
    ]
  },
  "id": "dontcare"
}
</p>
</details>
What could go wrong? {#what-could-go-wrong-1}
When API request fails, RPC server returns a structured error response with a limited number of well-defined error variants, so client code can exhaustively handle all the possible error cases. Our JSON-RPC errors follow verror convention for structuring the error response:
{
    "error": {
        "name": <ERROR_TYPE>,
        "cause": {
            "info": {..},
            "name": <ERROR_CAUSE>
        },
        "code": -32000,
        "data": String,
        "message": "Server error",
    },
    "id": "dontcare",
    "jsonrpc": "2.0"
}
Heads up
The fields code, data, and message in the structure above are considered legacy ones and might be deprecated in the future. Please, don't rely on them.
Here is the exhaustive list of the error variants that can be returned by broadcast_tx_commit method:
<table class="custom-stripe">
<thead>
<tr>
<th>
ERROR_TYPE<br />
<code>error.name</code>
</th>
<th>ERROR_CAUSE<br /><code>error.cause.name</code></th>
<th>Reason</th>
<th>Solution</th>
</tr>
</thead>
<tbody>
<tr>
<td rowspan="2">HANDLER_ERROR</td>
<td>INVALID_TRANSACTION</td>
<td>An error happened during transaction execution</td>
<td>
<ul>
<li>See <code>error.cause.info</code> for details</li>
</ul>
</td>
</tr>
<tr>
<td>TIMEOUT_ERROR</td>
<td>Transaction was routed, but has not been recorded on chain in 10 seconds.</td>
<td>
<ul>
<li> Re-submit the request with the identical transaction (in NEAR Protocol unique transactions apply exactly once, so if the previously sent transaction gets applied, this request will just return the known result, otherwise, it will route the transaction to the chain once again)</li>
<li>Check that your transaction is valid</li>
<li>Check that the signer account id has enough tokens to cover the transaction fees (keep in mind that some tokens on each account are locked to cover the storage cost)</li>
</ul>
</td>
</tr>
<tr class="stripe">
<td>REQUEST_VALIDATION_ERROR</td>
<td>PARSE_ERROR</td>
<td>Passed arguments can't be parsed by JSON RPC server (missing arguments, wrong format, etc.)</td>
<td>
<ul>
<li>Check the arguments passed and pass the correct ones</li>
<li>Check <code>error.cause.info</code> for more details</li>
</ul>
</td>
</tr>
<tr>
<td>INTERNAL_ERROR</td>
<td>INTERNAL_ERROR</td>
<td>Something went wrong with the node itself or overloaded</td>
<td>
<ul>
<li>Try again later</li>
<li>Send a request to a different node</li>
<li>Check <code>error.cause.info</code> for more details</li>
</ul>
</td>
</tr>
</tbody>
</table>
Read more...
What are the Transaction Status with Receipts?
Queries status of a transaction by hash, returning the final transaction result and details of all receipts.
- method:
EXPERIMENTAL_tx_status
- params:
transaction hash (see NEAR Explorer for a valid transaction hash)sender account id (used to determine which shard to query for transaction)
Example:
<Tabs>
<TabItem value="json" label="JSON" default>
{
  "jsonrpc": "2.0",
  "id": "dontcare",
  "method": "EXPERIMENTAL_tx_status",
  "params": ["HEgnVQZfs9uJzrqTob4g2Xmebqodq9waZvApSkrbcAhd", "bowen"]
}
</TabItem>
<TabItem value="js" label="JavaScript">
const response = await near.connection.provider.experimental_txStatus(
  "HEgnVQZfs9uJzrqTob4g2Xmebqodq9waZvApSkrbcAhd",
  "bowen"
);
</TabItem>
<TabItem value="http" label="HTTPie">
http post https://rpc.testnet.near.org jsonrpc=2.0 method=EXPERIMENTAL_tx_status params:='["HEgnVQZfs9uJzrqTob4g2Xmebqodq9waZvApSkrbcAhd", "bowen"]' id=dontcare
</TabItem>
</Tabs>
<details><summary>Example response:</summary>
<p>
{
  "id": "123",
  "jsonrpc": "2.0",
  "result": {
    "receipts": [
      {
        "predecessor_id": "bowen",
        "receipt": {
          "Action": {
            "actions": [
              {
                "FunctionCall": {
                  "args": "eyJhbW91bnQiOiIxMDAwIiwicmVjZWl2ZXJfaWQiOiJib3dlbiJ9",
                  "deposit": "0",
                  "gas": 100000000000000,
                  "method_name": "transfer"
                }
              }
            ],
            "gas_price": "186029458",
            "input_data_ids": [],
            "output_data_receivers": [],
            "signer_id": "bowen",
            "signer_public_key": "ed25519:2f9Zv5kuyuPM5DCyEP5pSqg58NQ8Ct9uSRerZXnCS9fK"
          }
        },
        "receipt_id": "FXMVxdhSUZaZftbmPJWaoqhEB9GrKB2oqg9Wgvuyvom8",
        "receiver_id": "evgeny.lockup.m0"
      },
      {
        "predecessor_id": "evgeny.lockup.m0",
        "receipt": {
          "Action": {
            "actions": [
              {
                "Transfer": {
                  "deposit": "1000"
                }
              }
            ],
            "gas_price": "186029458",
            "input_data_ids": [],
            "output_data_receivers": [],
            "signer_id": "bowen",
            "signer_public_key": "ed25519:2f9Zv5kuyuPM5DCyEP5pSqg58NQ8Ct9uSRerZXnCS9fK"
          }
        },
        "receipt_id": "3Ad7pUygUegMUWUb1rEazfjnTaHfptXCABqKQ6WNq6Wa",
        "receiver_id": "bowen"
      },
      {
        "predecessor_id": "system",
        "receipt": {
          "Action": {
            "actions": [
              {
                "Transfer": {
                  "deposit": "19200274886926125000"
                }
              }
            ],
            "gas_price": "0",
            "input_data_ids": [],
            "output_data_receivers": [],
            "signer_id": "bowen",
            "signer_public_key": "ed25519:2f9Zv5kuyuPM5DCyEP5pSqg58NQ8Ct9uSRerZXnCS9fK"
          }
        },
        "receipt_id": "5DdQg9pfoJMX1q6bvhsjyyRihzA3sb9Uq5K1J7vK43Ze",
        "receiver_id": "bowen"
      },
      {
        "predecessor_id": "system",
        "receipt": {
          "Action": {
            "actions": [
              {
                "Transfer": {
                  "deposit": "18663792669276228632284"
                }
              }
            ],
            "gas_price": "0",
            "input_data_ids": [],
            "output_data_receivers": [],
            "signer_id": "bowen",
            "signer_public_key": "ed25519:2f9Zv5kuyuPM5DCyEP5pSqg58NQ8Ct9uSRerZXnCS9fK"
          }
        },
        "receipt_id": "FDp8ovTf5uJYDFemW5op6ebjCT2n4CPExHYie3S1h4qp",
        "receiver_id": "bowen"
      }
    ],
    "receipts_outcome": [
      {
        "block_hash": "HuqYrYsC7h2VERFMgFkqaNqSiFuTH9CA3uJr3BkyNxhF",
        "id": "FXMVxdhSUZaZftbmPJWaoqhEB9GrKB2oqg9Wgvuyvom8",
        "outcome": {
          "executor_id": "evgeny.lockup.m0",
          "gas_burnt": 3493189769144,
          "logs": ["Transferring 1000 to account @bowen"],
          "receipt_ids": [
            "3Ad7pUygUegMUWUb1rEazfjnTaHfptXCABqKQ6WNq6Wa",
            "FDp8ovTf5uJYDFemW5op6ebjCT2n4CPExHYie3S1h4qp"
          ],
          "status": {
            "SuccessReceiptId": "3Ad7pUygUegMUWUb1rEazfjnTaHfptXCABqKQ6WNq6Wa"
          },
          "tokens_burnt": "349318976914400000000"
        },
        "proof": [
          {
            "direction": "Right",
            "hash": "5WwHEszBcpfrHnt2VTvVDVnEEACNq5EpQdjz1aW9gTAa"
          }
        ]
      },
      {
        "block_hash": "DJ6oK5FtPPSwksS6pKdEjFvHWAaSVocnVNLoyi8aYk1k",
        "id": "3Ad7pUygUegMUWUb1rEazfjnTaHfptXCABqKQ6WNq6Wa",
        "outcome": {
          "executor_id": "bowen",
          "gas_burnt": 223182562500,
          "logs": [],
          "receipt_ids": ["5DdQg9pfoJMX1q6bvhsjyyRihzA3sb9Uq5K1J7vK43Ze"],
          "status": {
            "SuccessValue": ""
          },
          "tokens_burnt": "22318256250000000000"
        },
        "proof": [
          {
            "direction": "Right",
            "hash": "CXSXmKpDU8R3UUrBAsffWMeGfKanKqEHCQrHeZkR3RKT"
          },
          {
            "direction": "Right",
            "hash": "2dNo7A1VHKBmMA86m1k3Z9DVXwWgQJGkKGRg8wUR3co9"
          }
        ]
      },
      {
        "block_hash": "9cjUoqAksMbs7ZJ4CXiuwm8vppz9QctTwGmgwZ5mDmUA",
        "id": "5DdQg9pfoJMX1q6bvhsjyyRihzA3sb9Uq5K1J7vK43Ze",
        "outcome": {
          "executor_id": "bowen",
          "gas_burnt": 0,
          "logs": [],
          "receipt_ids": [],
          "status": {
            "SuccessValue": ""
          },
          "tokens_burnt": "0"
        },
        "proof": []
      },
      {
        "block_hash": "DJ6oK5FtPPSwksS6pKdEjFvHWAaSVocnVNLoyi8aYk1k",
        "id": "FDp8ovTf5uJYDFemW5op6ebjCT2n4CPExHYie3S1h4qp",
        "outcome": {
          "executor_id": "bowen",
          "gas_burnt": 0,
          "logs": [],
          "receipt_ids": [],
          "status": {
            "SuccessValue": ""
          },
          "tokens_burnt": "0"
        },
        "proof": [
          {
            "direction": "Left",
            "hash": "A2Ry6NCeuK8WhRCWc41hy6uddadc5nLJ1NBX5wVYo3Yb"
          },
          {
            "direction": "Right",
            "hash": "2dNo7A1VHKBmMA86m1k3Z9DVXwWgQJGkKGRg8wUR3co9"
          }
        ]
      }
    ],
    "status": {
      "SuccessValue": ""
    },
    "transaction": {
      "actions": [
        {
          "FunctionCall": {
            "args": "eyJhbW91bnQiOiIxMDAwIiwicmVjZWl2ZXJfaWQiOiJib3dlbiJ9",
            "deposit": "0",
            "gas": 100000000000000,
            "method_name": "transfer"
          }
        }
      ],
      "hash": "HEgnVQZfs9uJzrqTob4g2Xmebqodq9waZvApSkrbcAhd",
      "nonce": 77,
      "public_key": "ed25519:2f9Zv5kuyuPM5DCyEP5pSqg58NQ8Ct9uSRerZXnCS9fK",
      "receiver_id": "evgeny.lockup.m0",
      "signature": "ed25519:5v1hJuw5RppKGezJHBFU6z3hwmmdferETud9rUbwxVf6xSBAWyiod93Lezaq4Zdcp4zbukDusQY9PjhV47JVCgBx",
      "signer_id": "bowen"
    },
    "transaction_outcome": {
      "block_hash": "9RX2pefXKw8M4EYjLznDF3AMvbkf9asAjN8ACK7gxKsa",
      "id": "HEgnVQZfs9uJzrqTob4g2Xmebqodq9waZvApSkrbcAhd",
      "outcome": {
        "executor_id": "bowen",
        "gas_burnt": 2428026088898,
        "logs": [],
        "receipt_ids": ["FXMVxdhSUZaZftbmPJWaoqhEB9GrKB2oqg9Wgvuyvom8"],
        "status": {
          "SuccessReceiptId": "FXMVxdhSUZaZftbmPJWaoqhEB9GrKB2oqg9Wgvuyvom8"
        },
        "tokens_burnt": "242802608889800000000"
      },
      "proof": [
        {
          "direction": "Right",
          "hash": "DXf4XVmAF5jnjZhcxi1CYxGPuuQrcAmayq9X5inSAYvJ"
        }
      ]
    }
  }
}
</p>
</details>
What could go wrong? {#what-could-go-wrong-3}
When API request fails, RPC server returns a structured error response with a limited number of well-defined error variants, so client code can exhaustively handle all the possible error cases. Our JSON-RPC errors follow verror convention for structuring the error response:
{
    "error": {
        "name": <ERROR_TYPE>,
        "cause": {
            "info": {..},
            "name": <ERROR_CAUSE>
        },
        "code": -32000,
        "data": String,
        "message": "Server error",
    },
    "id": "dontcare",
    "jsonrpc": "2.0"
}
Heads up
The fields code, data, and message in the structure above are considered legacy ones and might be deprecated in the future. Please, don't rely on them.
Here is the exhaustive list of the error variants that can be returned by EXPERIMENTAL_tx_status method:
<table class="custom-stripe">
<thead>
<tr>
<th>
ERROR_TYPE<br />
<code>error.name</code>
</th>
<th>ERROR_CAUSE<br /><code>error.cause.name</code></th>
<th>Reason</th>
<th>Solution</th>
</tr>
</thead>
<tbody>
<tr>
<td rowspan="3">HANDLER_ERROR</td>
<td>INVALID_TRANSACTION</td>
<td>An error happened during transaction execution</td>
<td>
<ul>
<li>See <code>error.cause.info</code> for details</li>
</ul>
</td>
</tr>
<tr>
<td>UNKNOWN_TRANSACTION</td>
<td>The requested transaction is not available on the node since it might have not been recorded on the chain yet or has been garbage-collected</td>
<td>
<ul>
<li>Try again later</li>
<li>If the transaction had been submitted more than 5 epochs ago, try to send your request to <a href="https://near-nodes.io/intro/node-types#archival-node">an archival node</a></li>
<li>Check the transaction hash</li>
</ul>
</td>
</tr>
<tr>
<td>TIMEOUT_ERROR</td>
<td>It was unable to wait for the transaction status for reasonable time</td>
<td>
<ul>
<li>Send a request to a different node</li>
<li>Try again later</li>
</ul>
</td>
</tr>
<tr class="stripe">
<td>REQUEST_VALIDATION_ERROR</td>
<td>PARSE_ERROR</td>
<td>Passed arguments can't be parsed by JSON RPC server (missing arguments, wrong format, etc.)</td>
<td>
<ul>
<li>Check the arguments passed and pass the correct ones</li>
<li>Check <code>error.cause.info</code> for more details</li>
</ul>
</td>
</tr>
<tr>
<td>INTERNAL_ERROR</td>
<td>INTERNAL_ERROR</td>
<td>Something went wrong with the node itself or overloaded</td>
<td>
<ul>
<li>Try again later</li>
<li>Send a request to a different node</li>
<li>Check <code>error.cause.info</code> for more details</li>
</ul>
</td>
</tr>
</tbody>
</table>
Read more...
What are the Imports?
In send-tokens-easy.js we use two dependencies:
- NEAR API JavaScript library
dotenv (used to load environment variables for private key)
const nearAPI = require("near-api-js");
const { connect, KeyPair, keyStores, utils } = nearAPI;
require("dotenv").config();
The second line above deconstructs several utilities from nearAPI that you will use to interact with the blockchain.
connect - create a connection to NEAR passing configuration variablesKeyPair - creates a keyPair from the private key you'll provide in an .env filekeyStores - stores the keyPair that you will create from the private key and used to sign Transactionsutils - used to format NEAR amounts
Read more...
What is the Accounts & Network?
Next, you'll need to enter the accountId of the sender and receiver, as well as the networkId (betanet, testnet, or mainnet).
const sender = "sender.testnet";
const receiver = "receiver.testnet";
const networkId = "testnet";
Read more...
What are the Formatting Token Amounts?
When sending NEAR tokens (Ⓝ) during a transaction, the amount needs to be converted into Yocto Ⓝ or (10^-24).
const amount = nearAPI.utils.format.parseNearAmount("1.5");
Read more...
What is the Create a Key Store?
In order to sign transactions you will need to create a "Key Store" that will hold a full access key to sign your transactions. There are several ways to accomplish this, but for this example we will use a private key stored in either an .env file in your project or an environment variable exported globally.
- If you created the account using
near-cli or ran near login in your terminal, your private key can be found in a .json file located in /HOME/.near-credentials.
- If you created an account using NEAR Wallet, your key will be found in your browser's
Local Storage.
- In your browser's dev tools...
Application >> Storage >> Local Storage
// sets up an empty keyStore object in memory using near-api-js
const keyStore = new keyStores.InMemoryKeyStore();
// creates a keyPair from the private key provided in your .env file
const keyPair = KeyPair.fromString(process.env.SENDER_PRIVATE_KEY);
// adds the key you just created to your keyStore which can hold multiple keys (must be inside an async function)
await keyStore.setKey(networkId, sender, keyPair);
Read more...
What is the Setting up a connection to NEAR?
Now create a connection to NEAR using a configuration object that will contain your networkId setup earlier as well as your keyStore.
// configuration used to connect to NEAR
const config = {
  networkId,
  keyStore,
  nodeUrl: `https://rpc.${networkId}.near.org`,
  walletUrl: `https://wallet.${networkId}.near.org`,
  helperUrl: `https://helper.${networkId}.near.org`,
  explorerUrl: `https://explorer.${networkId}.near.org`,
};
// connect to NEAR! :)
const near = await connect(config);
// create a NEAR account object
const senderAccount = await near.account(sender);
You'll notice the last line uses your NEAR connection to create a senderAccount object that you'll use to perform the transaction.
Read more...
What is the Create, Sign, & Send Transaction?
Now that everything is setup, creating the transaction is a single line of code.
const result = await senderAccount.sendMoney(receiver, amount);
This simple command constructs, signs, and sends a token transfer transaction on the NEAR blockchain. There is not a need to create a result variable aside from inspecting the response details from your transaction and even create a link to NEAR Explorer to view a GUI version of the transaction details.
Read more...
What are the Transaction Requirements?
What is signerId?
- The
signerId is the account ID of the transaction originator.
- This value is passed as a string (ex.
'example.testnet' or 'bob.near')
Read more...
What is signerPublicKey?
- The
signerPublicKey is required to be an object with two key value pairs: keyType and data.
PublicKey = {
  keyType: 0,
  data: Uint8Array(32)[
    (190,
    150,
    152,
    145,
    232,
    248,
    128,
    151,
    167,
    165,
    128,
    46,
    20,
    231,
    103,
    142,
    39,
    56,
    152,
    46,
    135,
    1,
    161,
    180,
    94,
    212,
    195,
    201,
    73,
    190,
    70,
    242)
  ],
};
- This can be constructed by calling
getPublicKey() using the keyPair we setup earlier.
const publicKey = keyPair.getPublicKey();
Read more...
What is receiverId`?
- The
receiverId is the account ID of the transaction recipient.
- This value is passed as a string (ex.
'example.testnet' or 'bob.near')
- The certain cases, the
signerId and the receiverId can be the same account.
Read more...
What is nonceForPublicKey?
- A unique number or
nonce is required for each transaction signed with an access key.
- To ensure a unique number is created for each transaction, the current
nonce should be queried and then incremented by 1.
- Current nonce can be retrieved using the
provider we created earlier.
const accessKey = await provider.query(
  `access_key/${sender}/${publicKey.toString()}`,
  ""
);
- now we can create a unique number for our transaction by incrementing the current
nonce.
const nonce = ++accessKey.nonce;
Read more...
What is blockHash?
- Each transaction requires a current block hash (within 24hrs) to prove that the transaction was created recently.
- Hash must be converted to an array of bytes using the
base_decode method found in nearAPI.
const recentBlockHash = nearAPI.utils.serialize.base_decode(
  accessKey.block_hash
);
[click here] to view source for base_decode().
Read more...
What is the Constructing the Transaction?
With all of our required arguments, we can construct the transaction.
- Using
nearAPI, we call on createTransaction() to perform this task.
const transaction = nearAPI.transactions.createTransaction(
  sender,
  publicKey,
  receiver,
  nonce,
  actions,
  recentBlockHash
);
[click here] to view source code for the Transaction class
Read more...
What is the Send Transaction?
Final step is to encode and send the transaction.
- First we serialize transaction into Borsh, and store the result as
signedSerializedTx. (required for all transactions)
- Then we send the transaction via RPC call using the
sendJsonRpc() method nested inside near.
// encodes transaction to serialized Borsh (required for all transactions)
const signedSerializedTx = signedTransaction.encode();
// sends transaction to NEAR blockchain via JSON RPC call and records the result
const result = await provider.sendJsonRpc("broadcast_tx_commit", [
  Buffer.from(signedSerializedTx).toString("base64"),
]);
Read more...
What is the RuntimeError?
Definition {#definition}
/// Error returned from `Runtime::apply`
pub enum RuntimeError {
    /// An unexpected integer overflow occurred. The likely issue is an invalid state or the transition.
    UnexpectedIntegerOverflow,
    /// An error happened during TX verification and account charging. It's likely the chunk is invalid.
    /// and should be challenged.
    InvalidTxError(InvalidTxError),
    /// Unexpected error which is typically related to the node storage corruption.account
    /// That it's possible the input state is invalid or malicious.
    StorageError(StorageError),
    /// An error happens if `check_balance` fails, which is likely an indication of an invalid state.
    BalanceMismatchError(BalanceMismatchError),
}
Error Messages {#error-messages}
- see below:
InvalidTxError, StorageError and BalanceMismatchError
Read more...
What is the InvalidTxError?
Definition {#definition-1}
/// An error happened during TX execution
pub enum InvalidTxError {
    /// Happens if a wrong AccessKey used or AccessKey has not enough permissions
    InvalidAccessKeyError(InvalidAccessKeyError),
    /// TX signer_id is not in a valid format or not satisfy requirements see `near_core::primitives::utils::is_valid_account_id`
    InvalidSignerId { signer_id: AccountId },
    /// TX signer_id is not found in a storage
    SignerDoesNotExist { signer_id: AccountId },
    /// Transaction nonce must be account[access_key].nonce + 1
    InvalidNonce { tx_nonce: Nonce, ak_nonce: Nonce },
    /// TX receiver_id is not in a valid format or not satisfy requirements see `near_core::primitives::utils::is_valid_account_id`
    InvalidReceiverId { receiver_id: AccountId },
    /// TX signature is not valid
    InvalidSignature,
    /// Account does not have enough balance to cover TX cost
    NotEnoughBalance {
        signer_id: AccountId,
        balance: Balance,
        cost: Balance,
    },
    /// Signer account rent is unpaid
    RentUnpaid {
        /// An account which is required to pay the rent
        signer_id: AccountId,
        /// Required balance to cover the state rent
        amount: Balance,
    },
    /// An integer overflow occurred during transaction cost estimation.
    CostOverflow,
    /// Transaction parent block hash doesn't belong to the current chain
    InvalidChain,
    /// Transaction has expired
    Expired,
    /// An error occurred while validating actions of a Transaction.
    ActionsValidation(ActionsValidationError),
}
Error Messages {#error-messages-1}
InvalidTxError::InvalidSignerId { signer_id }
    "Invalid signer account ID {:?} according to requirements"
InvalidTxError::SignerDoesNotExist { signer_id }
    "Signer {:?} does not exist"
InvalidTxError::InvalidAccessKeyError(access_key_error)
InvalidTxError::InvalidNonce { tx_nonce, ak_nonce }
    "Transaction nonce {} must be larger than nonce of the used access key {}"
InvalidTxError::InvalidReceiverId { receiver_id }
    "Invalid receiver account ID {:?} according to requirements"
InvalidTxError::InvalidSignature
    "Transaction is not signed with the given public key"
InvalidTxError::NotEnoughBalance { signer_id, balance, cost }
    "Sender {:?} does not have enough balance {} for operation costing {}"
InvalidTxError::RentUnpaid { signer_id, amount }
    "Failed to execute, because the account {:?} wouldn't have enough to pay required rent {}"
InvalidTxError::CostOverflow
    "Transaction gas or balance cost is too high"
InvalidTxError::InvalidChain
    "Transaction parent block hash doesn't belong to the current chain"
InvalidTxError::Expired
    "Transaction has expired"
InvalidTxError::ActionsValidation(error)
    "Transaction actions validation error: {}"
Read more...
What is the StorageError?
Definition {#definition-2}
pub enum StorageError {
    /// Key-value db internal failure
    StorageInternalError,
    /// Storage is PartialStorage and requested a missing trie node
    TrieNodeMissing,
    /// Either invalid state or key-value db is corrupted.
    /// For PartialStorage it cannot be corrupted.
    /// Error message is unreliable and for debugging purposes only. It's also probably ok to
    /// panic in every place that produces this error.
    /// We can check if db is corrupted by verifying everything in the state trie.
    StorageInconsistentState(String),
}
Read more...
What is the BalanceMismatchError?
Definition {#definition-3}
/// Happens when the input balance doesn't match the output balance in Runtime apply.
pub struct BalanceMismatchError {
    // Input balances
    pub incoming_validator_rewards: Balance,
    pub initial_accounts_balance: Balance,
    pub incoming_receipts_balance: Balance,
    pub processed_delayed_receipts_balance: Balance,
    pub initial_postponed_receipts_balance: Balance,
    // Output balances
    pub final_accounts_balance: Balance,
    pub outgoing_receipts_balance: Balance,
    pub new_delayed_receipts_balance: Balance,
    pub final_postponed_receipts_balance: Balance,
    pub total_rent_paid: Balance,
    pub total_validator_reward: Balance,
    pub total_balance_burnt: Balance,
    pub total_balance_slashed: Balance,
}
Error Messages {#error-messages-2}
"Balance Mismatch Error. The input balance {} doesn't match output balance {}\n\
Inputs:\n\
    \tIncoming validator rewards sum: {}\n\
    \tInitial accounts balance sum: {}\n\
    \tIncoming receipts balance sum: {}\n\
    \tProcessed delayed receipts balance sum: {}\n\
    \tInitial postponed receipts balance sum: {}\n\
Outputs:\n\
    \tFinal accounts balance sum: {}\n\
    \tOutgoing receipts balance sum: {}\n\
    \tNew delayed receipts balance sum: {}\n\
    \tFinal postponed receipts balance sum: {}\n\
    \tTotal rent paid: {}\n\
    \tTotal validators reward: {}\n\
    \tTotal balance burnt: {}\n\
    \tTotal balance slashed: {}",
Read more...
What is the InvalidAccessKeyError?
Definition {#definition-4}
pub enum InvalidAccessKeyError {
    /// The access key identified by the `public_key` doesn't exist for the account
    AccessKeyNotFound { account_id: AccountId, public_key: PublicKey },
    /// Transaction `receiver_id` doesn't match the access key receiver_id
    ReceiverMismatch { tx_receiver: AccountId, ak_receiver: AccountId },
    /// Transaction method name isn't allowed by the access key
    MethodNameMismatch { method_name: String },
    /// Transaction requires a full permission access key.
    RequiresFullAccess,
    /// Access Key does not have enough allowance to cover transaction cost
    NotEnoughAllowance {
        account_id: AccountId,
        public_key: PublicKey,
        allowance: Balance,
        cost: Balance,
    },
    /// Having a deposit with a function call action is not allowed with a function call access key.
    DepositWithFunctionCall,
}
Error Messages {#error-messages-3}
InvalidAccessKeyError::AccessKeyNotFound { account_id, public_key }
    "Signer {:?} doesn't have access key with the given public_key {}"
InvalidAccessKeyError::ReceiverMismatch { tx_receiver, ak_receiver }
    "Transaction receiver_id {:?} doesn't match the access key receiver_id {:?}"
InvalidAccessKeyError::MethodNameMismatch { method_name }
    "Transaction method name {:?} isn't allowed by the access key"
InvalidAccessKeyError::RequiresFullAccess
    "The transaction contains more then one action, but it was signed \
     with an access key which allows transaction to apply only one specific action. \
     To apply more then one actions TX must be signed with a full access key"
InvalidAccessKeyError::NotEnoughAllowance { account_id, public_key, allowance, cost }
    "Access Key {:?}:{} does not have enough balance {} for transaction costing {}"
InvalidAccessKeyError::DepositWithFunctionCall
    "Having a deposit with a function call action is not allowed with a function call access key."
Read more...
What is the ActionsValidationError?
Definition {#definition-5}
/// Describes the error for validating a list of actions.
pub enum ActionsValidationError {
    /// The total prepaid gas (for all given actions) exceeded the limit.
    TotalPrepaidGasExceeded { total_prepaid_gas: Gas, limit: Gas },
    /// The number of actions exceeded the given limit.
    TotalNumberOfActionsExceeded { total_number_of_actions: u64, limit: u64 },
    /// The total number of bytes of the method names exceeded the limit in a Add Key action.
    AddKeyMethodNamesNumberOfBytesExceeded { total_number_of_bytes: u64, limit: u64 },
    /// The length of some method name exceeded the limit in a Add Key action.
    AddKeyMethodNameLengthExceeded { length: u64, limit: u64 },
    /// Integer overflow during a compute.
    IntegerOverflow,
    /// Invalid account ID.
    InvalidAccountId { account_id: AccountId },
    /// The size of the contract code exceeded the limit in a DeployContract action.
    ContractSizeExceeded { size: u64, limit: u64 },
    /// The length of the method name exceeded the limit in a Function Call action.
    FunctionCallMethodNameLengthExceeded { length: u64, limit: u64 },
    /// The length of the arguments exceeded the limit in a Function Call action.
    FunctionCallArgumentsLengthExceeded { length: u64, limit: u64 },
}
Error Messages {#error-messages-4}
ActionsValidationError::TotalPrepaidGasExceeded     { total_prepaid_gas, limit }
     "The total prepaid gas {} exceeds the limit {}"

ActionsValidationError::TotalNumberOfActionsExceeded {total_number_of_actions, limit }
     "The total number of actions {} exceeds the limit {}"

ActionsValidationError::AddKeyMethodNamesNumberOfBytesExceeded { total_number_of_bytes, limit }
     "The total number of bytes in allowed method names {} exceeds the maximum allowed number {} in a AddKey action"

ActionsValidationError::AddKeyMethodNameLengthExceeded { length, limit }
     "The length of some method name {} exceeds the maximum allowed length {} in a AddKey action"

ActionsValidationError::IntegerOverflow
     "Integer overflow during a compute"

ActionsValidationError::InvalidAccountId { account_id }
     "Invalid account ID `{}`"

ActionsValidationError::ContractSizeExceeded { size, limit }
     "The length of the contract size {} exceeds the maximum allowed size {} in a DeployContract action"

ActionsValidationError::FunctionCallMethodNameLengthExceeded { length, limit }
     "The length of the method name {} exceeds the maximum allowed length {} in a FunctionCall action"

ActionsValidationError::FunctionCallArgumentsLengthExceeded { length, limit }
     "The length of the arguments {} exceeds the maximum allowed length {} in a FunctionCall action"
Read more...
What is the TxExecutionError?
Definition {#definition-6}
/// Error returned in the ExecutionOutcome in case of failure
pub enum TxExecutionError {
    /// An error happened during Acton execution
    ActionError(ActionError),
    /// An error happened during Transaction execution
    InvalidTxError(InvalidTxError),
}
Read more...
What is the ActionError?
Definition {#definition-7}
ActionError
pub struct ActionError {
    /// Index of the failed action in the transaction.
    /// Action index is not defined if ActionError.kind is `ActionErrorKind::RentUnpaid`
    pub index: Option<u64>,
    /// The kind of ActionError happened
    pub kind: ActionErrorKind,
}
Read more...
What is the ActionErrorKind?
Definition {#definition-8}
pub enum ActionErrorKind {
    /// Happens when CreateAccount action tries to create an account with account_id which is already exists in the storage
    AccountAlreadyExists { account_id: AccountId },
    /// Happens when TX receiver_id doesn't exist (but action is not Action::CreateAccount)
    AccountDoesNotExist { account_id: AccountId },
    /// A newly created account must be under a namespace of the creator account
    CreateAccountNotAllowed { account_id: AccountId, predecessor_id: AccountId },
    /// Administrative actions like `DeployContract`, `Stake`, `AddKey`, `DeleteKey`. can be proceed only if sender=receiver
    /// or the first TX action is a `CreateAccount` action
    ActorNoPermission { account_id: AccountId, actor_id: AccountId },
    /// Account tries to remove an access key that doesn't exist
    DeleteKeyDoesNotExist { account_id: AccountId, public_key: PublicKey },
    /// The public key is already used for an existing access key
    AddKeyAlreadyExists { account_id: AccountId, public_key: PublicKey },
    /// Account is staking and can not be deleted
    DeleteAccountStaking { account_id: AccountId },
    /// Foreign sender (sender=!receiver) can delete an account only if a target account hasn't enough tokens to pay rent
    DeleteAccountHasRent {
        account_id: AccountId,
        balance: Balance,
    },
    /// ActionReceipt can't be completed, because the remaining balance will not be enough to pay rent.
    RentUnpaid {
        /// An account which is required to pay the rent
        account_id: AccountId,
        /// Rent due to pay.
        amount: Balance,
    },
    /// Account is not yet staked, but tries to unstake
    TriesToUnstake { account_id: AccountId },
    /// The account doesn't have enough balance to increase the stake.
    TriesToStake {
        account_id: AccountId,
        stake: Balance,
        locked: Balance,
        balance: Balance,
    },
    /// An error occurred during a `FunctionCall` Action.
    FunctionCallError(FunctionCallError),
    /// Error occurs when a new `ActionReceipt` created by the `FunctionCall` action fails
    /// receipt validation.
    NewReceiptValidationError(ReceiptValidationError),
}
Error Messages {#error-messages-5}
ActionErrorKind::AccountAlreadyExists { account_id }
"Can't create a new account {:?}, because it already exists"
ActionErrorKind::AccountDoesNotExist { account_id }
"Can't complete the action because account {:?} doesn't exist"
ActionErrorKind::ActorNoPermission { actor_id, account_id }
"Actor {:?} doesn't have permission to account {:?} to complete the action"
ActionErrorKind::RentUnpaid { account_id, amount }
"The account {} wouldn't have enough balance to pay required rent {}"
ActionErrorKind::TriesToUnstake { account_id }
"Account {:?} is not yet staked, but tries to unstake"
ActionErrorKind::TriesToStake { account_id, stake, locked, balance }
"Account {:?} tries to stake {}, but has staked {} and only has {}"
ActionErrorKind::CreateAccountNotAllowed { account_id, predecessor_id }
"The new account_id {:?} can't be created by {:?}"
ActionErrorKind::DeleteKeyDoesNotExist { account_id, .. }
"Account {:?} tries to remove an access key that doesn't exist"
ActionErrorKind::AddKeyAlreadyExists { public_key, .. }
"The public key {:?} is already used for an existing access key"
ActionErrorKind::DeleteAccountStaking { account_id }
"Account {:?} is staking and can not be deleted"
ActionErrorKind::DeleteAccountHasRent { account_id, balance }
"Account {:?} can't be deleted. It has {}, which is enough to cover the rent"
ActionErrorKind::FunctionCallError(s)
ActionErrorKind::NewReceiptValidationError(e)
"An new action receipt created during a FunctionCall is not valid: {}"
Read more...
What is the ReceiptValidationError?
Definition {#definition-9}
/// Describes the error for validating a receipt.
pub enum ReceiptValidationError {
/// The `predecessor_id` of a Receipt is not valid.
InvalidPredecessorId { account_id: AccountId },
/// The `receiver_id` of a Receipt is not valid.
InvalidReceiverId { account_id: AccountId },
/// The `signer_id` of an ActionReceipt is not valid.
InvalidSignerId { account_id: AccountId },
/// The `receiver_id` of a DataReceiver within an ActionReceipt is not valid.
InvalidDataReceiverId { account_id: AccountId },
/// The length of the returned data exceeded the limit in a DataReceipt.
ReturnedValueLengthExceeded { length: u64, limit: u64 },
/// The number of input data dependencies exceeds the limit in an ActionReceipt.
NumberInputDataDependenciesExceeded { number_of_input_data_dependencies: u64, limit: u64 },
/// An error occurred while validating actions of an ActionReceipt.
ActionsValidation(ActionsValidationError),
}
Error Messages {#error-messages-6}
ReceiptValidationError::InvalidPredecessorId { account_id }
"The predecessor_id `{}` of a Receipt is not valid."
ReceiptValidationError::InvalidReceiverId { account_id }
"The receiver_id `{}` of a Receipt is not valid."
ReceiptValidationError::InvalidSignerId { account_id }
"The signer_id `{}` of an ActionReceipt is not valid."
ReceiptValidationError::InvalidDataReceiverId { account_id }
"The receiver_id `{}` of a DataReceiver within an ActionReceipt is not valid."
ReceiptValidationError::ReturnedValueLengthExceeded { length, limit }
"The length of the returned data {} exceeded the limit {} in a DataReceipt"
ReceiptValidationError::NumberInputDataDependenciesExceeded { number_of_input_data_dependencies, limit }
"The number of input data dependencies {} exceeded the limit {} in an ActionReceipt"
ReceiptValidationError::ActionsValidation(e)
Read more...
What is the VMError?
Definition {#definition-10}
pub enum VMError {
FunctionCallError(FunctionCallError),
/// Serialized external error from External trait implementation.
ExternalError(Vec<u8>),
/// An error that is caused by an operation on an inconsistent state.
/// E.g. an integer overflow by using a value from the given context.
InconsistentStateError(InconsistentStateError),
}
Error Messages {#error-messages-7}
VMError::ExternalError
"Serialized ExternalError"
Read more...
What is the FunctionCallError?
Definition {#definition-11}
pub enum FunctionCallError {
CompilationError(CompilationError),
LinkError { msg: String },
MethodResolveError(MethodResolveError),
WasmTrap { msg: String },
HostError(HostError),
}
Error Messages {#error-messages-8}
FunctionCallError::WasmTrap
"WebAssembly trap: {}"
Read more...
What is the MethodResolveError?
Definition {#definition-12}
pub enum MethodResolveError {
MethodEmptyName,
MethodUTF8Error,
MethodNotFound,
MethodInvalidSignature,
}
Read more...
What is the CompilationError?
Definition {#definition-13}
pub enum CompilationError {
CodeDoesNotExist { account_id: String },
PrepareError(PrepareError),
WasmerCompileError { msg: String },
}
Error Messages {#error-messages-9}
CompilationError::CodeDoesNotExist
"cannot find contract code for account {}"
CompilationError::PrepareError(p)
"PrepareError: {}"
CompilationError::WasmerCompileError
"Wasmer compilation error: {}"
Read more...
What is the PrepareError?
Definition {#definition-14}
/// Error that can occur while preparing or executing Wasm smart-contract.
pub enum PrepareError {
/// Error happened while serializing the module.
Serialization,
/// Error happened while deserializing the module.
Deserialization,
/// Internal memory declaration has been found in the module.
InternalMemoryDeclared,
/// Gas instrumentation failed.
///
/// This most likely indicates the module isn't valid.
GasInstrumentation,
/// Stack instrumentation failed.
///
/// This most likely indicates the module isn't valid.
StackHeightInstrumentation,
/// Error happened during instantiation.
///
/// This might indicate that `start` function trapped, or module isn't
/// instantiable and/or unlinkable.
Instantiate,
/// Error creating memory.
Memory,
}
Error Messages {#error-messages-10}
Serialization
"Error happened while serializing the module."
Deserialization
"Error happened while deserializing the module."
InternalMemoryDeclared
"Internal memory declaration has been found in the module."
GasInstrumentation
"Gas instrumentation failed."
StackHeightInstrumentation
"Stack instrumentation failed."
Instantiate
"Error happened during instantiation."
Memory
"Error creating memory"
Read more...
What is the HostError?
Definition {#definition-15}
pub enum HostError {
/// String encoding is bad UTF-16 sequence
BadUTF16,
/// String encoding is bad UTF-8 sequence
BadUTF8,
/// Exceeded the prepaid gas
GasExceeded,
/// Exceeded the maximum amount of gas allowed to burn per contract
GasLimitExceeded,
/// Exceeded the account balance
BalanceExceeded,
/// Tried to call an empty method name
EmptyMethodName,
/// Smart contract panicked
GuestPanic { panic_msg: String },
/// IntegerOverflow happened during a contract execution
IntegerOverflow,
/// `promise_idx` does not correspond to existing promises
InvalidPromiseIndex { promise_idx: u64 },
/// Actions can only be appended to non-joint promise.
CannotAppendActionToJointPromise,
/// Returning joint promise is currently prohibited
CannotReturnJointPromise,
/// Accessed invalid promise result index
InvalidPromiseResultIndex { result_idx: u64 },
/// Accessed invalid register id
InvalidRegisterId { register_id: u64 },
/// Iterator `iterator_index` was invalidated after its creation by performing a mutable operation on trie
IteratorWasInvalidated { iterator_index: u64 },
/// Accessed memory outside the bounds
MemoryAccessViolation,
/// VM Logic returned an invalid receipt index
InvalidReceiptIndex { receipt_index: u64 },
/// Iterator index `iterator_index` does not exist
InvalidIteratorIndex { iterator_index: u64 },
/// VM Logic returned an invalid account id
InvalidAccountId,
/// VM Logic returned an invalid method name
InvalidMethodName,
/// VM Logic provided an invalid public key
InvalidPublicKey,
/// `method_name` is not allowed in view calls
ProhibitedInView { method_name: String },
/// The total number of logs will exceed the limit.
NumberOfLogsExceeded { limit: u64 },
/// The storage key length exceeded the limit.
KeyLengthExceeded { length: u64, limit: u64 },
/// The storage value length exceeded the limit.
ValueLengthExceeded { length: u64, limit: u64 },
/// The total log length exceeded the limit.
TotalLogLengthExceeded { length: u64, limit: u64 },
/// The maximum number of promises within a FunctionCall exceeded the limit.
NumberPromisesExceeded { number_of_promises: u64, limit: u64 },
/// The maximum number of input data dependencies exceeded the limit.
NumberInputDataDependenciesExceeded { number_of_input_data_dependencies: u64, limit: u64 },
/// The returned value length exceeded the limit.
ReturnedValueLengthExceeded { length: u64, limit: u64 },
/// The contract size for DeployContract action exceeded the limit.
ContractSizeExceeded { size: u64, limit: u64 },
}
Error Messages {#error-messages-11}
BadUTF8
"String encoding is bad UTF-8 sequence."
BadUTF16
"String encoding is bad UTF-16 sequence."
GasExceeded
"Exceeded the prepaid gas."
GasLimitExceeded
"Exceeded the maximum amount of gas allowed to burn per contract."
BalanceExceeded
"Exceeded the account balance."
EmptyMethodName
"Tried to call an empty method name."
GuestPanic { panic_msg }
"Smart contract panicked: {}"
IntegerOverflow
"Integer overflow."
InvalidIteratorIndex { iterator_index }
"Iterator index {:?} does not exist"
InvalidPromiseIndex { promise_idx }
"{:?} does not correspond to existing promises"
CannotAppendActionToJointPromise
"Actions can only be appended to non-joint promise."
CannotReturnJointPromise
"Returning joint promise is currently prohibited."
InvalidPromiseResultIndex { result_idx }
"Accessed invalid promise result index: {:?}"
InvalidRegisterId { register_id }
"Accessed invalid register id: {:?}"
IteratorWasInvalidated { iterator_index }
"Iterator {:?} was invalidated after its creation by performing a mutable operation on trie"
MemoryAccessViolation
"Accessed memory outside the bounds."
InvalidReceiptIndex { receipt_index }
"VM Logic returned an invalid receipt index: {:?}"
InvalidAccountId
"VM Logic returned an invalid account id"
InvalidMethodName
"VM Logic returned an invalid method name"
InvalidPublicKey
"VM Logic provided an invalid public key"
ProhibitedInView { method_name }
"{} is not allowed in view calls"
NumberOfLogsExceeded { limit }
"The number of logs will exceed the limit {}"
KeyLengthExceeded { length, limit }
"The length of a storage key {} exceeds the limit {}"
ValueLengthExceeded { length, limit }
"The length of a storage value {} exceeds the limit {}"
TotalLogLengthExceeded{ length, limit }
"The length of a log message {} exceeds the limit {}"
NumberPromisesExceeded { number_of_promises, limit }
"The number of promises within a FunctionCall {} exceeds the limit {}"
NumberInputDataDependenciesExceeded { number_of_input_data_dependencies, limit }
"The number of input data dependencies {} exceeds the limit {}"
ReturnedValueLengthExceeded { length, limit }
"The length of a returned value {} exceeds the limit {}"
ContractSizeExceeded { size, limit }
"The size of a contract code in DeployContract action {} exceeds the limit {}"
Read more...
What is the VMLogicError?
Definition {#definition-16}
pub enum VMLogicError {
HostError(HostError),
/// Serialized external error from External trait implementation.
ExternalError(Vec<u8>),
/// An error that is caused by an operation on an inconsistent state.
InconsistentStateError(InconsistentStateError),
}
Read more...
What is the InconsistentStateError?
Definition {#definition-17}
pub enum InconsistentStateError {
/// Math operation with a value from the state resulted in a integer overflow.
IntegerOverflow,
}
Error Messages {#error-messages-12}
InconsistentStateError::IntegerOverflow
"Math operation with a value from the state resulted in a integer overflow."
Read more...
What is the RPC interface?
What is The life of a transaction:?
- A client creates a transaction, computes the transaction hash and signs this hash to get a signed transaction. Now this signed transaction can be sent to a node.
- The RPC interface receives the transaction and routes it to the correct physical node using
signer_id. Since the signer_id must be a NEAR Account ID which lives on a single shard, the account is mapped to a shard which is followed by at least one validator running at least one machine with an IP address.
- When a node receives a new signed transaction, it validates the transaction for signer, receiver, account balance, cost overflow, signature, etc. (see here) and gossips it to all peers following the same shard. If a transaction has an invalid signature or would be invalid on the latest state, it is rejected quickly and returns an error to the original RPC call.
- Valid transactions are added to the transaction pool (every validating node has its own independent copy of a transaction pool). The transaction pool maintains transactions that are not yet discarded and not yet included into the chain.
- A pool iterator is used to pick transactions from the pool one at a time, ordered from the smallest nonce to largest, until the pool is drained or some chunk limit is reached (max number of transactions per chunk or max gas burnt per chunk to process transactions). Please refer to articles on the pool iterator and gas for more details.
- To accommodate the distributed nature of a sharded blockchain, all transactions are subsequently returned to a segmented transaction pool having 3 distinct layers: accepted transactions (which will be processed on the next chunk), pending transactions (which exceeded the limits of the current chunk and will be included in a later round of processing) and invalid transactions (which will be rejected at the next available opportunity).
- Before producing a chunk, transactions are ordered and validated again. This is done to produce chunks with only valid transactions across a distributed system.
- While a transaction is being processed on to a chunk, any errors raised by the application of its actions are also returned via RPC.
Read more...
What are the NEAR Platform Errors?
Errors raised by the NEAR platform are implemented in the following locations in nearcore:
- nearcore/core/primitives/src/errors.rs
- nearcore/runtime/near-vm-errors/src/lib.rs
This page includes:
- RuntimeError and subtypes: errors raised when a transaction is first received by the destination node and again before it's processed and applied to a chunk
- TxExecutionError and subtypes: errors raised while a transaction and its component action(s) are being validated and applied to a chunk
- VMerror and subtypes: errors raised during the execution of a Wasm contract by the NEAR VM
Read more...
What are the RuntimeError and subtypes?
RuntimeError Error returned from `Runtime::apply
StorageError Unexpected error which is typically related to the node storage corruption.account
BalanceMismatchError An error happens if `check_balance` fails, which is likely an indication of an invalid state
InvalidTxError An error happened during TX verification and account charging
InvalidAccessKeyError Describes the error for validating access key
ActionsValidationError Describes the error for validating a list of actions
TotalPrepaidGasExceeded The total prepaid gas (for all given actions) exceeded the limit.
TotalNumberOfActionsExceeded The number of actions exceeded the given limit.
AddKeyMethodNamesNumberOfBytesExceeded The total number of bytes of the method names exceeded the limit in a Add Key action.
AddKeyMethodNameLengthExceeded The length of some method name exceeded the limit in a Add Key action.
IntegerOverflow Integer overflow during a compute.
InvalidAccountId Invalid account ID.
ContractSizeExceeded The size of the contract code exceeded the limit in a DeployContract action.
FunctionCallMethodNameLengthExceeded The length of the method name exceeded the limit in a Function Call action.
FunctionCallArgumentsLengthExceeded The length of the arguments exceeded the limit in a Function Call action.
Read more...
What are the TxExecutionError and subtypes?
TxExecutionError Error returned in the ExecutionOutcome in case of failure
InvalidTxError An error happened during Transaction execution
InvalidAccessKeyError Describes the error for validating access key
ActionsValidationError Describes the error for validating a list of actions
TotalPrepaidGasExceeded The total prepaid gas (for all given actions) exceeded the limit.
TotalNumberOfActionsExceeded The number of actions exceeded the given limit.
AddKeyMethodNamesNumberOfBytesExceeded The total number of bytes of the method names exceeded the limit in a Add Key action.
AddKeyMethodNameLengthExceeded The length of some method name exceeded the limit in a Add Key action.
IntegerOverflow Integer overflow during a compute.
InvalidAccountId Invalid account ID.
ContractSizeExceeded The size of the contract code exceeded the limit in a DeployContract action.
FunctionCallMethodNameLengthExceeded The length of the method name exceeded the limit in a Function Call action.
FunctionCallArgumentsLengthExceeded The length of the arguments exceeded the limit in a Function Call action.
ActionError An error happened during Acton execution
ActionErrorKind The kind of ActionError happened
RuntimeCallError
ReceiptValidationError Describes the error for validating a receipt
ActionsValidationError Describes the error for validating a list of actions
TotalPrepaidGasExceeded The total prepaid gas (for all given actions) exceeded the limit.
TotalNumberOfActionsExceeded The number of actions exceeded the given limit.
AddKeyMethodNamesNumberOfBytesExceeded The total number of bytes of the method names exceeded the limit in a Add Key action.
AddKeyMethodNameLengthExceeded The length of some method name exceeded the limit in a Add Key action.
IntegerOverflow Integer overflow during a compute.
InvalidAccountId Invalid account ID.
ContractSizeExceeded The size of the contract code exceeded the limit in a DeployContract action.
FunctionCallMethodNameLengthExceeded The length of the method name exceeded the limit in a Function Call action.
FunctionCallArgumentsLengthExceeded The length of the arguments exceeded the limit in a Function Call action.
Read more...
What is the Integration Reference?
What are the Transaction Reference Links?
What is the Blocks and Finality?
Some important pieces of information regarding blocks and finality include:
- Expected block time is around 1s and expected time to finality is around 2s. The last final block can be queried by
specifying
{"finality": "final"} in the block query. For example, to get the latest final block on mainnet, one can run
http post https://rpc.mainnet.near.org method=block params:='{"finality":"final"}' id=123 jsonrpc=2.0
- Block height are not necessarily continuous and certain heights may be skipped if, for example, a block producer for that height is offline. For example, after a block at height 100 is produced, the block at height 101 may be skipped. When block at height 102 is produced, its previous block is the block at height 100.
- Some blocks may not include new chunks if, for example, the previous chunk producer is offline. Even though in the RPC
return result every block will have non-empty
chunks field, it does not imply that there is a new chunk included in the block.
The way to tell whether the chunk is included in the block is to check whether height_included in the chunk is the same
as the height of the block.
Read more...
What is the Running an Archival Node?
What is a good project summary for NEAR?
NEAR is a sharded, public, proof-of-stake blockchain and smart contract platform. It is built in Rust and contracts compile to WASM. It is conceptually similar to Ethereum 2.0.
Read more...
What's special about NEAR?
NEAR is the blockchain for builders.
If you understand the basics of web development, you can write, test and deploy scalable decentralized applications in minutes on the most developer-friendly blockchain without having to learn new tools or languages.
Read more...
How are cryptographic functions used?
We support both secp256k1 and ed25519 for account keys and ed25519 for signing transactions. We currently use the ed25519_dalek and sha2 libraries for crypto.
Read more...
Do you have any on-chain governance mechanisms?
NEAR does not have any on-chain governance at the moment. Any changes to state or state transition function must be done through a hard fork.
Read more...
Do you have a bug-bounty program?
Our plan is to have a transparent Bug Bounty program with clear guidelines for paying out to those reporting issues. Payments will likely be based on publicly available rankings provided by protocol developers based on issue severity.
Read more...
What contracts should we be aware of right now?
We have developed a number of initial contracts with ones in bold being most mature at time of writing
- Staking Pool / Delegation contract
- Lockup / Vesting contract
- Whitelist Contract
- Staking Pool Factory
- Multisig contract
Read more...
Do you have a cold wallet implementation (ie. Ledger)?
What is the process for becoming a validator?
Validation is permissionless and determined via auction. Parties who want to become a validator submit a special transaction to the chain one day ahead which indicates how many tokens they want to stake. An auction is run which determines the minimum necessary stake to get a validation seat during the next epoch and, if the amount submitted is greater than the minimum threshold, the submitter will validate at least one shard during the next epoch.
Read more...
How long does a validator remain a validator?
A validator will stop being a validator for the following reasons:
- Not producing enough blocks or chunks.
- Not getting elected in the auction for next epoch because their stake is not large enough.
- Getting slashed.
Otherwise a validator will remain a validator indefinitely.
Validator election happens in epochs. The Nightshade whitepaper introduces epochs this way: "the maintenance of the network is done in epochs" where an epoch is a period of time on the order of half a day.
At the beginning of each epoch, some computation produces a list of validators for the very next epoch.
The input to this computation includes all accounts that have "raised their hand to be a validator"
by submitting a special transaction (
StakeAction)
expressing the commitment of some amount of tokens over the system's staking threshold,
as well as validators from the previous epoch.
The output of this computation is a list of the validators for the very next epoch.
Read more...
What is the penalty for misbehaving validators?
Validators are not slashed for being offline but they do miss out on the rewards of validating. Validators who miss too many blocks or chunks will be removed from the validation set in the next auction and not get any reward (but, again, without slashing).
Any foul play on the part of the validator that is detected by the system may result is a "slashing event" where the validator is marked as out of integrity and forfeit their stake (according to some formula of progressive severity). The slashed stake is burnt.
Read more...
What is the mechanism for for delegating stake to validators?
NEAR supports separate validation keys that can be used in smart contracts to delegate stake. Delegation is done via smart contract which allows for a validator to define a custom way to collect stake, manage it and split rewards. This also allows validators to provide leverage or derivatives on stake. Delegated stake will be slashed like any other stake if the node misbehaves.
If a validator misbehaves the funds of the delegators are also slashed. There is no waiting period for delegators to withdraw their stake.
Read more...
Does a validator control funds that have been delegated to them?
Delegation is custodial (you are transferring funds to a different account, the smart contract that implements staking pool). We provide a reference implementation being security reviewed and tested by 100 validators at time of writing.
We allow validators to write and deploy new contracts but it is up to users to decide if they want to delegate. Validators can compete for delegation by choosing different logic and conditions around tax optimization, etc.
Currently no slashing but will be added as we add shards into the system. At some point validators will be able to add an option to shield delegators from slashing (similar to Tezos model).
Read more...
How do we get the balance of an account after it has delegated funds?
One would need to query the staking pool contract to get balance.
Read more...
Can a node be configured to archive all blockchain data since genesis?
v
Yes. Start the node using the following command:
./target/release/near run --archive
Read more...
Can a node be configured to expose an RPC (ex: HTTP) interface?
Yes. All nodes expose this interface by default which can be configured by setting the value of listen_addr:port in the node's config.json file.
Read more...
Can a node be gracefully terminated and restarted (using archived data on disk to continue syncing)?
Does a node expose an interface for retrieving health telemetry in a structured format (ex: JSON) over RPC?
Yes. GET /status and GET /health provide this interface.
/status: block height, syncing status, peer count, etc/health: success/failure if node is up running & progressing
Read more...
Can a node can be started using a Dockerfile without human supervision?
Yes.
docker run <port mapping> <mount data folder> <ENV vars> nearprotocol/nearcore:latest
See nearcore/scripts/nodelib.py for different examples of configuration.
Read more...
What is the source of truth for current block height exposed via API?
How old can the referenced block hash be before it's invalid?
There is a genesis parameter which can be discovered for any network using:
http post https://rpc.testnet.near.org jsonrpc=2.0 id=dontcare method=EXPERIMENTAL_genesis_config
# in the line above, testnet may be replaced with mainnet or betanet
It's 43200 seconds or ~12 hours. You can view the live configuration for epoch_length using the protocol_config RPC endpoint.
In the response we find transaction_validity_period": 86400 (and since it takes about 1 second to produce a block, this period is about 24 hrs)
Read more...
How will the network will be bootstrapped?
Distribution at genesis will be spread among the NEAR team, our contributors, project partners (ie. contributor, beta applications, infrastructure developers, etc.) and the NEAR foundation (with many portions of that segregated for post-MainNet distribution activity and unavailable to stake so the foundation isn’t able to control the network).
There will be auctions occurring on the platform after launch which will allocate large amounts of tokens over the next 2 years. Additionally we are planning to run TestNet where any validator who participates will receive rewards in real tokens. We are planning to onboard at least 50 separate entities to be validators at launch.
Read more...
What is the network upgrade process?
We are currently upgrading via restarting with a new genesis block.
Read more...
Which consensus algorithm does NEAR use?
NEAR is a sharded proof-of-stake blockchain.
You can read more in our Nightshade whitepaper.
A few relevant details have been extracted here for convenience:
[Since NEAR is a sharded blockchain, there are challenges that need to be overcome] including state validity and data
availability problems. Nightshade is the solution NEAR Protocol is built upon that addresses these issues.
Nightshade uses the heaviest chain consensus. Specifically when a block producer produces a block (see section 3.3), they can collect signatures from other block producers and validators attesting to the previous block. The weight of a block is then the cumulative stake of all the signers whose signatures are included in the block. The weight of a chain is the sum of the block weights.
On top of the heaviest chain consensus we use a finality gadget that uses the attestations to finalize the blocks. To reduce the complexity of the system, we use a finality gadget that doesn’t influence the fork choice rule in any way, and instead only introduces extra slashing conditions, such that once a block is finalized by the finality gadget, a fork is impossible unless a very large percentage of the total stake is slashed.
Read more...
How does on-chain transaction finality work?
Finality is deterministic, and requires at least 3 blocks as well as (2/3 +1) signatures of the current validator set.
In a normal operation, we expect this to happen right at 3 blocks but it is not guaranteed.
Finality will be exposed via RPC when querying block or transaction.
Our definition of finality is BOTH:
- Block has quorum pre-commit from the finality gadget. See details of the finality gadget [here]
- At least 120 blocks (2-3 minutes) built on top of the block of interest. This is relevant in case of invalid state transition in some shard and provides enough time for state change challenges. In case all shards are tracked and some mechanics to pause across nodes is employed, this is not needed. We recommend exchanges track all shards.
Read more...
How are addresses generated?
Please check out the spec here on accounts https://nomicon.io/DataStructures/Account.html.
Read more...
What is the balance record-keeping model on the NEAR platform?
NEAR uses an Account-based model. All users and contracts are associated with at least 1 account. Each account lives on a single shard. Each account can have multiple keys for signing transactions.
You can read more about NEAR accounts here
Read more...
How are user accounts represented on-chain?
Users create accounts with human-readable names (eg alice) which can contain multiple keypairs with individual permissions. Accounts can be atomically and securely transferred between parties as a native transaction on the network. Permissions are programmable with smart contracts as well. For example, a lock up contract is just an account with permission on the key that does not allow to transfer funds greater than those unlocked.
Read more...
Is there a minimum account balance?
To limit on-chain "dust", accounts (and contracts) are charged rent for storing data on the chain. This means that if the balance of the account goes below some threshold * rent_on_block then account can be removed by anyone. Also any user can remove their own account and transfer left over balance to another (beneficiary) account.
There will be a restoration mechanism for accounts removed (or slept) in this way implemented in the future.
Read more...
How many keys are used?
An account can have arbitrarily many keys, as long as it has enough tokens for their storage.
Read more...
Which balance look-ups exists? What is required?
What is the fee structure for on-chain transactions?
NEAR uses a gas-based model where prices are generally deterministically adjusted based on congestion of the network.
We avoid making changes that are too large through re-sharding by changing number of available shards (and thus throughput).
Accounts don’t have associated resources. Gas amount is predetermined for all transactions except function calls. For function call transactions the user (or more likely the developer) attaches the required amount of gas. If some gas is left over after the function call, it is converted back to NEAR and refunded to the original funding account.
Read more...
How do we know how much gas to add to a transaction?
- See reference documentation here: https://nomicon.io/Economics/
- See API documentation for discovering gas price via RPC here.
The issuer of a transaction should attach some amount of gas by taking a guess at budget which will get the transaction processed. The contract knows how much to fund different cross contract calls. Gas price is calculated and fixed per block, but may change from block to block depending on how full / busy the block is. If blocks become more than half full then gas price increases.
We're also considering adding a max gas price limit.
Read more...
How do we follow Tx status?
How are transactions constructed and signed?
Transactions are a collection of related data that is composed and cryptographically signed by the sender using their private key. The related public key is part of the transaction and used for signature verification. Only signed transactions may be sent to the network for processing.
Transactions can be constructed and signed offline. Nodes are not required for signing. We are planning to add optional recent block hash to help prevent various replay attacks.
See transactions in the concepts section of our documentation.
Read more...
How is the hash preimage generated? Which fields does the raw transaction consist of?
For a transaction, we sign the hash of the transaction. More specifically, what is signed is the sha256 of the transaction object serialized in borsh (https://github.com/near/borsh).
Read more...
How do transactions work on the NEAR platform?
A Transaction is made up of one of more Actions. An action can (currently) be one of 8 types: CreateAccount,
DeployContract, FunctionCall, Transfer, Stake, AddKey, DeleteKey and DeleteAccount. Transactions are composed by a sender and then signed using the private keys of a valid NEAR account to create a SignedTransaction. This signed transaction is considered ready to send to the network for processing.
Transactions are received via our JSON-RPC endpoint and routed to the shared where the sender account lives. This "home shard" for the sender account is then responsible for processing the transaction and generating related receipts to be applied across the network.
Once received by the network, signed transactions are verified (using the embedded public key of the signer) and transformed into a collection of Receipts, one per action. Receipts are of two types: Action Receipt is the most common and represents almost all actions on the network while Data Receipt handles the very special case of "a FunctionCallAction which includes a Promise". These receipts are then propagated and applied across the network according to the "home shard" rule for all affected receiver accounts.
These receipts are then propagated around the network using the receiver account's "home shard" since each account lives on one and only one shard. Once located on the correct shard, receipts are pulled from a nonce-based queue.
Receipts may generate other, new receipts which in turn are propagated around the network until all receipts have been applied. If any action within a transaction fails, the entire transaction is rolled back and any unburnt fees are refunded to the proper accounts.
For more detail, see specs on Transactions, Actions, Receipts
Read more...
How does NEAR serialize transactions?
We use a simple binary serialization format that's deterministic: https://borsh.io
Read more...
What is the Background?
Implicit accounts work similarly to Bitcoin/Ethereum accounts.
- They allow you to reserve an account ID before it's created by generating a ED25519 key-pair locally.
- This key-pair has a public key that maps to the account ID.
- The account ID is a lowercase hex representation of the public key.
- An ED25519 Public key contains 32 bytes that maps to 64 characters account ID.
- The corresponding secret key allows you to sign transactions on behalf of this account once it's created on chain.
Read more...
What is the Creating an account locally?
For a purpose of this demo, we'll use the betanet network.
Read more...
What is the Set betanet network?
What is the Generating a key-pair first?
near generate-key tmp1
Example Output
Generated key pair with ed25519:BGCCDDHfysuuVnaNVtEhhqeT4k9Muyem3Kpgq2U1m9HX public key
It generates a key-pair for tmp1 account ID. The new public key is ed25519:BGCCDDHfysuuVnaNVtEhhqeT4k9Muyem3Kpgq2U1m9HX.
NEAR's string representation of a public key is <curve>:<data>.
- Curve is either
ed25519 or secp256k1. For implicit accounts we only support ed25519.
- Data is a base58 encoding of the public key. For
ed25519 it contains 32 bytes.
This command generated a key-pair locally and stored it locally at:
~/.near-credentials/betanet/tmp1.json
Read more...
What is the Viewing the key-pair?
Run this command to print the content of the key-pair file:
cat ~/.near-credentials/betanet/tmp1.json
Content:
{"account_id":"tmp1","public_key":"ed25519:BGCCDDHfysuuVnaNVtEhhqeT4k9Muyem3Kpgq2U1m9HX","private_key":"ed25519:4qAABW9HfVW4UNQjuQAaAWpB21jqoP58kGqDia18FZDRat6Lg6TLWdAD9FyvAd3PPQLYF4hhx2mZAotJudVjoqfs"}
As you can see, it's a valid json-file and public key matches the one we generated.
The private_key is a secret/private key of the key pair that can be used to sign transactions with the corresponding public key.
Read more...
What is the Converting a public key to an account ID.?
Let's convert a public key from NEAR string representation ed25519:BGCCDDHfysuuVnaNVtEhhqeT4k9Muyem3Kpgq2U1m9HX
The easiest way is to use near-cli with interactive console repl
- Start
near repl:
near repl
- Store your base58 public key to a local constant:
const pk58 = 'ed25519:BGCCDDHfysuuVnaNVtEhhqeT4k9Muyem3Kpgq2U1m9HX'
- Now let's parse the public key and convert it to the hex in one line:
nearAPI.utils.PublicKey.fromString(pk58).data.hexSlice()
The output string is the account ID in hex (without '):
'98793cd91a3f870fb126f66285808c7e094afcfc4eda8a970f6648cdf0dbd6de'
Now the new account ID is 98793cd91a3f870fb126f66285808c7e094afcfc4eda8a970f6648cdf0dbd6de.
4) We can now give this account ID to someone and ask them to transfer tokens.
Read more...
What is the Moving the temporary key-pair?
Finally, we need to move tmp1.json key-pair to the real account ID, so that near-cli can use it to sign transactions.
Let's first export our account ID to a bash env variable:
export ACCOUNT="98793cd91a3f870fb126f66285808c7e094afcfc4eda8a970f6648cdf0dbd6de"
Now we can move the tmp1.json file:
mv ~/.near-credentials/betanet/tmp1.json ~/.near-credentials/betanet/$ACCOUNT.json
NOTE: While .json key-pair file still contains the "account_id":"tmp1", it's okay. Because near-cli doesn't care.
Assuming you've received tokens on your new account, you can transfer from it using the following command:
near $ACCOUNT <receiver> <amount>
You can also replace $ACCOUNT with your actual account ID, e.g.
near send 98793cd91a3f870fb126f66285808c7e094afcfc4eda8a970f6648cdf0dbd6de <receiver> <amount>
Read more...
What is the Transferring to the implicit account?
Let's say someone gives you their account ID 0861ea8ddd696525696ccf3148dd706c4fda981c64d8a597490472594400c223. You can just transfer to it by running:
near send <your_account_id> 0861ea8ddd696525696ccf3148dd706c4fda981c64d8a597490472594400c223 <amount>
Read more...
 Main page of